The device on which your app runs contains flash memory that functions as the equivalent of a hard disk, holding files that survive the device’s being powered down (persistent storage). Apps can store files to, and retrieve them from, this virtual hard disk. Apps can also define document types in which they specialize and can hand such documents to one another; apps can also share documents into the cloud (iCloud), so that multiple copies of the same app can retrieve them on different devices.
User preferences can be maintained in NSUserDefaults (Chapter 13), and visible state can be maintained through the iOS 6 state saving and restoration mechanism (Chapter 19), but the data that constitutes your app’s model in the model–view–controller architecture is neither preferences nor state, so if your app has such data, and if that data is to persist between uses, your app will probably save the data to disk as a file or files. At a minimum, you’ll probably save your data to disk when your app goes into the background (Chapter 11), so that if your app is terminated in the background, you can load your data from disk when your app launches. More proactively, you might save your data to disk more often, for extra safety, and, if your data is large, you might also release it when your app goes into the background, so as to use less memory in the background and reduce your chances of being terminated while suspended; in that case, you’ll load your data from disk whenever your app comes to the foreground. (I described a possible strategy for loading your data “lazily,” whenever your app finds that it has no reference to the data, in View Controller Memory Management.)
Settling on a structure or format for your data on disk is up to you; this chapter concludes with some examples of how to manipulate some important file formats, but only you can decide what suits your app’s particular needs.
The hard disk as a whole is not open to your app’s view. A limited portion of the hard disk is dedicated to your app alone: this is your app’s sandbox. The idea is that every app, seeing only its own sandbox, is hindered from spying or impinging on the files belonging to other apps, and in turn is protected from having its own files spied or impinged on by other apps. Your app’s sandbox is thus a safe place for you to store your data. Your sandbox, and hence your data, will be deleted if the user deletes your app; otherwise, it should reliably persist. (Your app can also see some higher-level directories owned by the system as a whole, but cannot write to them.)
The sandbox contains some standard directories. For example, suppose you want a reference to the Documents directory. Here’s one way to access it:
NSString* docs = [NSSearchPathForDirectoriesInDomains(
    NSDocumentDirectory, NSUserDomainMask, YES) lastObject];
That code returns a path string for the Documents directory. The preferred way to refer to a file or directory, however, is with a URL. You can obtain this from an NSFileManager instance:
NSFileManager* fm = [NSFileManager new];
NSError* err = nil;
NSURL* docsurl =
    [fm URLForDirectory:NSDocumentDirectory
               inDomain:NSUserDomainMask appropriateForURL:nil
                 create:YES error:&err];
// error-checking omitted
A question that will immediately occur to you is: where should I put files and folders that I want to save now and read later? The Documents directory can be a good place. But if your app supports file sharing (discussed later in this chapter), the user can see and modify your app’s Documents directory through iTunes, so you might not want to put things there that the user isn’t supposed to see and change.
Personally, I favor the Application Support directory for most purposes. On a Mac, this directory is shared by multiple applications, each of which must confine itself to an individual subfolder, but on iOS each app has its own private Application Support directory in its own sandbox, so you can safely put files anywhere within it. This directory may not exist initially, so you can obtain it and create it at the same time:
NSURL* suppurl =
   [fm URLForDirectory:NSApplicationSupportDirectory
              inDomain:NSUserDomainMask appropriateForURL:nil
                create:YES error:&err];
See also “Where You Should Put Your App’s Files” in the “File System Basics” chapter of Apple’s File System Programming Guide, which talks about the implications of various file storage locations when the user syncs or backs up the device. The advice given there, however, fails to grapple with the fact that file sharing makes the Documents directory directly modifiable by the user.
Although URLs are the favored way of referring to files and folders, they are a more recent innovation than path strings, and there are some operations that still require a string. To derive a path string from an NSURL, send it the path message.
Let’s say we intend to create folder MyFolder inside the Documents directory. Assume that we have an NSFileManager instance fm and an NSURL docsurl pointing at the Documents directory, as shown in the previous section. We can then generate a reference to MyFolder; we can then ask our NSFileManager instance to create the folder if it doesn’t exist already:
NSURL* myfolder = [docsurl URLByAppendingPathComponent:@"MyFolder"];
NSError* err = nil;
BOOL ok =
    [fm createDirectoryAtURL:myfolder
        withIntermediateDirectories:YES attributes:nil error:nil];
// ... error-checking omitted
To learn what files and folders exist within a directory, you can ask for an array of the directory’s contents:
NSError* err = nil;
NSArray* arr =
    [fm contentsOfDirectoryAtURL:docsurl
        includingPropertiesForKeys:nil options:0 error:&err];
// ... error-checking omitted
NSLog(@"%@", [arr valueForKey:@"lastPathComponent"]);
/*
MyFolder
*/
The array resulting from contentsOfDirectoryAtURL:... lists full URLs of the directory’s immediate contents; it is shallow. For a deep array, which might be very big, you can enumerate the directory, so that you are handed only one file reference at a time:
NSDirectoryEnumerator* dir =
    [fm enumeratorAtURL:docsurl
        includingPropertiesForKeys:nil options:0 errorHandler:nil];
for (NSURL* f in dir)
    if ([[f pathExtension] isEqualToString: @"txt"])
        NSLog(@"%@", [f lastPathComponent]);
/*
file1.txt
file2.txt
*/
A directory enumerator also permits you to decline to dive into a particular subdirectory (skipDescendants), so you can make your traversal even more efficient; I’ll give an example later in this chapter.
Consult the NSFileManager class documentation for more about what you can do with files, and see also Apple’s Low-Level File Management Programming Topics.
To save or read a simple file, you are likely to use one of the convenience methods for the class appropriate to the file’s contents. NSString, NSData, NSArray, and NSDictionary provide writeToURL... and initWithContentsOfURL... methods.
NSString and NSData objects map directly between their own contents and the contents of the file. Here, I’ll generate a text file from a string:
NSError* err = nil;
BOOL ok =
    [@"howdy" writeToURL:[myfolder URLByAppendingPathComponent:@"file1.txt"]
              atomically:YES encoding:NSUTF8StringEncoding error:&err];
// error-checking omitted
NSArray and NSDictionary files are actually property lists (Chapter 10), and will work only if all the contents of the array or dictionary are property list types (NSString, NSData, NSDate, NSNumber, NSArray, and NSDictionary).
So how do you save to a file an object of some other class? Well, if an object’s class adopts the NSCoding protocol, you can convert it to an NSData and back again using NSKeyedArchiver and NSKeyedUnarchiver; an NSData can then be saved as a file or in a property list. An example of doing this with a UIColor object appears in Chapter 10.
You can make your own class adopt the NSCoding protocol. This can become somewhat complicated because an object can refer (through an instance variable) to another object, which may also adopt the NSCoding protocol, and thus you can end up saving an entire graph of interconnected objects if you wish. However, I’ll confine myself to illustrating a simple case (and you can read the Archives and Serializations Programming Guide for more information).
Let’s say, then, that we have a simple Person class with a firstName property and a lastName property. We’ll declare that it adopts the NSCoding protocol:
@interface Person : NSObject <NSCoding>
To make this class actually conform to NSCoding, we must implement encodeWithCoder: (to archive the object) and initWithCoder: (to unarchive the object). In encodeWithCoder:, we must first call super if the superclass adopts NSCoding, and then call the appropriate encode... method for each instance variable we want preserved:
- (void)encodeWithCoder:(NSCoder *)encoder {
    //[super encodeWithCoder: encoder]; // not in this case
    [encoder encodeObject:self.lastName forKey:@"last"];
    [encoder encodeObject:self.firstName forKey:@"first"];
}
In initWithCoder, we must call super, using either initWithCoder: if the superclass adopts the NSCoding protocol or the designated initializer if not, and then call the appropriate decode... method for each instance variable stored earlier, finally returning self; memory management is up to us (but under ARC there will probably be no need to think about that):
- (id) initWithCoder:(NSCoder *)decoder {
    //self = [super initWithCoder: decoder]; // not in this case
    self = [super init];
    self->_lastName = [decoder decodeObjectForKey:@"last"];
    self->_firstName = [decoder decodeObjectForKey:@"first"];
    return self;
}
We can test our code by creating, configuring, and saving a Person instance as a file:
Person* moi = [Person new];
moi.firstName = @"Matt";
moi.lastName = @"Neuburg";
NSData* moidata = [NSKeyedArchiver archivedDataWithRootObject:moi];
NSURL* moifile = [docsurl URLByAppendingPathComponent:@"moi.txt"];
[moidata writeToURL:moifile atomically:NO];
We can retrieve the saved Person at a later time:
NSData* persondata = [[NSData alloc] initWithContentsOfURL:moifile];
Person* person = [NSKeyedUnarchiver unarchiveObjectWithData:persondata];
NSLog(@"%@ %@", person.firstName, person.lastName); // Matt Neuburg
If the NSData object is itself the entire content of the file, as here, then instead of using archivedDataWithRootObject: and unarchiveObjectWithData:, you can skip the intermediate NSData object and use archiveRootObject:toFile: and unarchiveObjectWithFile:.
Saving a single Person as an archive may seem like overkill; why didn’t we just make a text file consisting of the first and last names? But imagine that a Person has a lot more properties, or that we have an array of hundreds of Persons, or an array of hundreds of dictionaries where one value in each dictionary is a Person; now the power of an archivable Person is evident. Even though Person now adopts the NSCoding protocol, an NSArray containing a Person object still cannot be written to disk using NSArray’s writeToFile... or writeToURL..., because Person is still not a property list type. But the array can be archived and written to disk with NSKeyedArchiver.
User defaults (NSUserDefaults), which have often been referred to earlier in this book (see especially Chapter 10 and Chapter 13), are intended as the persistent storage of the user’s preferences. They are little more, really, than a special case of an NSDictionary property list file. You talk to the NSUserDefaults standardUserDefaults object much as if it were a dictionary; it has keys and values. And the only legal values are property list values (see the preceding section); thus, for example, to store a Person in user defaults, you’d have to archive it first to an NSData object. Unlike NSDictionary, NSUserDefaults provides convenience methods for converting between a simple data type such as a float or a BOOL and the object that is stored in the defaults (setFloat:forKey:, floatForKey:, and so forth). But the defaults themselves are still a dictionary.
Meanwhile, somewhere on disk, this dictionary is being saved for you automatically as a property list file — though you don’t concern yourself with that. You simply set or retrieve values from the dictionary by way of their keys, secure in the knowledge that the file is being read into memory or written to disk as needed. Your chief concern is to make sure that you’ve written everything needful into user defaults before your app terminates; as we saw in Chapter 11, in a multitasking world this will usually mean when the app delegate receives applicationDidEnterBackground: at the latest. If you’re worried that your app might crash, you can tell the standardUserDefaults object to synchronize as a way of forcing it to save right now, but this is rarely necessary.
To provide the value for a key before the user has had a chance to do so — the default default, as it were — use registerDefaults:. What you’re supplying here is a dictionary whose key–value pairs will each be written into the defaults, but only if there is no such key already. Recall this example from Chapter 10:
[[NSUserDefaults standardUserDefaults] registerDefaults:
    @{@"cardMatrixRows":@4, @"cardMatrixColumns":@3}];
The idea is that we call registerDefaults: extremely early as the app launches. Either the app has run at some time previously and the user has set these preferences, in which case this call has no effect and does no harm, or not, in which case we now have initial values for these preferences with which to get started. So, in the game app from which that code comes, we start out with a 4×3 game layout, but the user can change this at any time.
This leaves only the question of how the user is to interact with the defaults. One way is that your app provides some kind of interface. For example, in the TidBITS News app, there’s a single button for setting the size of text, and that’s the only preference with which the user ever interacts directly.
The game app from which the previous code comes has a tab bar interface; the second tab is where the user sets preferences (Figure 20.1). The app is compiled for iOS 5, and hence doesn’t participate in the iOS 6 built-in state saving and restoration. So it uses (or misuses) the user defaults to store state information. It records the state of the game board and the card deck into user defaults every time these change, so that if the app is terminated and then launched again later, we can restore the game as it was when the user left off. One might argue that, while the current card layout may be state, the card deck itself is data — and so I am also misusing the user defaults to store data. However, while purists may grumble, it’s a very small amount of data and I don’t think the distinction is terribly significant in this case. (See also Chapter 13 on user defaults as a locus of global values.)
Alternatively, you can provide a settings bundle, consisting mostly of one or more property list files describing an interface and the corresponding user default keys and their initial values; the Settings app is then responsible for translating your instructions into an actual interface, and for presenting it to the user.
Using a settings bundle has some obvious disadvantages: the user may not think to look in the Settings app; the user has to leave your app to access preferences; and you don’t get the kind of control over the interface that you have within your own app. Also, in a multitasking world, this means that the user can set preferences while your app is backgrounded; you’ll need to register for NSUserDefaultsDidChangeNotification in order to hear about this.
In some situations, though, a settings bundle has some clear advantages. Keeping the preferences interface out of your app can make your app’s own interface cleaner and simpler. You don’t have to write any of the “glue” code that coordinates the preferences interface with the user default values. And it may be appropriate for the user to be able to set preferences for your app even when your app isn’t running.
Writing a settings bundle is described in the “Implementing Application Preferences” chapter of Apple’s iOS Application Programming Guide, along with the Settings Application Schema Reference.
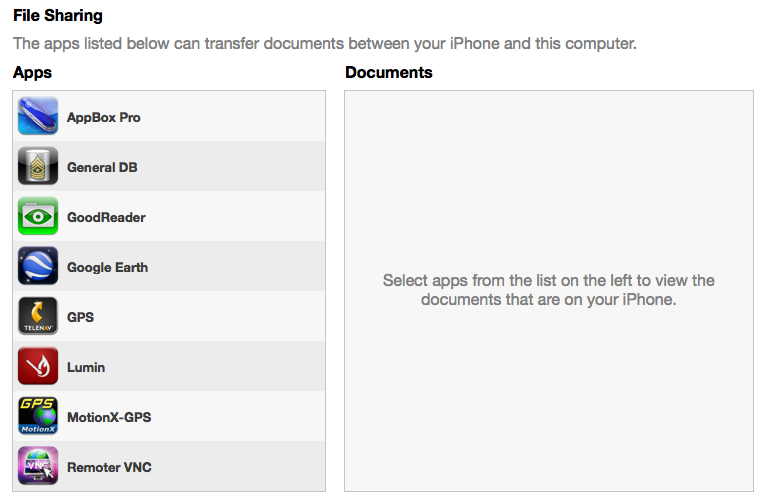
If your app supports file sharing, its Documents directory becomes available to the user through iTunes (Figure 36.1). The user can add files to your app’s Documents directory, and can save files and folders from your app’s Documents directory to the computer, as well as renaming and deleting files and folders. This could be appropriate, for example, if your app works with common types of file that the user might obtain elsewhere, such as PDFs or JPEGs.
To support file sharing, set the Info.plist key “Application supports iTunes file sharing” (UIFileSharingEnabled).
Once your entire Documents directory is exposed to the user this way, you are suddenly not so likely to use the Documents directory to store private files. As I mentioned earlier, I like to use the Application Support directory instead.
Your app doesn’t get any notification when the user has altered the contents of the Documents directory. Noticing that the situation has changed and responding appropriately is entirely up to you.
Your app can declare itself willing to open documents of a certain type. In this way, if another app obtains a document of this type, it can propose to hand the document off to your app. For example, the user might download the document with Mobile Safari, or receive it in a mail message with the Mail app; now we need a way to get it from Safari or Mail to you.
To let the system know that your app is a candidate for opening a certain kind of document, you will configure the “Document types” (CFBundleDocumentTypes) key in your Info.plist. This is an array, where each entry will be a dictionary specifying a document type by using keys such as “Document Content Type UTIs” (LSItemContentTypes), “Document Type Name” (CFBundleTypeName), CFBundleTypeIconFiles, and LSHandlerRank. Far and away the simplest method for configuring the Info.plist is through the interface available in the Info tab when you edit the target.
For example, suppose I want to declare that my app opens PDFs. My Info.plist could contain this simple entry (as seen in the standard editor):
Document types                       (1 item)
    Item 0                           (1 item)
        Document Type Name           PDF
        Document Content Type UTIs   (1 item)
            Item 0                   com.adobe.pdf
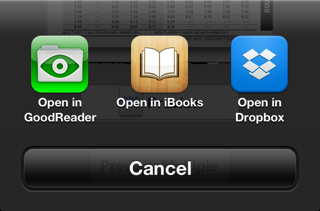
Now suppose the user receives a PDF in an email message. The Mail app can display this PDF, but the user can also tap the Action button to bring up an activity view offering, among other things, to open the file in my app. (The interface will resemble Figure 36.2, with my app listed as one of the buttons.)
Next, suppose the user actually taps the button that hands the PDF off to my app. For this to work, my app delegate must implement application:handleOpenURL:.
When that method is called, my app has been brought to the front, either by launching it from scratch or by reviving it from background suspension; its job is now to handle the opening of the document whose URL has arrived as the second parameter. To prevent me from peeking into another app’s sandbox, the system has already copied the document into my sandbox, into the Inbox directory, which is created for exactly this purpose.
Warning
The Inbox directory is created in your Documents folder. Thus, if your app implements file sharing, the user can see the Inbox folder; you may wish to delete the Inbox folder, therefore, as soon as you’re done retrieving files from it.
In this simple example, my app has just one view controller, which has an outlet to a UIWebView where we will display any PDFs that arrive in this fashion. So my app delegate contains this code:
- (BOOL)application:(UIApplication *)application handleOpenURL:(NSURL *)url {
    [self.viewController displayPDF:url];
    return YES;
}
And my view controller contains this code:
- (void) displayPDF: (NSURL*) url {
    NSURLRequest* req = [NSURLRequest requestWithURL:url];
    [self.wv loadRequest:req];
}
In real life, things might be more complicated. Our implementation of application:handleOpenURL: might check to see whether this really is a PDF, and return NO if it isn’t. Also, our app might be in the middle of something else, possibly displaying a completely different view controller’s view; because application:handleOpenURL: can arrive at any time, we may have to be prepared to drop whatever we were doing and showing previously and display the incoming document instead.
If our app is launched from scratch by the arrival of this URL, application:didFinishLaunchingWithOptions: will be sent to our app delegate as usual. The options dictionary (the second parameter) will contain the UIApplicationLaunchOptionsURLKey, and we can take into account, if we like, the fact that we are being launched specifically to open a document. The usual thing, however, is to ignore this key and launch in the normal way; application:handleOpenURL: will then arrive in good order after our interface has been set up, and we can handle it just as we would if we had already been running.
Your app delegate can also implement application:openURL:sourceApplication:annotation: in order to receive more information about the incoming URL. If implemented, this will be called in preference to application:handleOpenURL:.
The example I’ve been discussing assumes that the UTI for the document type is standard and well-known. It is also possible that your app will operate on a new document type, that is, a type of document that the app itself defines. In that case, you’ll also want to add this UTI to your app’s list of Exported UTIs in the Info.plist. I’ll give an example later in this chapter.
The converse of the situation discussed in the previous section is this: your app has somehow acquired a document and wants to let the user hand off a copy of it to whatever app can deal with it. This is done through the UIDocumentInteractionController class. This class operates asynchronously, so retaining an instance of it is up to you; typically, you’ll store it in an instance variable with a retain setter policy.
For example, let’s say our app has a PDF sitting in its Documents directory. Assuming we have an NSURL pointing to this document, presenting the interface for handing the document off to some other application (Figure 36.2) could be as simple as this (sender is a button that the user has just tapped):
self.dic =
    [UIDocumentInteractionController interactionControllerWithURL:url];
BOOL y =
    [self.dic presentOpenInMenuFromRect:[sender bounds]
                                 inView:sender animated:YES];
Starting in iOS 6, this interface is an activity view (Chapter 26); formerly, it was an action sheet. There are actually two activity views available:
-
presentOpenInMenuFromRect:inView:animated:
presentOpenInMenuFromBarButtonItem:animated: - Presents an activity view listing apps in which the document can be opened.
-
presentOptionsMenuFromRect:inView:animated:
presentOptionsMenuFromBarButtonItem:animated: - Presents an activity view listing apps in which the document can be opened, along with other possible actions, such as Print, Copy, and Mail.
These methods work on both iPhone and iPad interfaces; on the iPad, the buttons appear in a popover.
Your app can’t learn which other applications are capable of accepting the document! Indeed, it can’t even learn in advance whether any other applications are capable of accepting the document; your only clue is that the returned BOOL value afterward will be NO if UIDocumentInteractionController couldn’t present the requested interface.
UIDocumentInteractionController can, however, be interrogated for some information about the document type. In this example, we configure a button in our interface to make its image the icon of the document type:
self.dic =
    [UIDocumentInteractionController interactionControllerWithURL:url];
UIImage* icon = self.dic.icons[0];
[self.b setImage:icon forState:UIControlStateNormal];
A UIDocumentInteractionController can also present a preview of the document, if the document is of a type for which preview is enabled. You must give the UIDocumentInteractionController a delegate (UIDocumentInteractionControllerDelegate), and the delegate must implement documentInteractionControllerViewControllerForPreview:, returning an existing view controller that will contain the preview’s view controller. So, here we ask for the preview:
self.dic =
    [UIDocumentInteractionController interactionControllerWithURL:url];
self.dic.delegate = self;
[self.dic presentPreviewAnimated:YES];
In the delegate, we supply the view controller; it happens that, in my code, this delegate is a view controller — in fact, it’s the very view controller that is presenting the UIDocumentInteractionController — so it simply returns self:
- (UIViewController *) documentInteractionControllerViewControllerForPreview:
        (UIDocumentInteractionController *) controller {
    return self;
}
If the view controller returned were a UINavigationController, the preview’s view controller would be pushed onto it. In this case it isn’t, so the preview’s view controller is a presented view controller with a Done button. The preview interface also contains an Action button that lets the user summon the Options activity view. In fact, this preview interface is exactly the same interface already familiar from the Mail app.
Delegate methods allow you to track what’s happening in the interface presented by the UIDocumentInteractionController. Probably most important are those that inform you that key stages of the interaction are ending:
-
documentInteractionControllerDidDismissOptionsMenu: -
documentInteractionControllerDidDismissOpenInMenu: -
documentInteractionControllerDidEndPreview: -
documentInteractionController:didEndSendingToApplication:
Previews are actually provided through the Quick Look framework, and you can skip the UIDocumentInteractionController and present the preview yourself through a QLPreviewController; you’ll link to QuickLook.framework and import <QuickLook/QuickLook.h>.
It’s a view controller, so to display the preview you show it as a presented view controller or push it onto a navigation controller’s stack, just as UIDocumentInteractionController would have done. A nice feature of QLPreviewController is that you can give it more than one document to preview; the user can move between these, within the preview, using arrow buttons that appear at the bottom of the interface. Apart from this, the interface looks just like the interface presented by the UIDocumentInteractionController.
In this example, I have in my Documents directory several PDF documents. I acquire a list of their URLs and present a preview for them:
// obtain URLs of PDFs as an array
NSFileManager* fm = [NSFileManager new];
NSURL* docsurl =
    [fm URLForDirectory:NSDocumentDirectory inDomain:NSUserDomainMask
        appropriateForURL:nil create:NO error:nil];
NSDirectoryEnumerator* dir =
    [fm enumeratorAtURL:[docsurl URLByAppendingPathComponent:@"Inbox"]
        includingPropertiesForKeys:nil options:0 errorHandler:nil];
if (!dir)
    return; // proper error-checking omitted
NSMutableArray* marr = [NSMutableArray array];
for (NSURL* f in dir) {
    [dir skipDescendants];
    if ([[f pathExtension] isEqualToString: @"pdf"])
        [marr addObject: f];
}
self.pdfs = marr; // retain policy
if (![self.pdfs count])
    return;
// show preview interface
QLPreviewController* preview = [QLPreviewController new];
preview.dataSource = self;
[self presentViewController:preview animated:YES completion:nil];
You’ll notice that I haven’t told the QLPreviewController what documents to preview. That is the job of QLPreviewController’s data source. In my code, this very same view controller is also the data source. It simply fetches the requested information from the list of URLs, which was previously saved into an instance variable:
- (NSInteger) numberOfPreviewItemsInPreviewController:
        (QLPreviewController *) controller {
    return [self.pdfs count];
}

- (id <QLPreviewItem>) previewController: (QLPreviewController *) controller
                      previewItemAtIndex: (NSInteger) index {
    return self.pdfs[index];
}
The second data source method requires us to return an object that adopts the QLPreviewItem protocol. By a wildly improbable coincidence, NSURL does adopt this protocol, so the example works.
If your app opens and saves documents of a type peculiar to itself, you may want to take advantage of the document architecture. This architecture revolves around a class, UIDocument, that takes care of a number of pesky issues, such as the fact that loading or writing your data might take some time. Plus, UIDocument provides autosaving behavior, so that your data is written out automatically whenever it changes. Moreover, UIDocument is your gateway to allowing your documents to participate in iCloud, so your app’s documents on one of the user’s devices will automatically be mirrored onto another of the user’s devices.
Getting started with UIDocument is not difficult. You’ll start with a UIDocument subclass, and you’ll override two methods:
-
loadFromContents:ofType:error: -
Called when it’s time to open a document from disk. You are expected to convert the
contentsvalue into a model object that your app can use, store that model object, and return YES. (If there was a problem, you’ll set theerror:by indirection and return NO.) -
contentsForType:error: -
Called when it’s time to save a document to disk. You are expected to convert the app’s model object into an NSData instance (or, if your document is a package, an NSFileWrapper) and return it. (If there was a problem, you’ll set the
error:by indirection and return nil.)
Your UIDocument subclass, then, in addition to its implementation of those two methods, will need a place to store and retrieve the data model object. Obviously, this might be an instance variable. However, your UIDocument instance will probably be partnered in some way with a view controller instance, and that view controller will need access to the data, so a more sophisticated solution might be to set up a delegate relationship between the view controller and the UIDocument and allow the UIDocument to call methods that set and retrieve a property of the view controller.
To instantiate a UIDocument, call its designated initializer, initWithFileURL:. This sets the UIDocument’s fileURL property, and associates the UIDocument with this file on disk, typically for the remainder of its lifetime.
In my description of the two key UIDocument methods that your subclass will override, I used the phrase, “when it’s time” (to open or save the document). This raises the question of how your UIDocument instance will know when to open and save a document. There are three circumstances to distinguish:
- Make a new document
-
The
fileURL:points to a nonexistent file. Immediately after instantiating the UIDocument, you send itsaveToURL:forSaveOperation:completionHandler:, where the second argument isUIDocumentSaveForCreating. (The first argument will be the UIDocument’s ownfileURL.) This in turn causescontentsForType:error:to be called, and the contents of an empty document are saved out to disk. This implies that your UIDocument subclass should know of some default value that represents the model data when there is no data. - Open an existing document
-
Send the UIDocument instance
openWithCompletionHandler:. This in turn causesloadFromContents:ofType:error:to be called. - Save an existing document
-
There are two approaches to saving an existing document:
- Autosave
-
Usually, you’ll mark the document as “dirty” by calling
updateChangeCount:. From time to time, the UIDocument will notice this situation and will save the document to disk, callingcontentsForType:error:in the process. - Manual save
-
On certain occasions, waiting for autosave won’t be appropriate. We’ve already seen an example of such an occasion — when the file itself needs to be created on the spot. Another is when the app is going into the background; we will want to preserve our document there and then, in case the app is terminated. You’ll call
saveToURL:forSaveOperation:completionHandler:; if the file is not being created for the first time, the second argument will beUIDocumentSaveForOverwriting. Alternatively, if you know you’re finished with the document (perhaps the interface displaying the document is about to be torn down) you can callcloseWithCompletionHandler:.
The open..., close..., and saveTo... methods have a completionHandler: argument. This is UIDocument’s solution to the fact that reading and saving may take time. The file operations themselves take place on a background thread; the completionHandler: block is then called on the main thread.
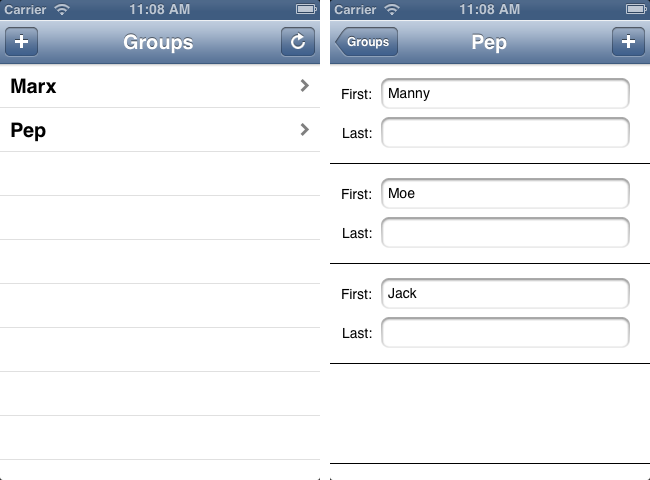
We now know enough for an example! I’ll reuse my Person class from earlier in this chapter. Imagine a document effectively consisting of multiple Person instances; I’ll call it each document a people group. Our app, People Groups, will list all people groups in the user’s Documents folder; it will also open any people group from disk and display its contents, allowing the user to edit any Person’s firstName or lastName (Figure 36.3).
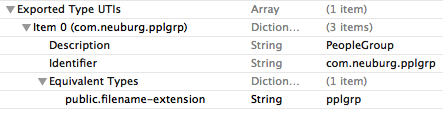
My first step is to define a custom UTI in my app’s Info.plist, associating a file type (com.neuburg.pplgrp) with a file extension (@"pplgrp"), as shown in Figure 36.4. I then also define a document type that uses this UTI, as shown earlier in this chapter.
A document consists of multiple Persons, so a natural model implementation is an NSArray of Persons. Moreover, as I mentioned earlier, since Person implements NSCoding, an NSArray of Persons can be archived directly into an NSData. Thus, assuming that our UIDocument subclass (which I’ll call PeopleDocument) has a people property, it can be implemented like this:
-(id)initWithFileURL:(NSURL *)url {
    self = [super initWithFileURL:url];
    if (self) {
        self->_people = [NSMutableArray array];
    }
    return self;
}

- (BOOL)loadFromContents:(id)contents ofType:(NSString *)typeName
                   error:(NSError **)outError {
    NSArray* arr = [NSKeyedUnarchiver unarchiveObjectWithData:contents];
    self.people = [NSMutableArray arrayWithArray:arr];
    return YES;
}

- (id)contentsForType:(NSString *)typeName error:(NSError **)outError {
    NSData* data = [NSKeyedArchiver archivedDataWithRootObject:self.people];
    return data;
}
We override initWithFileURL: to give ourselves something to save if we are called upon to save a new empty document; we then use NSKeyedUnarchiver and NSKeyedArchiver exactly as in our earlier examples.
The remaining questions are architectural: when should a PeopleDocument be initialized, where should it be stored, and what should be the nature of communications with it? The first view controller merely lists documents by name, and provides an interface for letting the user create a new group; only the second view controller, the one that displays the first and last names of the people in the group, actually needs to work with PeopleDocument. I’ll call this view controller PeopleLister. PeopleLister’s designated initializer requires that it be given a fileURL: argument, with which it sets its own fileURL property. In its viewDidLoad implementation, PeopleLister instantiates a PeopleDocument with that same fileURL, and retains it through a property (doc). If the URL points to a nonexistent file, PeopleLister requests that it be created by calling saveToURL:forSaveOperation:completionHandler:; otherwise, it requests that the document be read, by calling openWithCompletionHandler:. Either way, the completion handler points PeopleLister’s own people property at the PeopleDocument’s people property (so that they share the same data model object) and refreshes the interface:
NSFileManager* fm = [NSFileManager new];
self.doc = [[PeopleDocument alloc] initWithFileURL:self.fileURL];
void (^listPeople) (BOOL) = ^(BOOL success) {
    if (success) {
        self.people = self.doc.people;
        [self.tableView reloadData];
    }
};
if (![fm fileExistsAtPath:[self.fileURL path]])
    [self.doc saveToURL:doc.fileURL
       forSaveOperation:UIDocumentSaveForCreating
      completionHandler:listPeople];
else
    [self.doc openWithCompletionHandler:listPeople];
When the user performs a significant editing maneuver, such as creating or deleting a person or editing a person’s first or last name, PeopleLister tells its PeopleDocument that the document is dirty, and allows autosaving to take it from there:
[self.doc updateChangeCount:UIDocumentChangeDone];
When the app is about to go into the background, or when PeopleLister’s own view is disappearing, it forces PeopleDocument to save immediately:
- (void) forceSave: (id) n {
    [self.tableView endEditing:YES];
    [self.doc saveToURL:doc.fileURL
        forSaveOperation:UIDocumentSaveForOverwriting
        completionHandler:nil];
}
That’s all it takes; adding UIDocument support to your app is easy, because UIDocument is merely acting as a supplier and preserver of your app’s data model object. UIDocument presents itself in the documentation as a large and complex class, but that’s chiefly because it is so heavily customizable both at high and low levels; for the most part, you won’t need any of that heavy customization, and use of UIDocument really will be as simple as what I’ve shown here. You might go further in order to give your UIDocument a more sophisticated understanding of what constitutes a significant change in your data by working with its undo manager; I’ll talk about undo managers in Chapter 39. For further details, see Apple’s Document-based App Programming Guide for iOS.
Once your app is operating through UIDocument, iCloud compatibility falls right into your lap. You have just two steps to perform:
- Register for iCloud entitlements
-
In the Portal (Chapter 9), register your app and configure it to be enabled for iCloud (a simple checkbox); then create a provisioning profile for the app (obviously, while developing, this would be a Development profile), download it, and hand it over to Xcode.
Back in your project, edit the target; under Summary, check Enable Entitlements in the Entitlements section. This causes the entire entitlements mechanism to spring to life. The entitlements file is added to the project. The Enable iCloud checkbox is enabled; check it if it isn’t checked. You’ll also need one Ubiquity Container (listed just below the iCloud checkbox); if there isn’t one, add one, which will automatically be assigned your app’s bundle id.
- Obtain an iCloud-compatible directory
-
Early in your app’s lifetime, call NSFileManager’s
URLForUbiquityContainerIdentifier:(typically passing nil as the argument), on a background thread, to obtain the URL of a cloud-shared directory. It will probably be an app-specific directory inside file://localhost/private/var/mobile/Library/Mobile%20Documents/; you are given sandbox access to this directory even though strictly speaking it isn’t inside your sandbox area. Any documents your app puts here by way of a UIDocument subclass will be automatically shared into the cloud.
Thus, for example, having registered for iCloud entitlements, I was able to make my People Groups app iCloud-compatible with just two code changes. In the app delegate, as my app launches, I step out to background thread (Chapter 38), obtain the cloud-shared directory’s URL, and then step back to the main thread and retain the URL through a property, ubiq:
dispatch_async(dispatch_get_global_queue(0, 0), ^{
    NSFileManager* fm = [NSFileManager new];
    NSURL* ubiq = [fm URLForUbiquityContainerIdentifier:nil];
    dispatch_async(dispatch_get_main_queue(), ^{
        self.ubiq = ubiq;
    });
});
Note
New in iOS 6, you can precede that code with a call to NSFileManager’s ubiquityIdentityToken. You can do that on the main thread, in the normal way, because it returns immediately. If the result is nil, iCloud isn’t available, or this user hasn’t registered for iCloud, and you might omit any subsequent attempt to work with iCloud. (If it isn’t nil, it identifies the user’s iCloud account; this can be useful, for example, to detect when the user has logged into a different account.)
Then, anywhere in my code that I was specifying the URL for the user’s Documents folder as the place to seek and save people groups, I now specify ubiq if it isn’t nil:
NSURL* docsurl = [fm URLForDirectory:NSDocumentDirectory
                            inDomain:NSUserDomainMask
                   appropriateForURL:nil create:NO error:nil];
NSURL* ubiq =
    [(AppDelegate*)[[UIApplication sharedApplication] delegate] ubiq];
if (ubiq)
    docsurl = ubiq;
To test, I ran the app on one device and created a people group with some people in it. I then switched to a different device and ran the app there; presto, there was the same document with the same name containing the same people. It was quite thrilling.
There are a few further refinements that my app probably needs in order to be a good iCloud citizen. For example, my app is not automatically aware that a new document has appeared in the cloud. To be notified of that, I’d want to run an NSMetadataQuery. The usual strategy is: instantiate NSMetadataQuery, configure the search, register for notifications such as NSMetadataQueryDidFinishGatheringNotification and NSMetadataQueryDidUpdateNotification, start the search, and retain the NSMetadataQuery instance with the search continuing to run for the entire lifetime of the app.
Another concern is that my app should be notified when the currently open document changes on disk because a new version of it was downloaded from the cloud (that is, someone edited the document while I had it open). For that, register for UIDocumentStateChangedNotification. To learn the document’s state, consult its documentState property. A big issue is likely to be what should happen if the document state is UIDocumentStateInConflict. You’ll want to resolve the conflict in coordination with the NSFileVersion class; for details and example code, see the “Resolving Document Version Conflicts” chapter of Apple’s Document-based App Programming Guide for iOS.
Yet another issue is the question of what should happen if the availability of iCloud changes in the course of our app’s career. The problem here is that the data is stored in two different places (the Documents directory, or ubiq). Suppose, for example, that our app starts life without iCloud — because the user hasn’t registered for it, or has it turned off for our app — and then suddenly iCloud is available. We could then call NSFileManager’s setUbiquitous:itemAtURL:destinationURL:error: to transfer the document to our ubiquity container directory. However, it is not so obvious what to do if iCloud is switched from on to off, as we can no longer access the ubiquity container directory to rescue the document.
Further iCloud details are outside the scope of this discussion. Getting started is easy; making your app a good iCloud citizen, capable of dealing with the complexities that iCloud may entail, is not. For further details, see the “iCloud Storage” chapter of Apple’s iOS App Programming Guide.
Note
Instead of, or in addition to, storing full-fledged documents in the cloud, your app might like to store some key–value pairs, similar to a sort of online NSUserDefaults. To do this, use the NSUbiquitousKeyValueStore class; get the defaultStore shared object and talk to it much as you would talk to NSUserDefaults. The NSUbiquitousKeyValueStoreDidChangeExternallyNotification tells you when data is changed in the cloud. Material that you store in the cloud through NSUbiquitousKeyValueStore does not count against the user’s iCloud storage limit, but it needs to be kept short and simple.
XML is a highly flexible and widely used general-purpose text file format for storage and retrieval of structured data. You might use it yourself to store data that you’ll need to retrieve later, or you could encounter it when obtaining information from elsewhere, such as the Internet.
Mac OS X Cocoa provides a set of classes (NSXMLDocument and so forth) for reading, parsing, maintaining, searching, and modifying XML data in a completely general way, but iOS does not include these. I think the reason must be that their tree-based approach is too memory-intensive. Instead, iOS provides NSXMLParser, a much simpler class that walks through an XML document, sending delegate messages as it encounters elements. With this, you can parse an XML document once, but what you do with the pieces as they arrive is up to you. The general assumption here is that you know in advance the structure of the particular XML data you intend to read and that you have provided classes for storage of the same data in object form and for transforming the XML pieces into that storage.
To illustrate, let’s return once more to our Person class with a firstName and a lastName property. Imagine that as our app starts up, we would like to populate it with Person objects, and that we’ve stored the data describing these objects as an XML file in our app bundle, like this:
<?xml version="1.0" encoding="utf-8"?>
<people>
    <person>
        <firstName>Matt</firstName>
        <lastName>Neuburg</lastName>
    </person>
    <person>
        <firstName>Snidely</firstName>
        <lastName>Whiplash</lastName>
    </person>
    <person>
        <firstName>Dudley</firstName>
        <lastName>Doright</lastName>
    </person>
</people>
This data could be mapped to an array of Person objects, each with its firstName and lastName properties appropriately set. (This is a deliberately easy example, of course; not all XML is so readily expressed as objects.) Let’s consider how we might do that.
Using NSXMLParser is not difficult in theory. You create the NSXMLParser, handing it the URL of a local XML file (or an NSData, perhaps downloaded from the Internet), set its delegate, and tell it to parse. The delegate starts receiving delegate messages. For simple XML like ours, there are only three delegate messages of interest:
-
parser:didStartElement:namespaceURI:qualifiedName:attributes: -
The parser has encountered an opening element tag. In our document, this would be
<people>,<person>,<firstName>, or<lastName>. -
parser:didEndElement:namespaceURI:qualifiedName: -
The parser has encountered the corresponding closing element tag. In our document this would be
</people>,</person>,</firstName>, or</lastName>. -
parser:foundCharacters: -
The parser has encountered some text between the starting and closing tags for the current element. In our document this would be, for example,
MattorNeuburgand so on.
In practice, responding to these delegate messages poses challenges of maintaining state. If there is just one delegate, it will have to bear in mind at every moment what element it is currently encountering; this could make for a lot of instance variables and a lot of if-statements in the implementation of the delegate methods. To aggravate the issue, parser:foundCharacters: can arrive multiple times for a single stretch of text; that is, the text may arrive in pieces, so we have to accumulate it into an instance variable, which is yet another case of maintaining state.
An elegant way to meet these challenges is by resetting the NSXMLParser’s delegate to different objects at different stages of the parsing process. We make each delegate responsible for parsing one element; when a child of that element is encountered, we make a new object and make it the delegate. The child element delegate is then responsible for making the parent the delegate once again when it finishes parsing its own element. This is slightly counterintuitive because it means parser:didStartElement... and parser:didEndElement... for the same element are arriving at two different objects. Imagine, for example, what the job of our <people> parser will be:
-
When
parser:didStartElement...arrives, the<people>parser looks to see if this is a<person>. If so, it creates an object that knows how to deal with a<person>, handing that object a reference to itself (the<people>parser), and makes it the delegate. -
Delegate messages now arrive at this newly created
<person>parser. If any text is encountered,parser:foundCharacters:will be called, and the text must be accumulated into an instance variable. -
Eventually,
parser:didEndElement...arrives. The<person>parser now uses its reference to make the<people>parser the delegate once again. Thus, the<people>parser is in charge once again, ready if another<person>element is encountered (and the old<person>parser might now go quietly out of existence).
With this in mind, we can design a simple all-purpose base class for parsing an element (simple especially because we are taking no account of namespaces, attributes, and other complications):
@interface MyXMLParserDelegate : NSObject <NSXMLParserDelegate>

@property (nonatomic, copy) NSString* name;
@property (nonatomic, strong) NSMutableString* text;
@property (nonatomic, weak) MyXMLParserDelegate* parent;
@property (nonatomic, strong) MyXMLParserDelegate* child;
- (void) start: (NSString*) elementName parent: (id) parent;
- (void) makeChild: (Class) class
       elementName: (NSString*) elementName
            parser: (NSXMLParser*) parser;
- (void) finishedChild: (NSString*) s;

@end
Here’s how these properties and methods are intended to work:
-
name - The name of the element we are parsing now.
-
text - A place for any characters to accumulate as we parse our element.
-
parent - The MyXMLParserDelegate who created us and whose child we are.
-
child - If we encounter a child element, we’ll create a MyXMLParserDelegate and retain it here, making it the delegate.
-
start:parent: -
When we create a child parser, we’ll call this method on the child so that it knows who its parent is. The first parameter is the name of the element the child will be parsing; we know this because we, not the child, received
parser:didStartElement.... (In a fuller implementation, this method would be more elaborate and we’d hand the child all the information we got withparser:didStartElement....) -
makeChild:elementName:parser: -
If we encounter a child element, there’s a standard dance to do: instantiate some subclass of MyXMLParserDelegate, make it our
child, make it the parser’s delegate, and send itstart:parent:. This is a utility method that embodies that dance. -
finishedChild: -
When a child receives
parser:didEndElement..., it sends this message to its parent before making its parent the delegate. The parameter is thetext, but the parent can use this signal to obtain any information it expects from the child before the child goes out of existence.
Now we can sketch in the default implementation for MyXMLParserDelegate:
- (void) start: (NSString*) el parent: (id) p {
    self.name = el;
    self.parent = p;
    self.text = [NSMutableString string];
}

- (void) makeChild: (Class) class
       elementName: (NSString*) elementName
            parser: (NSXMLParser*) parser {
    MyXMLParserDelegate* del = [class new];
    self.child = del;
    parser.delegate = del;
    [del start: elementName parent: self];
}

- (void) finishedChild: (NSString*) s { // subclass implements as desired
}

- (void)parser:(NSXMLParser *)parser foundCharacters:(NSString *)string {
    [self.text appendString:string];
}

- (void)parser:(NSXMLParser *)parser didEndElement:(NSString *)elementName
        namespaceURI:(NSString *)namespaceURI qualifiedName:(NSString *)qName {
    if (self.parent) {
        [self.parent finishedChild: [self.text copy]];
        parser.delegate = self.parent;
    }
}
We can now create subclasses of MyXMLParserDelegate: one for each kind of element we expect to parse. The chief responsibility of such a subclass, if it encounters a child element in parser:didStartElement..., is to create an instance of the appropriate MyXMLParserDelegate subclass, send it start:parent:, and make it the delegate; we have already embodied this in the utility method makeChild:elementName:parser:. The reverse process is already built into the default implementation of parser:didEndElement...: we call the parent’s finishedChild: and make the parent the delegate.
We can now parse our sample XML into an array of Person objects very easily. We start by obtaining the URL of the XML file, handing it to an NSXMLParser, creating our first delegate parser and making it the delegate, and telling the NSXMLParser to start:
NSURL* url =
    [[NSBundle mainBundle] URLForResource:@"folks" withExtension:@"xml"];
NSXMLParser* parser = [[NSXMLParser alloc] initWithContentsOfURL:url];
MyPeopleParser* people = [MyPeopleParser new];
[parser setDelegate: people];
[parser parse];
// ... do something with people.people ...
Here is MyPeopleParser. It is the top-level parser so it has some extra work to do: when it encounters the <people> element, which is the first thing that should happen, it creates the people array that will hold the Person objects; this array will be the final result of the entire parsing operation. If it encounters a <person> element, it does the standard dance I described earlier, creating a <person> parser (MyPersonParser) as its child and making it the delegate; when the <person> parser calls back to tell us it’s finished, MyPeopleParser expects the <person> parser to supply a Person through its person property:
- (void)parser:(NSXMLParser *)parser didStartElement:(NSString *)elementName
        namespaceURI:(NSString *)namespaceURI
        qualifiedName:(NSString *)qualifiedName
        attributes:(NSDictionary *)attributeDict
{
    if ([elementName isEqualToString: @"people"])
        self.people = [NSMutableArray array];
    if ([elementName isEqualToString: @"person"])
        [self makeChild:[MyPersonParser class] elementName:elementName
                 parser:parser];
}

- (void) finishedChild: (NSString*) s {
    [self.people addObject: [(MyPersonParser*)self.child person]];
}
MyPersonParser does the same child-making dance when it encounters a <firstName> or a <lastName> element; it uses a plain vanilla MyXMLParserDelegate to parse these children, because the built-in ability to accumulate text and hand it back is all that’s needed. In finishedChild:, it makes sure it has a Person object ready to hand back to its parent through its person property; key–value coding is elegantly used to match the name of the element with the name of the Person property to be set:
- (void)parser:(NSXMLParser *)parser didStartElement:(NSString *)elementName
        namespaceURI:(NSString *)namespaceURI
        qualifiedName:(NSString *)qualifiedName
        attributes:(NSDictionary *)attributeDict {
    [self makeChild:[MyXMLParserDelegate class] elementName:elementName
             parser:parser];
}

- (void) finishedChild:(NSString *)s {
    if (!self.person) {
        Person* p = [Person new];
        self.person = p; // retain policy
    }
    [self.person setValue: s forKey: self.child.name];
}
This may seem like a lot of work to parse such a simple bit of XML, but it is neatly object-oriented and requires very little new code once we’ve established the MyXMLParserDelegate superclass, which is of course reusable in many other situations.
On the other hand, if you really want tree-based XML parsing along with XPath and so forth, you can have it, because the libxml2 library is present in the SDK (and on the device). This is a C dylib (short for “dynamic library,” extension .dylib), and Xcode doesn’t automatically know during the build process where to find its headers (even though it’s part of the SDK), so the instructions for accessing it in your project are a tiny bit more involved than linking to an Objective-C framework:
- In Xcode, add libxml2.dylib to the Link Binary With Libraries build phase for your target, just as you would do with a framework.
-
Now comes the extra step that differs from using a framework; it is needed because, although the Xcode build process automatically looks inside the SDK’s /usr/include/ folder for headers, it doesn’t automatically recurse down into folders, so it won’t look inside the libxml2 folder unless you tell it to. Edit the target’s build settings and set the Header Search Paths build setting to
$SDKROOT/usr/include/libxml2. (When you close the dialog for adding a search path, this will transform itself into iphoneos/usr/include/libxml2.) -
In your code, import
<libxml/tree.h>.
You now have to talk to libxml2 using C. This is no trivial task. Here’s an example proving we can do it; we read our XML file, parse it into a tree, and traverse all its elements:
NSURL* url =
    [[NSBundle mainBundle] URLForResource:@"folks" withExtension:@"xml"];
NSString* path = [url absoluteString];
const char* filename = [path UTF8String];
xmlDocPtr doc = nil;
xmlNode *root_element = nil;
doc = xmlReadFile(filename, nil, 0);
root_element = xmlDocGetRootElement(doc);
traverse_elements(root_element); // must be previously defined
xmlFreeDoc(doc);
xmlCleanupParser();
Here’s our definition for traverse_elements; it logs each person and the person’s first and last name, just to prove we are traversing successfully:
void traverse_elements(xmlNode * a_node) {
    xmlNode *cur_node = nil;
    for (cur_node = a_node; cur_node; cur_node = cur_node->next) {
        if (cur_node->type == XML_ELEMENT_NODE) {
            if (strcmp(cur_node->name, "person") == 0)
                NSLog(@"found a person");
            if (strcmp(cur_node->name, "firstName") == 0)
                NSLog(@"First name: %s", cur_node->children->content);
            if (strcmp(cur_node->name, "lastName") == 0)
                NSLog(@"Last name: %s", cur_node->children->content);
        }
        traverse_elements(cur_node->children);
    }
}
If talking C to libxml2 is too daunting, you can interpose an Objective-C front end by taking advantage of a third-party library. See, for example, https://github.com/TouchCode/TouchXML.
Keep in mind, however, that you’re really not supposed to do what I just did. Even if you use libxml2, you’re supposed to use stream-based parsing, not tree-based parsing. See Apple’s XMLPerformance example code.
Note
A foundation class for constructing and parsing JSON strings is also provided — NSJSONSerialization. It’s a very simple class: all its methods are class methods, and eligible structures are required to be an array or dictionary (corresponding to what JSON calls an object) whose elements must be a string, number, array, dictionary, or null. NSData is used as the medium of exchange; you’ll archive or unarchive as appropriate. JSON arises often as a lightweight way of communicating structured data across the network; for more information, see http://www.json.org/.
SQLite (http://www.sqlite.org/docs.html) is a lightweight, full-featured relational database that you can talk to using SQL, the universal language of databases. This can be an appropriate storage format when your data comes in rows and columns (records and fields) and needs to be rapidly searchable. Also, the database as a whole is never loaded into memory; the data is accessed only as needed. This is valuable in an environment like an iOS device, where memory is at a premium.
In the same way as you can link to libxml2.dylib, you can link to libsqlite3.dylib (and import <sqlite3.h>) to access the power of SQLite. As with libxml2, talking C to sqlite3 may prove annoying. There are a number of lightweight Objective-C front ends. In this example, I use fmdb (https://github.com/ccgus/fmdb) to read the names of people out of a previously created database:
NSString* docsdir = [NSSearchPathForDirectoriesInDomains(
    NSDocumentDirectory, NSUserDomainMask, YES) lastObject];
NSString* dbpath = [docsdir stringByAppendingPathComponent:@"people.db"];
FMDatabase* db = [FMDatabase databaseWithPath:dbpath];
if (![db open]) {
    NSLog(@"Ooops");
    return;
}
FMResultSet *rs = [db executeQuery:@"select * from people"];
while ([rs next]) {
    NSLog(@"%@ %@", rs[@"firstname"], rs[@"lastname"]);
}
[db close];
/* output:
Matt Neuburg
Snidely Whiplash
Dudley Doright
*/
You can include a previously constructed SQLite file in your app bundle, but you can’t write to it there; the solution is to copy it from your app bundle into another location, such as the Documents directory, before you start working with it.
The Core Data framework provides a generalized way of expressing objects and properties that form a relational graph; moreover, it has built-in facilities for persisting those objects to disk — typically using SQLite as a storage format — and reading them from disk only when they are needed, thus making efficient use of memory. For example, a person might have not only multiple addresses but also multiple friends who are also persons; expressing persons and addresses as explicit object types, working out how to link them and how to translate between objects in memory and data in storage, and tracking the effects of changes, such as when a person is deleted from the data, can be tedious. Core Data can help.
It is important to stress, however, that Core Data is not a beginner-level technology. It is difficult to use and extremely difficult to debug. It expresses itself in a highly verbose, rigid, arcane way. It has its own elaborate way of doing things — everything you already know about how to create, access, alter, or delete an object within an object collection becomes completely irrelevant! — and trying to bend it to your particular needs can be tricky and can have unintended side-effects. Nor should Core Data be seen as a substitute for a true relational database.
Therefore, I have no intention of explaining Core Data; that would require an entire book. Indeed, such books exist, and if Core Data interests you, you should read some of them. See also the Core Data Programming Guide and the other resources referred to there. I will, however, illustrate what it’s like to work with Core Data.
I will describe the People Groups example from earlier in this chapter as a Core Data app. We will no longer have multiple documents, each representing a single Group of People; instead, we will now have a single document, maintained for us by Core Data, containing both Groups and People.
A Core Data project is linked to CoreData.framework and will import <CoreData/CoreData.h>, usually in the precompiled header file (.pch; see Chapter 4). To construct a Core Data project, you’ll specify the Master–Detail Application template (or the Empty Application template) and check Use Core Data in the second screen. This gives you template code in the app delegate implementation file for constructing the Core Data persistence stack, a set of objects that work together to fetch and save your data; in most cases there will no reason to alter this template code, and I have not done so for this example.
The app delegate template code gives the app delegate three properties representing the important singleton objects comprising the persistence stack: managedObjectContext, managedObjectModel, and persistentStoreCoordinator. It also supplies “lazy” getters to give these properties their values when first needed. Of these, the managedObjectContext is the most important for other classes to have access to. The managed object context is the world in which your data objects live and move and have their being: to obtain an object, you fetch it from the managed object context; to create an object, you insert it into the managed object context; to save your data, you save the managed object context.
The Master–Detail Application template also gives the Master view controller a managedObjectContext property, and the app delegate sets its value when it instantiates the Master view controller. My Master view controller is called GroupLister, so the app delegate’s application:didFinishLaunchingWithOptions: contains these lines:
GroupLister* gl = [GroupLister new];
gl.managedObjectContext = self.managedObjectContext;
UINavigationController* nav =
    [[UINavigationController alloc] initWithRootViewController:gl];
self.window.rootViewController = nav;
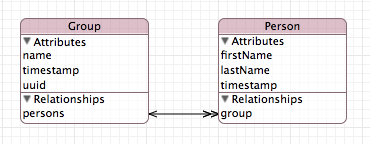
To describe the structure and relationships of the objects constituting your data model, you design an object graph in a data model document. Our object graph is very simple; a Group can have multiple Persons (Figure 36.5). The attributes, analogous to object properties, are all strings, except for the timestamps which are dates; the timestamps will be used for determining the sort order in which groups and people will be displayed in the interface — the display order is the order of creation.
Core Data attributes are not quite object properties. Group and Person are not classes; they are entity names. All Core Data model objects are instances of NSManagedObject, and therefore they do not, of themselves, have a name property, a firstName property, a lastName property, and so on. Instead, Core Data model objects make themselves dynamically KVC compliant for attribute names. For example, Core Data knows, thanks to our object graph, that a Person entity is to have a firstName attribute, so you can set a Person’s firstName attribute using KVC (setValue:forKey:). I find this maddening, so, at the very least, I like to give NSManagedObject the necessary properties through a category:
// NSManagedObject+GroupAndPerson.h:
#import <CoreData/CoreData.h>
@interface NSManagedObject (GroupAndPerson)
@property (nonatomic) NSString *firstName, *lastName;
@property (nonatomic) NSString *name, *uuid;
@property (nonatomic) NSDate* timestamp;
@property (nonatomic) NSManagedObject* group;
@end

// NSManagedObject+GroupAndPerson.m:
#import "NSManagedObject+GroupAndPerson.h"
@implementation NSManagedObject (GroupAndPerson)
@dynamic firstName, lastName, name, uuid, timestamp, group;
@end
(For the effect of the @dynamic directive, compare the discussion in Chapter 12.) Now we’ll be able to use name and firstName and the rest as properties, and CoreData will generate the corresponding accessors for us.
Now let’s talk about the first view controller, GroupLister. Its job is to list groups and to allow the user to create a new group (Figure 36.3). The way you ask Core Data for a model object is with a fetch request. In iOS, where Core Data model objects are often the data source for a UITableView, fetch requests are conveniently managed through an NSFetchedResultsController. The template code gives us an NSFetchedResultsController property, along with a “lazy” getter method that generates an NSFetchedResultsController if the property is nil, and for GroupLister I’ve only had to change it a little bit: my entity name is Group and my cache name is Groups, and I’ve renamed the property itself, frc.
The result is that self.frc is the data model, analogous to an array of Group objects. The implementation of the table view’s Three Big Questions to the data source, all pretty much straight from the template code, looks like this:
- (NSInteger)numberOfSectionsInTableView:(UITableView *)tableView {
    return [self.frc.sections count];
}

- (NSInteger)tableView:(UITableView *)tableView
        numberOfRowsInSection:(NSInteger)section {
    id<NSFetchedResultsSectionInfo> sectionInfo = self.frc.sections[section];
    return sectionInfo.numberOfObjects;
}

- (UITableViewCell *)tableView:(UITableView *)tableView
        cellForRowAtIndexPath:(NSIndexPath *)indexPath {
    UITableViewCell *cell =
        [tableView dequeueReusableCellWithIdentifier:@"Cell"];
    cell.accessoryType = UITableViewCellAccessoryDisclosureIndicator;
    NSManagedObject *object = [self.frc objectAtIndexPath:indexPath];
    cell.textLabel.text = object.name;
    return cell;
}
The only really interesting thing about that code is our ability to speak of object.name; we can do that because of the category on NSManagedObject that we created earlier. Otherwise, we’d have to fetch a Group entity’s name attribute as valueForKey:@"name".
Now let’s talk about object creation. GroupLister’s table is initially empty because our app starts out life with no data. When the user asks to create a group, I put up a UIAlertView asking for the name of the new group. If the user provides a valid name, I create a new Group entity and save the managed object context. Again, this is almost boilerplate code, copied from the template’s insertNewObject: method:
NSManagedObjectContext *context = self.frc.managedObjectContext;
NSEntityDescription *entity = self.frc.fetchRequest.entity;
NSManagedObject *mo =
    [NSEntityDescription insertNewObjectForEntityForName:entity.name
                                  inManagedObjectContext:context];
mo.name = name;
mo.uuid = [[NSUUID UUID] UUIDString]; // new in iOS 6
mo.timestamp = [NSDate date];
// save context
NSError *error = nil;
BOOL ok = [context save:&error];
if (!ok) {
    NSLog(@"%@", error);
    return;
}
The second view controller class is PeopleLister (Figure 36.3). It lists all the people in a particular Group, so I don’t want PeopleLister to be instantiated without a Group; therefore, its designated initializer is initWithNibName:bundle:groupManagedObject:, and it looks like this:
- (id) initWithNibName:(NSString *)nibNameOrNil
                bundle:(NSBundle *)nibBundleOrNil
               groupManagedObject: (NSManagedObject*) object {
    self = [super initWithNibName:nibNameOrNil bundle:nibBundleOrNil];
    if (self) {
        self->_groupObject = object;
    }
    return self;
}
To navigate from the GroupLister view to the PeopleLister view, I instantiate PeopleLister and push it onto the navigation controller’s stack. For example, here’s what happens when the user taps a Group name in the GroupLister table view:
- (void)tableView:(UITableView *)tableView
        didSelectRowAtIndexPath:(NSIndexPath *)indexPath {
    PeopleLister* pl =
        [[PeopleLister alloc] initWithNibName:@"PeopleLister" bundle:nil
            groupManagedObject:[self.frc objectAtIndexPath:indexPath]];
    [self.navigationController pushViewController:pl animated:YES];
}
PeopleLister, too, has an frc property, along with a getter that is almost identical to the template code for generating an NSFetchedResultsController. Almost, but not quite. In the case of GroupLister, we wanted every group; but a PeopleLister instance should list only the People belonging to one particular group, which has been stored as the groupObject property. So our implementation of the frc getter method contains these lines:
NSPredicate* pred =
    [NSPredicate predicateWithFormat:@"group = %@", self.groupObject];
req.predicate = pred; // req is the NSFetchRequest we're configuring
As you can see from Figure 36.3, the PeopleLister interface consists of a table of text fields. Populating the table is easy enough:
- (UITableViewCell *)tableView:(UITableView *)tableView
        cellForRowAtIndexPath:(NSIndexPath *)indexPath {
    UITableViewCell *cell =
        [tableView dequeueReusableCellWithIdentifier:@"Person"];
    NSManagedObject *object = [self.frc objectAtIndexPath:indexPath];
    UITextField* first = (UITextField*)[cell viewWithTag:1];
    UITextField* last = (UITextField*)[cell viewWithTag:2];
    first.text = object.firstName;
    last.text = object.lastName;
    first.delegate = last.delegate = self;
    return cell;
}
When the user edits a text field (the first or last name of a Person), I update the data model and save the managed object context; the first part of this code should be familiar from Chapter 21:
-(void)textFieldDidEndEditing:(UITextField *)textField {
    UIView* v = textField.superview;
    while (![v isKindOfClass: [UITableViewCell class]])
        v = v.superview;
    UITableViewCell* cell = (UITableViewCell*)v;
    NSIndexPath* ip = [self.tableView indexPathForCell:cell];
    NSManagedObject* object = [self.frc objectAtIndexPath:ip];
    [object setValue:textField.text
              forKey: ((textField.tag == 1) ? @"firstName" : @"lastName")];
    // save context
    NSError *error = nil;
    BOOL ok = [context save:&error];
    if (!ok) {
      NSLog(@"%@", error);
      return;
    }
}
The trickiest part is what happens when the user asks to make a new Person. It starts out analogously to making a new Group: I make a new Person entity, configure its attributes with an empty first name and last name, and save the context. But we must also make this empty Person appear in the table! To do so, we act as the NSFetchedResultsController’s delegate (NSFetchedResultsControllerDelegate); the delegate methods are triggered by the change in the managed object context:
- (void) doAdd: (id) sender {
    [self.tableView endEditing:YES];
    NSManagedObjectContext *context = self.frc.managedObjectContext;
    NSEntityDescription *entity = self.frc.fetchRequest.entity;
    NSManagedObject *mo =
    [NSEntityDescription insertNewObjectForEntityForName:[entity name]
                                  inManagedObjectContext:context];
    mo.group = self.groupObject;
    mo.lastName = @"";
    mo.firstName = @"";
    mo.timestamp = [NSDate date];
    // save context
    NSError *error = nil;
    BOOL ok = [context save:&error];
    if (!ok) {
        NSLog(@"%@", error);
        return;
    }
}

// delegate methods

-(void)controllerWillChangeContent:(NSFetchedResultsController *)controller {
    [self.tableView beginUpdates];
}

-(void)controllerDidChangeContent:(NSFetchedResultsController *)controller {
    [self.tableView endUpdates];
}

-(void)controller:(NSFetchedResultsController *)controller
  didChangeObject:(id)anObject
      atIndexPath:(NSIndexPath *)indexPath
    forChangeType:(NSFetchedResultsChangeType)type
     newIndexPath:(NSIndexPath *)newIndexPath {
    if (type == NSFetchedResultsChangeInsert) {
        [self.tableView insertRowsAtIndexPaths:@[newIndexPath]
            withRowAnimation:UITableViewRowAnimationAutomatic];
        // wait for interface to settle...
        // ...then start editing first name of new person
        dispatch_async(dispatch_get_main_queue(), ^{
            UITableViewCell* cell =
                [self.tableView cellForRowAtIndexPath:newIndexPath];
            UITextField* tf = (UITextField*)[cell viewWithTag:1];
            [tf becomeFirstResponder];
        });
    }
}
The Image I/O framework provides a simple, unified way to open image files (from disk or downloaded from the network, as described in Chapter 37), to save image files, to convert between image file formats, and to read metadata from standard image file formats, including EXIF and GPS information from a digital camera. You’ll need to link to ImageIO.framework and import <ImageIO/ImageIO.h>.
Obviously, such features were not entirely missing before the Image I/O framework was introduced (starting in iOS 4). UIImage can read the data from most standard image formats, and you can convert formats with functions such as UIImageJPEGRepresentation and UIImagePNGRepresentation. But you could not, for example, save an image as a TIFF without the Image I/O framework.
The Image I/O framework introduces the notion of an image source (CGImageSourceRef). This can be created from the URL of a file on disk or from an NSData object (actually CFDataRef, to which NSData is toll-free bridged). You can use this to obtain a CGImage of the source’s image (or, if the source format contains multiple images, a particular image). But you can also obtain metadata from the source without transforming the source into a CGImage, thus conserving memory. For example:
NSURL* url =
    [[NSBundle mainBundle] URLForResource:@"colson"
                            withExtension:@"jpg"];
CGImageSourceRef src =
    CGImageSourceCreateWithURL((__bridge CFURLRef)url, nil);
CFDictionaryRef result1 = CGImageSourceCopyPropertiesAtIndex(src, 0, nil);
NSDictionary* result = CFBridgingRelease(result1);
// ... do something with result ...
CFRelease(src);
Without having opened the image file as an image, we now have a dictionary full of information about it, including its pixel dimensions (kCGImagePropertyPixelWidth and kCGImagePropertyPixelHeight), its resolution, its color model, its color depth, and its orientation — plus, because this picture originally comes from a digital camera, the EXIF data such as the aperture and exposure at which it was taken, plus the make and model of the camera.
We can obtain the image as a CGImage, with CGImageSourceCreateImageAtIndex. Alternatively, we can request a thumbnail version of the image. This is a very useful thing to do, and the name “thumbnail” doesn’t really do it justice. If your purpose in opening this image is to display it in your interface, you don’t care about the original image data; a thumbnail is precisely what you want, especially because you can specify any size for this “thumbnail” all the way up to the original size of the image! This is tremendously convenient, because to assign a small UIImageView a large image wastes all the memory reflected by the size difference.
To generate a thumbnail at a given size, you start with a dictionary specifying the size along with other instructions, and pass that, together with the image source, to CGImageSourceCreateThumbnailAtIndex. The only pitfall is that, because we are working with a CGImage and specifying actual pixels, we must remember to take account of the scale of our device’s screen. So, for example, let’s say we want to scale our image so that its largest dimension is no larger than the width of the UIImageView (iv) into which we intend to place it:
NSURL* url =
    [[NSBundle mainBundle] URLForResource:@"colson"
                            withExtension:@"jpg"];
CGImageSourceRef src =
    CGImageSourceCreateWithURL((__bridge CFURLRef)url, nil);
CGFloat scale = [UIScreen mainScreen].scale;
CGFloat w = self.iv.bounds.size.width*scale;
NSDictionary* d =
    @{(id)kCGImageSourceShouldAllowFloat: (id)kCFBooleanTrue,
     (id)kCGImageSourceCreateThumbnailWithTransform: (id)kCFBooleanTrue,
     (id)kCGImageSourceCreateThumbnailFromImageAlways: (id)kCFBooleanTrue,
     (id)kCGImageSourceThumbnailMaxPixelSize: @((int)w)};
CGImageRef imref =
    CGImageSourceCreateThumbnailAtIndex(src, 0, (__bridge CFDictionaryRef)d);
UIImage* im =
    [UIImage imageWithCGImage:imref scale:scale
                  orientation:UIImageOrientationUp];
self.iv.image = im;
CFRelease(imref); CFRelease(src);
The Image I/O framework also introduces the notion of an image destination, used for saving an image into a specified file format. As a final example, I’ll show how to save our image as a TIFF. We never open the image as an image! We save directly from the image source to the image destination:
NSURL* url =
    [[NSBundle mainBundle] URLForResource:@"colson"
                            withExtension:@"jpg"];
CGImageSourceRef src =
    CGImageSourceCreateWithURL((__bridge CFURLRef)url, nil);
NSFileManager* fm = [NSFileManager new];
NSURL* suppurl = [fm URLForDirectory:NSApplicationSupportDirectory
                            inDomain:NSUserDomainMask
                   appropriateForURL:nil
                              create:YES error:nil];
NSURL* tiff = [suppurl URLByAppendingPathComponent:@"mytiff.tiff"];
CGImageDestinationRef dest =
    CGImageDestinationCreateWithURL((__bridge CFURLRef)tiff,
                                    (CFStringRef)@"public.tiff", 1, nil);
CGImageDestinationAddImageFromSource(dest, src, 0, nil);
bool ok = CGImageDestinationFinalize(dest);
// error-checking omitted
CFRelease(src); CFRelease(dest);