A modal dialog demands attention; while it is present, the user can do nothing other than work within it or dismiss it. You might need to put up a simple modal dialog in order to give the user some information or to ask the user how to proceed. Two UIView subclasses construct and present rudimentary modal dialogs:
- UIAlertView
-
A UIAlertView pops up unexpectedly with an elaborate animation and may be thought of as an attention-getting interruption. An alert is displayed in the center of the screen; it contains a title, a message, and some number of buttons, one of which may be the cancel button, meaning that it does nothing but dismiss the alert. In addition, an alert view may contain a text field, a password field, or both.
Alert views are minimal, but intentionally so; they are intended for simple, quick interaction or display of information. Often there is only a cancel button, the primary purpose of the alert being to show the user the message (“You won the game”); the additional buttons may be used to give the user a choice of how to proceed (“You won the game; would you like to play another?” “Yes,” “No,” “Replay”). The text field and password field might allow the user to supply login credentials.
- UIActionSheet
-
A UIActionSheet may be considered the iOS equivalent of a menu. An action sheet is displayed arising from the interface: on the iPhone, it slides up from the bottom of the screen; on the iPad, it is typically shown in a popover. It consists of some number of buttons (there can be a title, optionally, but there usually isn’t); one may be the cancel button, which appears last, and one may be a “destructive” button, which appears first in red, emphasizing the severity of that option.
Where a UIAlertView is an interruption, a UIActionSheet is a logical branching of what the user is already doing: it typically divides a single piece of interface into multiple possible courses of action. For example, in Apple’s Mail app, a single Action button summons an action sheet that lets the user reply to the current message, forward it, or print it (or cancel and do nothing).
One sees occasionally a misuse of the built-in dialogs to include additional interface. For example, a UIActionSheet is a UIView, so in theory you can add a subview to it. I cannot recommend such behavior; it clearly isn’t intended, and there’s no need for it. If what you want isn’t what a built-in dialog normally does, don’t use a built-in dialog. I’ll suggest some alternatives in the last part of this chapter.
A local notification is an alert that the system presents at a predetermined time on your app’s behalf when your app isn’t frontmost. This alert can appear as a UIAlertView, so I discuss it in this chapter as well.
New in iOS 6 is the activity view, a modal dialog displaying icons representing possible courses of action, and intended in certain circumstances to replace the action sheet. For example, Mobile Safari now presents an activity view from its Action button; the icons represent external modes of sharing a URL such as Mail, Message, and Twitter, as well as internal actions such as Bookmark and Add to Reading List. I’ll discuss activity views at the end of this chapter.
The basic method for constructing an alert view (UIAlertView) is initWithTitle:message:delegate:cancelButtonTitle:otherButtonTitles:. The method for making a constructed alert view appear onscreen is show. The alert is automatically dismissed as soon as the user taps any button. Here’s an example (Figure 26.1):
UIAlertView* alert = [[UIAlertView alloc] initWithTitle:@"Not So Fast!"
    message:@"Do you really want to do this tremendously destructive thing?"
    delegate:self cancelButtonTitle:@"Yes"
    otherButtonTitles:@"No", @"Maybe", nil];
[alert show];
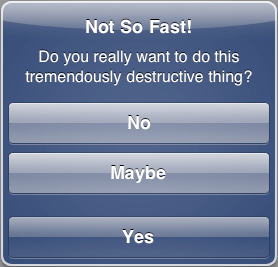
The otherButtonTitles parameter is of indefinite length, so it must be either nil or a nil-terminated list (not an array!) of strings. The cancel button needn’t be titled “Cancel”; it is drawn darker than the other buttons and comes last in a column of buttons, as you can see from Figure 26.1. If there are more than two otherButtonTitles and a nil cancelButtonTitle, the last of the otherButtonTitles is drawn as if it were a cancel button; this code, too, produces Figure 26.1:
UIAlertView* alert = [[UIAlertView alloc] initWithTitle:@"Not So Fast!"
    message:@"Do you really want to do this tremendously destructive thing?"
    delegate:self cancelButtonTitle:nil
    otherButtonTitles:@"No", @"Maybe", @"Yes", nil];
If an alert view is to contain a text field, it probably should have at most one or two buttons, with short titles such as “OK” and “Cancel”. Otherwise, there might not be room on the screen for the alert view and the keyboard. To add a text field to the alert view, modify its alertViewStyle before calling show. Your choices are:
-
UIAlertViewStyleDefault, the default (no text fields) -
UIAlertViewStylePlainTextInput, one normal text field -
UIAlertViewStyleSecureTextInput, onesecureTextEntrytext field -
UIAlertViewStyleLoginAndPasswordInput, one normal text field and onesecureTextEntrytext field
You can retrieve the text fields with textFieldAtIndex:; possible arguments are 0 and 1 (where 1 is the password field when the style is UIAlertViewStyleLoginAndPasswordInput). You can treat the text fields as you would any text field (see Chapter 23); for example, you can set the text field’s delegate, arrange to receive control events from the text field, determine the text field’s keyboard type, and so on:
UIAlertView* alert = [[UIAlertView alloc] initWithTitle:@"Enter a number:"
    message:nil delegate:self cancelButtonTitle:@"Cancel"
    otherButtonTitles:@"OK", nil];
alert.alertViewStyle = UIAlertViewStylePlainTextInput;
UITextField* tf = [alert textFieldAtIndex:0];
tf.keyboardType = UIKeyboardTypeNumberPad;
[tf addTarget:self action:@selector(textChanged:)
         forControlEvents:UIControlEventEditingChanged];
[alert show];
The alert dialog is modal, but the code that presents it is not: after the alert is shown, your code continues to run. If an alert consists of a single button (the cancel button), you might show it and forget about it, secure in the knowledge that the user must dismiss it sooner or later and that nothing can happen until then. But if you want to respond at the time the user dismisses the alert, or if there are several buttons and you want to know which one the user tapped to dismiss the alert, you’ll need to implement at least one of these delegate methods (UIAlertViewDelegate):
-
alertView:clickedButtonAtIndex: -
alertView:willDismissWithButtonIndex: -
alertView:didDismissWithButtonIndex:
The cancel button index is usually 0, with the remaining button indexes increasing in the order in which they were defined. If you’re in any doubt, or if you need the button title for any other reason, you can call buttonTitleAtIndex:. Properties allow you to work out the correspondence between indexes and buttons without making any assumptions:
-
cancelButtonIndex(-1if none) -
firstOtherButtonIndex(-1if none) -
numberOfButtons(including the cancel button)
You can also dismiss an alert view programmatically, with dismissWithClickedButtonIndex:animated:. When an alert view is dismissed programmatically, the delegate method alertView:clickedButtonAtIndex: is not called, because no button was actually clicked by the user. But the button index you specify is still passed along to the two dismiss delegate methods. The button index you specify needn’t correspond to any existing button; thus, you could use it as a way of telling your delegate method that your code, and not the user, dismissed the alert.
Two additional delegate methods notify you when the alert is initially shown:
-
willPresentAlertView: -
didPresentAlertView:
A further delegate method asks whether the first “other button” should be enabled:
-
alertViewShouldEnableFirstOtherButton:
The delegate receives that message each time the state of things changes in the alert — in particular, when the alert appears and when the text in a text field changes. In this example, there’s a text field, my cancel button says “Cancel”, and my other button says “OK”; I enable the OK button only if there is text in the text field:
- (BOOL)alertViewShouldEnableFirstOtherButton:(UIAlertView *)alertView {
    UITextField* tf = [alertView textFieldAtIndex:0];
    return [tf.text length] > 0;
}
One last delegate method notifies you if the alert is dismissed by the system:
-
alertViewCancel:
Before iOS 4.0, this could happen because the user quit the app with the alert showing; the system dismissed the alert, and your code had a chance to respond before actually terminating. In the multitasking world, however, if the user clicks the Home button, your app is backgrounded without the system dismissing the alert, and alertViewCancel: may be a dead letter. It would thus be up to your code, as the app is backgrounded, whether to leave the alert there or to dismiss the alert and perhaps take some default action.
The basic method for constructing an action sheet (UIActionSheet) is initWithTitle:delegate:cancelButtonTitle:destructiveButtonTitle:otherButtonTitles:. There are various methods for summoning the actual sheet, depending on what part of the interface you want the sheet to arise from. The following are appropriate on the iPhone, where the sheet typically rises from the bottom of the screen:
-
showInView: -
On the iPhone, far and away the most commonly used method. You will usually specify the root view controller’s view. Don’t specify a view whose view controller is contained by a view controller that hides the bottom of the interface, such as a tab bar controller or a navigation controller with a toolbar; if you do, some of the buttons may not function (and you get a helpful warning in the console: “Presenting action sheet clipped by its superview”). Instead, specify the tab bar controller’s view itself, or the navigation controller’s view itself, or use one of the other methods. For example, in my Zotz! app, which has a tab bar interface, the settings view controller summons an action sheet like this (Figure 26.2):
[sheet showInView: self.tabBarController.view];

-
showFromTabBar:
showFromToolbar: -
On the iPhone, these cause the sheet to rise from the bottom of the screen, just like
showInView:, because the tab bar or toolbar is at the bottom of the screen; however, they avoid the clipping problem withshowInView:described earlier.
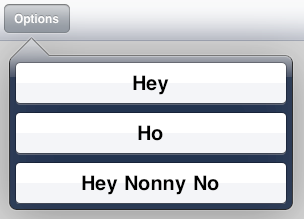
On the iPad, you are more likely to use one of the following methods, which resemble the methods for presenting a popover (Chapter 22); they do in fact present the action sheet as a popover, with its arrow pointing to the specified part of the interface (Figure 26.3):
-
showFromRect:inView:animated: -
showFromBarButtonItem:animated:
(On the iPhone, those methods should be avoided; they don’t cause an error, and they do work — the sheet still ends up at the bottom at the screen — but they can do messy things to the interface.)
On the iPad, there is usually no point including a cancel button title; if the alert sheet is shown as a popover, no cancel button will appear. This is because the popover is configured to be dismissed when the user taps outside it, which is the same as canceling it.
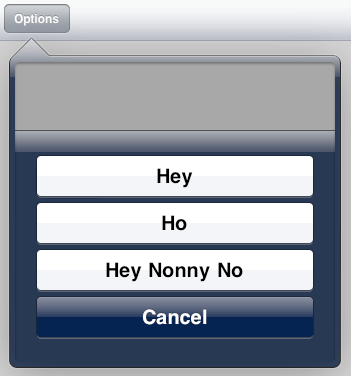
Alternatively, it is possible on the iPad to show an alert sheet inside an existing popover. In this scenario, we are already presenting the popover, and then we summon an action sheet within the popover’s view. The action sheet then behaves just as if the popover were an iPhone: you summon it with showInView:, it slides up from the bottom of the popover, and the cancel button, if specified, does appear (Figure 26.4). The action sheet behaves like a presented view inside a popover, where modalInPopover is YES.
An action sheet also has a style, its actionSheetStyle:
-
UIActionSheetStyleAutomatic -
UIActionSheetStyleDefault -
UIActionSheetStyleBlackTranslucent -
UIActionSheetStyleBlackOpaque
These values are closely related to the possible styles (barStyle) of a UIToolbar (Chapter 25). However, an action sheet’s style depends also on the mode of presentation; my experimentation suggests, for example, that setting the actionSheetStyle of an action sheet that appears as a popover may make no perceptible difference, and that an action sheet that is shown from a tab bar will always be black opaque.
In other respects an action sheet is managed in a manner completely parallel to an alert view. When one of its buttons is tapped, the sheet is dismissed automatically, but you’ll probably want to implement a delegate method (UIActionSheetDelegate) in order to learn which button it was:
-
actionSheet:clickedButtonAtIndex: -
actionSheet:willDismissWithButtonIndex: -
actionSheet:didDismissWithButtonIndex:
If the action sheet is shown as a popover on the iPad, and if the popover is dismissed by the user tapping outside it, the button index is -1.
To respond appropriately to the delegate methods without making assumptions about how the indexes correspond to the buttons, you can use the buttonTitleAtIndex: method, and these properties:
-
cancelButtonIndex -
destructiveButtonIndex -
firstOtherButtonIndex -
numberOfButtons
You can dismiss an action sheet programmatically with dismissWithClickedButtonIndex:animated:, in which case actionSheet:clickedButtonAtIndex: is not called, but the two dismiss delegate methods are. Two additional delegate methods notify you when the sheet is initially shown:
-
willPresentActionSheet: -
didPresentActionSheet:
A further delegate method, actionSheetCancel:, notifies you if the sheet is dismissed by the system, though in the multitasking world this is unlikely to happen; if your app is backgrounded with an action sheet showing, it’s up to you to decide how to proceed.
Here’s the code that presents the action sheet shown in Figure 26.2, along with the code that responds to its dismissal:
- (void) chooseLayout: (id) sender {
    UIActionSheet* sheet =
        [[UIActionSheet alloc] initWithTitle:@"Choose New Layout"
        delegate:self
        cancelButtonTitle:@"Cancel" destructiveButtonTitle:nil
        otherButtonTitles:@"3 by 3", @"4 by 3", @"4 by 4",
                          @"5 by 4", @"5 by 5", nil];
    [sheet showInView: self.tabBarController.view];
}

- (void)actionSheet:(UIActionSheet *)as clickedButtonAtIndex:(NSInteger)ix {
    if (ix == as.cancelButtonIndex)
        return;
    NSString* s = [as buttonTitleAtIndex:ix];
    // ...
}
On the iPad, an action sheet shown as a popover or inside an existing popover introduces the same issues with regard to the popover’s passthroughViews that I enumerated in Chapter 22. When an action sheet is shown as a popover from a bar button item in a toolbar, the toolbar becomes a passthrough view for the popover, and the user can now tap a bar button item without causing the action sheet’s popover to be dismissed (possibly even summoning another popover — perhaps even another instance of the same action sheet — simultaneously). You can’t solve this problem by adjusting the popover controller’s passthroughViews, because you’ve no access to the popover controller! One workaround is to implement the delegate methods to toggle user interaction with the toolbar:
- (IBAction)doButton:(id)sender { // sender is a bar button item
    UIActionSheet* act = [[UIActionSheet alloc]
        initWithTitle:nil delegate:self cancelButtonTitle:nil
        destructiveButtonTitle:nil
        otherButtonTitles:@"Hey", @"Ho", @"Hey Nonny No", nil];
    [act showFromBarButtonItem:sender animated:YES];
}

- (void)didPresentActionSheet:(UIActionSheet *)actionSheet {
    [self.toolbar setUserInteractionEnabled:NO];
}

- (void)actionSheet:(UIActionSheet *)actionSheet
        didDismissWithButtonIndex:(NSInteger)buttonIndex {
    [self.toolbar setUserInteractionEnabled:YES];
}
Similarly, an action sheet shown inside a popover causes the popover to behave as if modalInPopover is YES; thus, while the action sheet is showing, the user can’t dismiss the popover by tapping anywhere that isn’t listed in the popover’s passthroughViews. So far, so good. But you must take care that the popover’s passthroughViews make sense for this situation; setting the passthroughViews property to nil while the action sheet is present (if it isn’t nil already) might be a good idea. But the view controller that presents the action sheet might not have ready access to the popover controller in order to set its passthroughViews! This entire situation is just another maddening consequence of iOS’s poor built-in popover management.
Alert views and actions sheets are limited, inflexible, and inappropriate to any but the simplest cases. In more complex situations, it really isn’t that much work to implement an alternative.
On the iPhone, the main alternative is to navigate to a new screenful of interface. This might be by way of a navigation interface, or using a presented view (Chapter 19). For example, in the Zotz! app, in the Settings view, when the user taps a color, I summon a presented view, using a UIViewController subclass of my own, ColorPickerController (Figure 26.5).
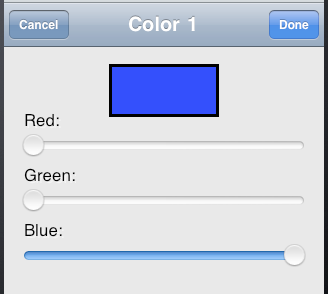
On the desktop, the color picker in Figure 26.5 might be presented as a secondary window acting as a dialog. On the small iPhone screen, where there are no secondary windows, the presented view is the equivalent of a dialog. Indeed, one might argue that the action sheet shown in Figure 26.2 is not a very appropriate use of an action sheet; it’s intrusive and has too many buttons. It might have been better if I’d designed my own presented view. I probably picked an action sheet because it required just a few lines of code; basically, I was being lazy.
On the iPad, a popover is virtually a secondary window, and can be truly modal. An action sheet is usually presented as a popover, but it’s limited, and you don’t get access to the popover controller; in many cases, you’ll probably be better off designing your own view to be presented in a popover. The popovers in Figure 22.1, for example, are effectively modal dialogs. A popover can internally display a secondary presented view or even an action sheet, as we’ve already seen. Also on the iPad, a presented view can use the UIModalPresentationFormSheet presentation style, which is effectively a dialog window smaller than the screen.
A local notification is an alert to the user that can appear even if your app is not running. In one of its manifestations, it appears as a dialog on top of whatever the user is doing at that moment, which is why it is treated in this chapter. (If a local notification from some other app were to appear as a dialog while your app is frontmost, your app would become inactive; see Chapter 11 and the applicationWillResignActive: app delegate message.)
Note
This use of the term notification has nothing to do with NSNotification (Chapter 11). The ambiguity is unfortunate.
Your app does not present a local notification alert: indeed, your app can’t present a local notification alert, because if your app’s local notification alert appears, your app ex hypothesi isn’t frontmost. Rather, your app hands a local notification to the system along with instructions about when the local notification should fire. When the specified time arrives, if your app isn’t frontmost, the system presents the notification on your behalf.
The user has several choices as to how a notification from your app should be presented. These choices appear in the Settings app, under Notifications. There is a Notification Center, which appears when the user swipes downward from the very top of the screen, and the user can enable or disable your app’s notifications appearing there. A notification from your app can also appear as an alert, as a temporary banner at the top of the screen, or not at all. The user can also prohibit your app’s alerts from appearing in the lock screen. It is thus perfectly possible for the user to suppress your app’s alerts altogether!
No matter the interface whereby a notification presents itself, it generally provides some way for the user to summon your app in response. If the notification is a banner, the user can tap it. If the notification is an alert, the user can tap its action button. If the notification appears in the lock screen, the user can slide the slider at the bottom of the lock screen. If the user does any of these things, your app will be brought to the front, launching it if it isn’t already suspended in the background. Your app may need to be concerned with detecting that it has been brought to the front under these special circumstances, and I’ll talk in a moment about how it can do that.
To create a local notification, you configure a UILocalNotification object and hand it to the system with UIApplication’s scheduleLocalNotification:. The UILocalNotification object has properties as follows:
-
alertBody - The message displayed in the notification.
-
alertAction -
This matters only if your notification is displayed as an alert; in that case, this is the text of the action button. If you don’t set
alertAction, the text of the action button will be “Launch.”
Note
According to the documentation, you should be able to set hasAction to NO to suppress the action button altogether, but in my testing, doing so has no effect.
-
soundName -
The name of a sound file at the top level of your app bundle, to be played when the alert appears. This should be an uncompressed sound (AIFF or WAV). Alternatively, you can specify the default sound,
UILocalNotificationDefaultSoundName. If you don’t set this property, there won’t be a sound. Regardless of the value you supply here, the user can prevent your app’s notifications from emitting a sound. -
userInfo - An optional NSDictionary whose contents are up to you. Your app can retrieve this dictionary later on, if it receives the notification after the notification fires (more about that in a moment).
-
fireDate,timeZone -
When you want the local notification to fire. The
fireDateis an NSDate (see Chapter 10 and Chapter 25 for examples of date manipulation). If you don’t include atimeZone, the date is measured against universal time; if you do include atimeZone, the date is measured against the user’s local time zone, even if that time zone changes (because the user travels, for instance). -
repeatInterval,repeatCalendar - If set, the local notification will recur.
As I’ve already mentioned, you hand a configured local notification to the system with UIApplication’s scheduleLocalNotification:. Additional UIApplication methods let you manipulate the list of local notifications you’ve already scheduled. You can cancel one or all scheduled local notifications (cancelLocalNotification:, cancelAllLocalNotifications:); you can also manipulate the list directly by setting UIApplication’s scheduledLocalNotifications, an NSArray property.
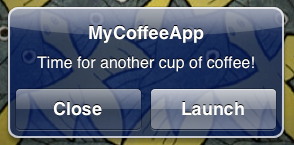
Figure 26.6 shows an alert generated by the firing of a local notification. Here’s a simple example of creating and scheduling the local notification that resulted in that alert:
UILocalNotification* ln = [UILocalNotification new];
ln.alertBody = @"Time for another cup of coffee!";
ln.fireDate = [NSDate dateWithTimeIntervalSinceNow:15];
ln.soundName = UILocalNotificationDefaultSoundName;
[[UIApplication sharedApplication] scheduleLocalNotification:ln];
Now let’s talk about what happens when one of your scheduled local notifications fires. There are three possibilities, depending on the state of your app at that moment:
- Your app is suspended in the background
-
If the user summons your app from a notification, your app is brought to the front; your app delegate will then receive
application:didReceiveLocalNotification:, where the second parameter is the UILocalNotification, and your application’sapplicationStatewill beUIApplicationStateInactive. - Your app is frontmost
-
The user won’t be informed by the system that the notification has fired (though the notification may be stored in the Notification Center). Your app delegate will receive
application:didReceiveLocalNotification:, where the second parameter is the UILocalNotification, and your application’sapplicationStatewill beUIApplicationStateActive. The idea is that if your app wants to let the user know that something special is happening, that’s your app’s business and it can do it in its own way. - Your app isn’t running
-
If the user summons your app from a notification, your app is launched; your app delegate will then receive, not
application:didReceiveLocalNotification:, but ratherapplication:didFinishLaunchingWithOptions:with an NSDictionary parameter that includes theUIApplicationLaunchOptionsLocalNotificationKey, whose value is the UILocalNotification.
Thus, you should implement application:didReceiveLocalNotification: to check the UIApplication’s applicationState, and you should implement application:didFinishLaunchingWithOptions: to check its second parameter to see whether we are launching in response to a local notification. In this way, you will be able to distinguish the three different possibilities, and you can respond appropriately.
In the first and third cases (your app is suspended in the background, or your app isn’t running), you may want to show the user some interface appropriate to the local notification’s situation. For example, you might want to push a particular view controller onto your navigation interface or present a particular view controller’s view. However, when your app is launched from scratch, the first thing the user sees is its launch image (Chapter 9); and when your app is activated from a suspended state, the first thing the user sees is a screenshot image of your app, taken by the system when your app was suspended. Thus, there may be a mismatch between these images and the interface that you’re about to show the user in this special situation; if so, the user will see an odd flash as the image is removed to reveal your app’s actual interface. To prevent this flash, you can include in the original UILocalNotification an alertLaunchImage to be presented instead of these images. The idea is that this alertLaunchImage should be a better match for the interface the user will actually see.
(When your app is launched from scratch by a local notification, if you intend to respond by showing some special interface appropriate to the notification, and if you’re using the built-in state saving and restoration mechanism discussed in Chapter 19, you’ll want to take steps to prevent inappropriate parts of the interface from being restored automatically in this special situation.)
There is a fourth possibility for what happens when a local notification fires. Under some special circumstances (addressed, for example, in Chapter 27 and Chapter 35), your app might be running, not suspended, in the background. In this case, the situation is similar to what happens when your app is suspended: the user may be notified, and can summon your app to the front. Your running-in-the-background app can even schedule a notification to fire immediately with the convenience method presentLocalNotificationNow:.
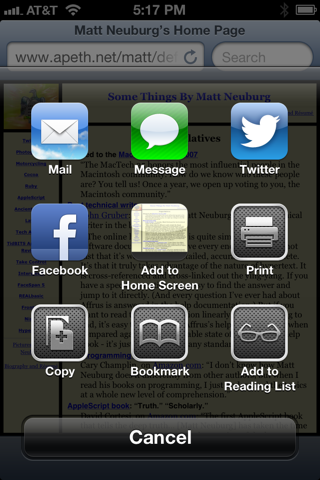
An activity view is the view belonging to a UIActivityViewController (new in iOS 6). You start with one or more pieces of data, such as an NSString, that you want the user to have the option of sharing or working with in your app. The activity view contains an icon for every activity (UIActivity) that can work with this type of data. There are nine built-in activities, and your app can provide more. The user may tap an icon in the activity view, and is then perhaps shown additional interface, belonging to the provider of the chosen activity. For example, as I mentioned earlier, the Action button in Mobile Safari presents an activity view (Figure 26.7).
Note
Don’t confuse UIActivityViewController, UIActivity, UIActivityItemProvider, and UIActivityItemSource, on the one hand, with UIActivityIndicatorView (Chapter 25) on the other. The similarity of the names is unfortunate.
Presenting an activity view is easy. You instantiate UIActivityViewController by calling initWithActivityItems:applicationActivities:, where the first parameter is an NSArray of objects to be shared, such as NSString or UIImage objects. Presumably these are objects associated somehow with the interface the user is looking at right now. You set the controller’s completionHandler to a block that will be called when the user’s interaction with the activity interface ends. Then you present the controller, as a presented controller on the iPhone or as a popover on the iPad. So, for example, on the iPhone:
UIActivityViewController* avc =
    [[UIActivityViewController alloc] initWithActivityItems:@[myCoolString]
                                      applicationActivities:nil];
avc.completionHandler = ^(NSString *activityType, BOOL completed) {
    // ...
};
[self presentViewController:avc animated:YES completion:nil];
And on the iPad:
UIActivityViewController* avc =
    [[UIActivityViewController alloc] initWithActivityItems:@[myCoolString]
                                      applicationActivities:nil];
avc.completionHandler = ^(NSString *activityType, BOOL completed) {
    // ...
};
UIPopoverController* pop =
    [[UIPopoverController alloc] initWithContentViewController:avc];
self.currentPop = pop;
[pop presentPopoverFromBarButtonItem:sender
    permittedArrowDirections:UIPopoverArrowDirectionAny animated:YES];
pop.passthroughViews = nil;
There is no Cancel button in the popover presentation of the activity view; the user cancels by tapping outside the popover. If you set a delegate for the UIPopoverController, it will be sent popoverControllerDidDismissPopover: if the user cancels, but not if the user proceeds to an activity (this feels like a bug).
The activity view is populated automatically with known system-wide activities that can handle any of the types of data you provided as activity items. These activities represent UIActivity types, and are designated by constants:
-
UIActivityTypePostToFacebook -
UIActivityTypePostToTwitter -
UIActivityTypePostToWeibo -
UIActivityTypeMessage -
UIActivityTypeMail -
UIActivityTypePrint -
UIActivityTypeCopyToPasteboard -
UIActivityTypeAssignToContact -
UIActivityTypeSaveToCameraRoll
Consult the UIActivity class documentation to learn what types of activity item each of these activities can handle. For example, the UIActivityTypeMail activity will accept an NSString, a UIImage, or a file on disk (such as an image file) designated by an NSURL; it will present a mail composition interface with the activity item in the body of the email.
Since the default is to include all the system-wide activities that can handle the provided data, if you don’t want a certain system-wide activity included in the activity view, you must exclude it explicitly. You do this by setting the UIActivityViewController’s excludedActivityTypes property to an NSArray of any or all of the activity type constants.
The purpose of the applicationActivities: parameter of initWithActivityItems:applicationActivities: is for you to list any additional activities implemented by your own app, so that their icons will appear as choices in the activity view as well. Each activity will be an instance of one of your own UIActivity subclasses.
To illustrate, I’ll create a minimal (and nonsensical) activity called Be Cool that accepts NSString activity items. It is a UIActivity subclass called MyCoolActivity. So, to include Be Cool among the choices presented to the user by a UIActivityViewController, I’d say:
UIActivityViewController* avc =
    [[UIActivityViewController alloc]
        initWithActivityItems:@[myCoolString]
        applicationActivities:@[[MyCoolActivity new]]];
Now let’s implement MyCoolActivity. It has an NSArray property called items, for reasons that will be apparent in a moment. We need to arm ourselves with an image to represent this activity in the activity view; this must be a transparency mask, meaning that colors will be ignored — all that matters is the transparency of the various parts of the image — and should be no larger than 43×43 (55×55 on iPad). It can be smaller, and it needn’t be square, as it will be centered in the activity icon automatically.
Here’s the preparatory part of the implementation of MyCoolActivity:
-(NSString *)activityType {
    return @"com.neuburg.matt.coolActivity"; // make up your own unique string
}

-(NSString *)activityTitle {
    return @"Be Cool";
}

-(UIImage *)activityImage {
    return self.image; // prepared beforehand
}

-(BOOL)canPerformWithActivityItems:(NSArray *)activityItems {
    for (id obj in activityItems) {
        if ([obj isKindOfClass: [NSString class]])
            return YES;
    }
    return NO;
}

-(void)prepareWithActivityItems:(NSArray *)activityItems {
    self.items = activityItems;
}
None of these methods actually asks us to perform the activity in question; we haven’t yet reached that phase. If we return YES from canPerformWithActivityItems:, then an icon for this activity, labeled Be Cool and displaying our activityImage, will appear in the activity view. If the user taps our icon, prepareWithActivityItems: will be called. We retain the activityItems into a property, because they won’t be arriving again when we are actually told to perform the activity.
To perform the activity, we implement one of two methods:
-
performActivity - We simply perform the activity directly, using the activity items we’ve already retained. If the activity is time-consuming, the activity should be performed on a background thread (Chapter 38) so that we can return immediately; the activity view interface will be taken down and the user will be able to go on interacting with the app.
-
activityViewController - We have further interface that we’d like to show the user as part of the activity, so we return a UIViewController subclass. The activity view mechanism will present this UIViewController for us in place of the activity view; it is not our job to present or dismiss it. (We may, however, present or dismiss dependent interface. For example, if our UIViewController is a navigation controller with a custom root view controller, we might push another view controller onto its stack while the user is working on the activity.)
No matter which of these two methods we implement, we must eventually call this activity instance’s activityDidFinish:. This is the signal to the activity view mechanism that the activity is over. If the activity view mechanism is still presenting any interface, it will be taken down, and the argument we supply here, a BOOL signifying whether the activity completed successfully, will be passed into the block we supplied earlier as the activity view controller’s completionHandler. So, for example:
-(void)performActivity {
    // ... do something with self.items here ...
    [self activityDidFinish:YES];
}
If you’re supplying your own view controller from activityViewController, you’ll want to hand it a reference to self before returning it, so that the view controller can call its activityDidFinish: when the time comes. For example, suppose our activity involves letting the user draw a mustache on a photo of someone. Our view controller will provide interface for doing that, including some way of letting the user signal completion, such as a Cancel button and a Done button. When the user taps either of those, we’ll do whatever else is necessary (such as saving the altered photo somewhere if the user tapped Done) and then call activityDidFinish:. Thus, we could implement activityViewController like this:
-(UIViewController *)activityViewController {
    MustacheViewController* mvc = [MustacheViewController new];
    mvc.activity = self;
    mvc.items = self.items;
    return mvc;
}
And then MustacheViewController would have code like this:
- (IBAction)doCancel:(id)sender {
    [self.activity activityDidFinish:NO];

}
- (IBAction)doDone:(id)sender {
    [self.activity activityDidFinish:YES];

}
Unfortunately, I haven’t been able to get activityViewController to work properly on the iPad; the view controller is presented fullscreen (contrary to the documentation) and is never dismissed, and logging proves that there are all kinds of memory management issues behind the scenes. This seems to be a major bug. However, it works fine on the iPhone.