Xcode is the application used to develop an iOS app. An Xcode project is the source for an app; it’s the entire collection of files and settings needed to construct the app. To create, develop, and maintain an app, you must know how to manipulate and navigate an Xcode project. So you must know something about Xcode, and you must know something about the nature and structure of Xcode projects and how Xcode shows them to you. That’s the subject of this chapter.
Note
The term “Xcode” is actually used in two ways. It’s the name for the entire suite of developer tools — the Xcode tools — and it’s the name of one application within that suite, the application in which you edit and build your app. This ambiguity should generally present little difficulty.
Xcode is a powerful, complex, and extremely large program. My approach in introducing Xcode is to suggest that you adopt a kind of deliberate tunnel vision: if you don’t understand something, don’t worry about it — don’t even look at it, and don’t touch it, because you might change something important. Our survey of Xcode will chart a safe, restricted, and essential path, focusing on aspects of Xcode that you most need to understand immediately, and resolutely ignoring everything else.
For full information, study Apple’s own documentation (choose Help → Xcode Help); it may seem overwhelming at first, but what you need to know is probably in there somewhere. There are also entire books devoted to describing and explaining Xcode.
Note
The structure of the Xcode installation changed starting with Xcode 4.3. The Developer folder in Xcode 4.2 and before was a top-level install folder. In Xcode 4.3 and later, the Developer folder is inside the Xcode application bundle itself, Xcode.app/Contents/Developer. When I say /Developer, this is the folder I’m referring to.
Even before you’ve written any code, an Xcode project is quite elaborate. To see this, let’s make a new, essentially “empty” project; you’ll see instantly that it isn’t empty at all.
- Start up Xcode and choose File → New → Project.
-
The “Choose a template” dialog appears. The template is your project’s initial set of files and settings. When you pick a template, you’re really picking an existing folder full of files; basically, it will be one of the folders inside /Developer/Platforms/iPhoneOS.platform/Developer/Library/Xcode/Templates/Project Templates/Application. This template folder will essentially be copied, and a few values will be filled in, in order to create your project.
So, in this case, on the left, under iOS (not Mac OS X!), choose Application. On the right, select Single View Application. Click Next.
-
You are now asked to provide a name for your project (Product Name). Let’s call our new project Empty Window.
In a real project, you should give some thought to the project’s name, as you’re going to be living in close quarters with it. As Xcode copies the template folder, it’s going to use the project’s name to “fill in the blank” in several places, including some filenames and some settings, such as the name of the app. Thus, whatever you type at this moment is something you’ll be seeing in a lot of places throughout your project. I’ll talk at the end of this chapter about how to change an existing project’s name.
It’s fine to use spaces in a project name. Spaces are legal in the folder name, the project name, the app name, and the various names of files that Xcode will generate automatically; and in the few places where spaces are problematic (such as the bundle identifier, discussed in the next paragraph), the name you type as the Product Name will have its spaces converted to hyphens.
-
Note the Company Identifier field. The first time you create a project, this field will be blank, and you should fill it in. The goal here is to create a unique string (unique to you personally); your app’s bundle identifier, which is shown in gray below the company identifier, will consist of the company identifier plus a version of the project’s name, and because every project should have a unique name, the bundle identifier will also be unique and will thus uniquely identify this project along with the app that it produces and everything else connected with it. The convention is to start the company identifier with
com.and to follow it with a string (possibly with multiple dot-components) that no one else is likely to use. For example, I usecom.neuburg.matt. - Make sure the Devices pop-up menu is set to iPhone. Make sure that Use Automatic Reference Counting is checked but that the other two checkboxes are unchecked. (Ignore the Class Prefix field for now; it should be empty, with its default value “XYZ” shown in gray.) Click Next.
-
You’ve now told Xcode how to construct your project. Basically, it’s going to copy the Single View Application.xctemplate folder from within the Project Templates/Application folder I mentioned earlier. But you need to tell it where to copy this template folder to. That’s why Xcode is now presenting a Save dialog. You are to specify the location of a folder that is about to be created — a folder that will be the project folder for this project.
The project folder can go just about anywhere, and you can move it after creating it. I usually create new projects on the Desktop.
- Xcode also offers to create a git repository for your project. In real life, this can be a great convenience (see Chapter 9), but for now, uncheck that checkbox. Click Create.
- The Empty Window project folder is created on disk (on the Desktop, if that’s the location you just specified), and the project window for the Empty Window project opens in Xcode.
The project we’ve just created is a working project; it really does build an iOS app called Empty Window. To see this, make sure that the Scheme pop-up menu in the project window’s toolbar reads Empty Window → iPhone 6.0 Simulator (though the exact system version number might be different), and choose Product → Run. After some delay, the iOS Simulator application eventually opens and displays your app running — an empty gray screen.
Note
To build a project is to compile its code and assemble the compiled code, together with various resources, into the actual app. Typically, if you want to know whether your code compiles and your project is consistently and correctly constructed, you’ll build the project (Product → Build). To run a project is to launch the built app, in the Simulator or on a connected device; if you want to know whether your code works as expected, you’ll run the project (Product → Run), which automatically builds first if necessary.
An Xcode project embodies a lot of information about what files constitute the project and how they are to be used when building the app, such as:
- The source files (your code) that are to be compiled
- Any resources, such as icons, images, or sound files, as well as nib and storyboard files, that are to be part of the app
- Any frameworks to which the code must be linked as the app is built
- All settings (instructions to the compiler, to the linker, and so on) that are to be obeyed as the app is built
Xcode presents this information in graphical form, and this is one reason why a project window is so elaborate, and why learning to navigate and understand it takes time. Also, this single window must let you access, edit, and navigate your code, as well as reporting the progress and results of such procedures as building or debugging an app. In short, the single project window displays a lot of information and embodies a lot of functionality. You won’t lose your way, however, if you just take a moment to explore this window and see how it is constructed.
Figure 6.1 shows the project window, configured in rather an extreme manner, so as to display as many parts of the window as possible. In real life, you’d probably never show all these parts of the window at the same time, except very briefly, unless you had a really big monitor.

- On the left is the Navigator pane. Show and hide it with View → Navigators → Show/Hide Navigator (Command-0) or with the first button in the View segmented control in the toolbar.
- In the middle is the Editor pane (or simply “editor”). This is the main area of a project window. A project window nearly always displays at least one Editor pane. I could have made this window display multiple Editor panes, but I was afraid that might make you run screaming from the room.
- On the right is the Utilities pane. Show and hide it with View → Utilities → Show/Hide Utilities (Command-Option-0) or with the third button in the View segmented control in the toolbar.
- At the bottom is the Debugger pane. Show and hide it with View → Show/Hide Debug Area (Shift-Command-Y) or with the second button in the View segmented control in the toolbar.
Note
All Xcode keyboard shortcuts can be customized; see the Key Bindings pane of the Preferences window. Keyboard shortcuts that I cite are the defaults.
The Navigator pane is the column of information at the left of the window. Among other things, it’s your primary mechanism for controlling what you see in the main area of the project window. An important general use pattern for Xcode is: you select something in the Navigator pane, and that thing is displayed in the main area (the editor) of the project window.
It is possible to toggle the visibility of the Navigator pane (View → Navigators → Hide/Show Navigator, or Command-0); for example, once you’ve used the Navigator pane to reach the item you want to see or work on in the editor, you might hide the Navigator pane temporarily to maximize your screen real estate (especially on a smaller monitor). You can change the Navigator pane’s width by dragging the vertical line at its right edge.
The Navigator pane itself can display seven different sets of information; thus, there are actually seven navigators. These are represented by the seven icons across its top; to switch among them, use these icons or their keyboard shortcuts (Command-1, Command-2, and so on). You will quickly become adept at switching to the navigator you want; their keyboard shortcuts will become second nature. If the Navigator pane is hidden, pressing a navigator’s keyboard shortcut both shows the Navigator pane and switches to that navigator.
Depending on your settings in the Behaviors pane of Xcode’s preferences, a navigator might show itself automatically when you perform a certain action. For example, by default, when you build your project, if warning messages or error messages are generated, the Issue navigator will appear. This automatic behavior will not prove troublesome, because it is generally precisely the behavior you want, and if it isn’t, you can change it; plus you can easily switch to a different navigator at any time.
Let’s begin experimenting immediately with the various navigators:
- Project navigator (Command-1)
-
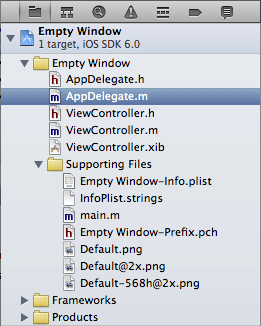
Click here for basic navigation through the files that constitute your project. For example, in the Empty Window folder (these folder-like things in the Project navigator are actually called groups), click AppDelegate.m to view its code in the editor (Figure 6.2).
At the top level of the Project navigator, with a blue Xcode icon, is the Empty Window project itself; click it to view the settings associated with your project and its targets. Don’t change anything here without knowing what you’re doing! I’ll talk later in this chapter about what these settings are for.
The filter bar at the bottom of the Project navigator lets you limit what files are shown; when there are many files, this is great for quickly reaching a file with a known name. For example, try typing “delegate” in the filter bar search field. Don’t forget to remove your filter when you’re done experimenting.
Warning
Once you’ve filtered a navigator, it stays filtered until you remove the filter — even if you close the project! A common mistake is to filter a navigator, forget that you’ve done so, fail to notice the filter (because you’re looking at the navigator itself, not down at the bottom where the filter bar is), and wonder, “Hey, where did all my files go?”
- Symbol navigator (Command-2)
-
A symbol is a name, typically the name of a class or method. Depending on which of the three icons in the filter bar at the bottom of the Symbol navigator you highlight, you can view Cocoa’s built-in symbols or the symbols defined in your project. The former can be a useful form of documentation; the latter can be helpful for navigating your code. For example, highlight the first two icons in the filter bar (the first two are dark-colored, the third is light), and see how quickly you can reach the definition of AppDelegate’s
applicationDidBecomeActive:method.Try highlighting the filter bar icons in various ways to see how the contents of the Symbol navigator change. Type in the search field in the filter bar to limit what appears in the Symbol navigator; for example, try typing “active” in the search field, and see what happens.
- Search navigator (Command-3)
-
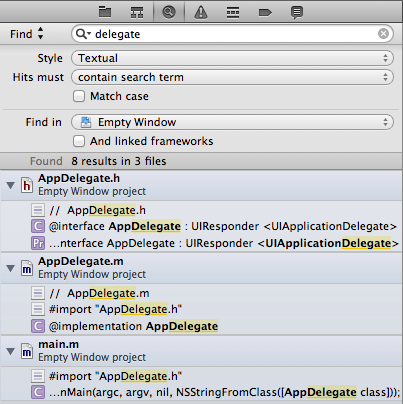
This is a powerful search facility for finding text globally in your project, and even in the headers of Cocoa frameworks. You can also summon the Search navigator with Edit → Find → Find in Workspace (Shift-Command-F). To access the full set of options, click the magnifying glass and choose Show Find Options. For example, try searching for “delegate” (Figure 6.3). Click a search result to jump to it in your code.
You can type in the other search field, the one in the filter bar at the bottom, to limit further which search results are displayed. (I’m going to stop calling your attention to the filter bar now, but every navigator has it in some form.)
- Issue navigator (Command-4)
-
You’ll need this navigator primarily when your code has issues. This doesn’t refer to emotional instability; it’s Xcode’s term for warning and error messages emitted when you build your project.
To see the Issue navigator in action, you’ll need to give your code an issue. For example, navigate (as you already know how to do, in at least three different ways) to the file AppDelegate.m, and in the blank line after the last comment at the top of the file’s contents, above the
#importline, typehowdy. Build (Command-B), saving if you’re prompted to. The Issue navigator will display numerous error messages, showing that the compiler is totally unable to cope with this illegal word appearing in an illegal place. Click an issue to see it within its file. In your code, issue “balloons” may appear to the right of lines containing issues; if you’re distracted or hampered by these, toggle their visibility with Editor → Issues → Hide/Show All Issues (Control-Command-M).Now that you’ve made Xcode miserable, select “howdy” and delete it; build again, and your issues will be gone. If only real life were this easy!
- Debug navigator (Command-5)
-
By default, this navigator will appear when your code is paused while you’re debugging it. There is not a strong distinction in Xcode between running and debugging; the milieu is the same. The difference is mostly a matter of whether breakpoints are obeyed (more about that, and about debugging in general, in Chapter 9). If your code runs and doesn’t pause, the Debug navigator by default won’t come into play.
To see the Debug navigator in action, you’ll need to give your code a breakpoint. Navigate once more to the file AppDelegate.m, select in the line that says
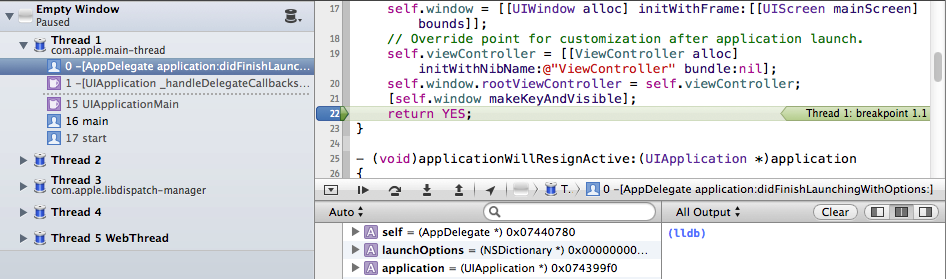
return YES, and choose Product → Debug → Add Breakpoint at Current Line to make a blue breakpoint arrow appear on that line. Run the project. (If the project is already running, the Stop dialog may appear; click Stop to terminate the current run and begin a new one.) By default, as the breakpoint is encountered, the Navigator pane switches to the Debug navigator, and the Debug pane appears at the bottom of the window.This overall layout (Figure 6.4) will rapidly become familiar as you debug your projects. The Debug navigator displays the call stack, with the names of the nested methods in which the pause occurs; as you would expect, you can click on a method name to navigate to it. You can shorten or lengthen the list with the slider at the bottom of the navigator. The Debug pane, which can be shown or hidden at will (View → Debug Area → Hide/Show Debug Area, or Shift-Command-Y), consists of two subpanes — the variables list and the console. Either of these can be hidden using the segmented control at the top right of the pane. The console can also be summoned by choosing View → Debug Area → Activate Console.
- On the left, the variables list is populated with the variables in scope for the selected method in the call stack (and you can optionally display processor registers as well).
- On the right is the console, where the debugger displays text messages; that’s how you learn of exceptions thrown by your running app. Exceptions are extremely important to know about, and this is your only way to know about them, so keep an eye on the console as your app runs. You can also use the console to communicate via text with the debugger. This can often be a better way to explore variable values during a pause than the variables list.
- Breakpoint navigator (Command-6)
- This navigator lists all your breakpoints. At the moment you’ve only one, but when you’re actively debugging a large project with many breakpoints, you’ll be glad of this navigator. Also, this is where you create special breakpoints (such as symbolic breakpoints), and in general it’s your center for managing existing breakpoints. We’ll return to this topic in Chapter 9.
- Log navigator (Command-7)
-
This navigator lists your recent major actions, such as building or running (debugging) your project. Click on a listing to see the log file generated when you performed that action. The log file might contain information that isn’t displayed in any other way, and also it lets you dredge up messages from the recent past (“What was that exception I got while debugging a moment ago?”).
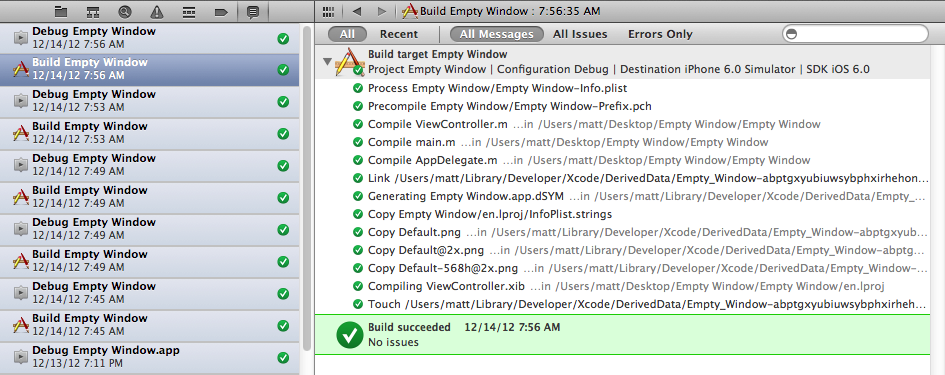
For example, by clicking on the listing for a successful build, and by choosing to display All and All Messages using the filter switches at the top of the log, we can see the steps by which a build takes place (Figure 6.5). To reveal the full text of a step, click on that step and then click the Expand Transcript button that appears at the far right (and see also the menu items in the Editor menu).
When navigating by clicking in the Navigator pane, modifications to your click can determine where navigation takes place. By default, Option-click navigates in an assistant pane (discussed later in this chapter), double-click navigates by opening a new window, and Shift-Option-click summons the navigation window, a little heads-up pane where you can specify where to navigate (a new window, a new tab, or a new assistant pane). For the settings that govern these click modifications, see the General pane of Xcode’s preferences.
The Utilities pane is the column at the right of the project window. It contains inspectors that provide information about the current selection or its settings; in some cases, these inspectors let you change those settings. It also contains libraries that function as a source of objects you may need while editing your project. The Utilities pane’s importance emerges mostly when you’re working in the nib editor (Chapter 7). But it can also be useful while editing code, because Quick Help, a form of documentation (Chapter 8), is displayed here as well, plus the Utilities pane is the source of code snippets (Chapter 9). To toggle the visibility of the Utilities pane, choose View → Utilities → Hide/Show Utilities (Command-Option-0). You can change the Utilities pane’s width by dragging the vertical line at its left edge.
Many individual inspectors and libraries are discussed in subsequent chapters. Here, I’ll just describe the overall physical characteristics of the Utilities pane.
The Utilities pane consists of a set of palettes. Actually, there are so many of these palettes that they are clumped into multiple sets, divided into two major groups: the top half of the pane and the bottom half of the pane. You can change the relative heights of these two halves by dragging the horizontal line that separates them.
- The top half
-
What appears in the top half of the Utilities pane depends on what’s selected in the current editor. There are two main cases:
- A code file is being edited
- The top half of the Utilities pane shows either the File inspector or Quick Help. Toggle between them with the icons at the top of this half of the Utilities pane, or with their keyboard shortcuts (Command-Option-1, Command-Option-2). The File inspector is rarely needed, but Quick Help can be useful as documentation. The File inspector consists of multiple sections, each of which can be expanded or collapsed by clicking its header.
- A nib or storyboard file is being edited
- The top half of the Utilities pane shows, in addition to the File inspector and Quick Help, the Identity inspector (Command-Option-3), the Attributes inspector (Command-Option-4), the Size inspector (Command-Option-5), and the Connections inspector (Command-Option-6). Like the File inspector, these can consist of multiple sections, each of which can be expanded or collapsed by clicking its header.
- The bottom half
-
The bottom half of the Utilities pane shows one of four libraries. Toggle between them with the icons at the top of this half of the Utilities pane, or with their keyboard shortcuts. They are the File Template library (Command-Option-Control-1), the Code Snippet library (Command-Option-Control-2), the Object library (Command-Option-Control-3), and the Media library (Command-Option-Control-4). The Object library is the most important; you’ll use it heavily when editing a nib or storyboard.
To see a help pop-up describing the currently selected item in a library, press Spacebar.
In the middle of the project window is the editor. This is where you get actual work done, reading and writing your code (Chapter 9), or designing your interface in a nib or storyboard file (Chapter 7). The editor is the core of the project window. You can eliminate the Navigator pane, the Utilities pane, and the Debug pane, but there is no such thing as a project window without an editor (though you can cover the editor completely with the Debug pane).
The editor provides its own form of navigation, the jump bar across the top. Not only does the jump bar show you hierarchically what file is currently being edited, but also it allows you to switch to a different file. In particular, each path component in the jump bar is also a pop-up menu. These pop-up menus can be summoned by clicking on a path component, or by using keyboard shortcuts (shown in the second section of the View → Standard Editor submenu). For example, Control-4 summons a hierarchical pop-up menu, which can be navigated entirely with the keyboard, allowing you to choose a different file in your project to edit. Moreover, each pop-up menu in the jump bar also has a filter field; to see it, summon a pop-up menu from the jump bar and start typing. Thus you can navigate your project even if the Project navigator isn’t showing.
It is extremely likely, as you develop a project, that you’ll want to edit more than one file simultaneously, or obtain multiple views of a single file so that you can edit two areas of it simultaneously. This can be achieved in three ways: assistants, tabs, and secondary windows.
- Assistants
-
You can split the editor into multiple editors by summoning an assistant pane. To do so, click the second button in the Editor segmented control in the toolbar, or choose View → Assistant Editor → Show Assistant Editor (Command-Option-Return). Also, by default, adding the Option key to navigation opens an assistant pane; for example, Option-click in the Navigator pane, or Option-choose in the jump bar, to navigate by opening an assistant pane (or to navigate in an existing assistant pane if there is one). To remove the assistant pane, click the first button in the Editor segmented control in the toolbar, or choose View → Standard Editor → Show Standard Editor (Command-Return), or click the X button at the assistant pane’s top right.
Your first task will be to decide how you want multiple editor panes arranged with respect to one another. To do so, choose from the View → Assistant Editor submenu. I usually prefer All Editors Stacked Vertically, but it’s purely a matter of personal taste and convenience.
Once you’ve summoned an assistant pane, you can split it further into additional assistant panes. To do so, click the Plus button at the top right of an assistant pane. To dismiss an assistant pane, click the X button at its top right.
What makes an assistant pane an assistant, and not just a form of split-pane editing, is that it can bear a special relationship to the primary editor pane. The primary editor pane is the one whose contents, by default, are determined by what you click on in the Navigator pane; an assistant pane, meanwhile, can respond to what file is being edited in the primary editor pane by changing intelligently what file it (the assistant pane) is editing. This is called tracking.
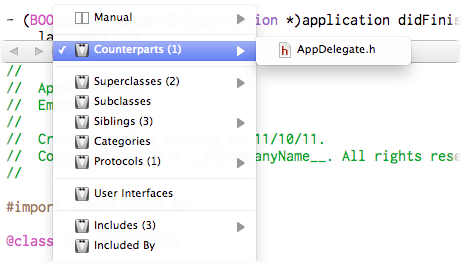
To see tracking in action, open a single assistant pane and set the first component in its jump bar to Counterparts (Figure 6.6). Now use the Project navigator to select AppDelegate.m; the primary editor pane displays this file, and the assistant automatically displays AppDelegate.h. Next, use the Project navigator to select AppDelegate.h; the primary editor pane displays this file, and the assistant automatically displays AppDelegate.m. There’s a lot of convenience and power lurking here, which you’ll explore as you need it.
- Tabs
- You can embody the entire project window interface as a tab. To do so, choose File → New → Tab (Command-T), revealing the tab bar (just below the toolbar) if it wasn’t showing already. Use of a tabbed interface will likely be familiar from applications such as Safari. You can switch between tabs by clicking on a tab, or with Command-Shift-}. At first, your new tab will look largely identical to the original window from which it was spawned. But now you can make changes in a tab — change what panes are showing or what file is being edited, for example — without affecting any other tabs. Thus you can get multiple views of your project. You can assign a descriptive name to a tab: double-click on a tab name to make it editable.
- Secondary windows
- A secondary project window is similar to a tab, but it appears as a separate window instead of a tab in the same window. To create one, choose File → New → Window (Command-Shift-T). Alternatively, you can promote a tab to be a window by dragging it right out of its current window. Or choose Navigate → Open In and navigate left in the resulting dialog until the dialog offers to make a new window.
There isn’t a strong difference between a tab and a secondary window; which you use, and for what, will be a matter of taste and convenience. I find that the advantage of a secondary window is that you can see it at the same time as the main window, and that it can be small. Thus, when I have a file I frequently want to refer to, I often spawn off a secondary window displaying that file, sized fairly small and without any panes other than the editor.
Now that you’re comfortable with the Xcode project window, you’re ready to explore the project and its constituents.
The first item in the Project navigator (Command-1) represents the project file on disk (in our new project, this is called Empty Window). Hierarchically dependent upon it are items that contribute to the building of the project (Figure 6.7).
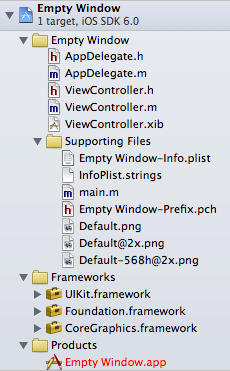
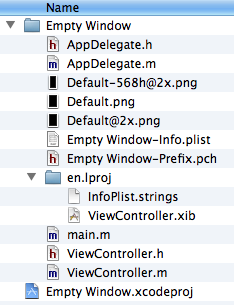
Many of these items, including the project file itself, correspond to items on disk in the project folder. To survey this correspondence, let’s examine the project folder in the Finder simultaneously with the Xcode project window. Select the project file listing in the Project navigator and choose File → Show in Finder.
The Finder displays the contents of your project folder (Figure 6.8). The most important of these is Empty Window.xcodeproj. This is the project file. All Xcode’s knowledge about your project — what files it consists of and how to build the project — is stored in this file.
Note
To open a project from the Finder, double-click the project file. This will launch Xcode if it isn’t already running.
Warning
Never, never, never touch anything in a project folder by way of the Finder, except for double-clicking the project file to open the project. Don’t put anything directly into a project folder. Don’t remove anything from a project folder. Don’t rename anything in a project folder. Don’t touch anything in a project folder! Do all your interaction with the project through the project window in Xcode. (When you’re an Xcode power user, you’ll know when you can disobey this rule. Until then, just obey it blindly and rigorously.)
The reason is that the project expects things in the project folder to be a certain way. If you make any alterations to the project folder directly in the Finder, behind the project’s back, you can upset those expectations and break the project. When you work in the project window, it is Xcode itself that makes any necessary changes in the project folder, and all will be well.
Consider now the groups and files shown in the Project navigator (Figure 6.7) as hierarchically dependent upon the project file, and how they correspond to reality on disk as portrayed in the Finder (Figure 6.8). (Recall that group is the technical term for the folder-like objects shown in the Project navigator.)
Observe that groups in the Project navigator don’t necessarily correspond to folders on disk in the Finder, and folders on disk in the Finder don’t necessarily correspond to groups in the Project navigator.
- The Empty Window group is, to some extent, real; it corresponds directly to the Empty Window folder on disk. If you were to create additional files (which, in real life, you would almost certainly do in the course of developing your project), you would likely put them in the Empty Window group in the Project navigator so that they’d be in the Empty Window folder on disk. (Doing so, however, is not a requirement; your files can live anywhere and your project will still work fine.)
- The Supporting Files group, on the other hand, corresponds to nothing on disk; it’s just a way of clumping some items together in the Project navigator, so that they can be located easily and can be shown or hidden together. The things inside this group are real, however; you can see that the four files Empty Window-Info.plist, InfoPlist.strings, Empty Window-Prefix.pch, and main.m, along with the three Default.png files, do exist on disk — they’re just not inside anything called Supporting Files. Rather, they’re at the top level of the Empty Window folder.
- Two files, InfoPlist.strings and ViewController.xib, appear in the Finder inside a folder called en.lproj, which doesn’t appear in the Project navigator. The folder en.lproj has to do with localization, which I’ll discuss in Chapter 9.
You may be tempted to find all this confusing. Don’t! Remember what I said about not involving yourself with the project folder on disk in the Finder. Keep your attention on the Project navigator, make your modifications to the project there, and all will be well.
By convention, as you add other files to your project that are not code but need to be copied into the app as it is built, such as sound and image files, you would usually put them into yet another group — probably, though not necessarily, a group inside the Empty Window group. You might call this group Resources. (I usually do.) And as your project grows further, you should feel free to create even more groups to help organize your files. To make a new group, choose File → New → Group. To rename a group, select it in the Project navigator and press Return to make the name editable.
When I say “feel free,” I mean it. You want navigating your project to be easy and intuitive. That’s what groups are for. They are just ways of making the Project navigator work well for you. As we’ve seen, they don’t necessarily affect how the actual files are stored on disk. Even more important, they don’t affect how the app is built. It is not the placement of files in groups or in the Finder that causes them to be built into the app; it’s their inclusion in the appropriate target build phase, as I’ll explain later in this chapter.
The things in the Frameworks group and the Products group don’t correspond to anything in the project folder, but they do correspond to real things that the project needs to know about in order to build and run:
- Frameworks
- This group, by convention, lists frameworks (Cocoa code) on which your code depends. Frameworks exist on disk, but they are not built into your app when it is constructed; they don’t have to be, because they are present also on the target device (an iPhone, iPod touch, or iPad). Instead, the frameworks are linked to the app, meaning that the app knows about them and expects to find them on the device when it runs. Thus, all the framework code is omitted from the app itself, saving considerable space.
- Products
- This group, by convention, holds an automatically generated reference to the built app.
A target is a collection of parts along with rules and settings for how to build a product from them. It is a major determinant of how an app is built. Whenever you build, what you’re really building is a target.
Select the Empty Window project at the top of the Project navigator, and you’ll see two things on the left side of the editor: the project itself, and a list of your targets. In this case, there is only one target, called Empty Window (just like the project itself). But there could be more than one target, under certain circumstances. For example, you might want to write an app that can be built as an iPhone app or as an iPad app — two different apps that share a lot of the same code. So you might want one project containing two targets.
If you select the project in the left side of the editor, you edit the project. If you select the target in the left side of the editor, you edit the target. I’ll use those expressions a lot in later instructions.
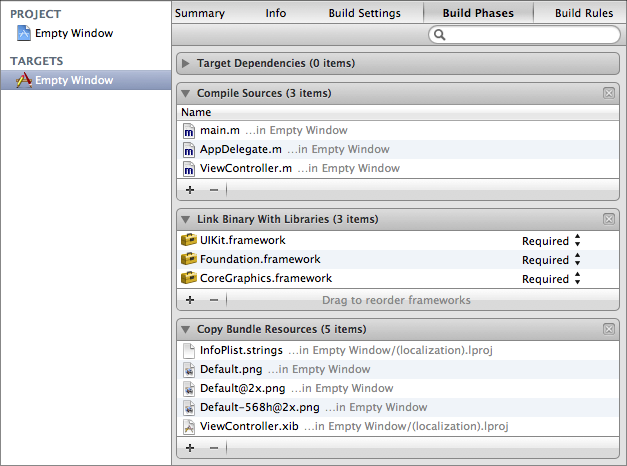
Edit the target and click Build Phases at the top of the editor (Figure 6.9). These are the stages by which your app is built. By default, there are three of them with content — Compile Sources, Link Binary With Libraries, and Copy Bundle Resources — and those are the only stages you’ll usually need, though you can add others. The build phases are both a report to you on how the target will be built and a set of instructions to Xcode on how to build the target; if you change the build phases, you change the build process.
The meanings of the three build phases are pretty straightforward:
- Compile Sources
- Certain files (your code) are compiled, and the resulting compiled code is copied into the app.
- Link Binary With Libraries
- Certain libraries, usually frameworks, are linked to the compiled code (now referred to as the binary), so that it will expect them to be present on the device when the app runs.
- Copy Bundle Resources
- Certain files are copied into the app, so that your code or the system can find them there when the app runs. For example, if your app had an icon, it would need to be copied into the app so the device could find and display it.
By opening the build phases in the editor, you can see the files to which each phase applies. The first phase, Compile Sources, presently compiles three files (main.m, AppDelegate.m, and ViewController.m). The second phase, Link Binary With Libraries, presently links three libraries (frameworks). The third phase, Copy Bundle Resources, presently copies five files — InfoPlist.strings, ViewController.xib (a nib file), and three .png files that supply a default image of your app as it launches, as explained in Chapter 9.
You can alter these lists. If something in your project was not in Copy Bundle Resources and you wanted it copied into the app during the build process, you would drag it from the Project navigator into the Copy Bundle Resources list, or (easier) click the Plus button beneath the Copy Bundle Resources list to get a helpful dialog listing everything in your project. If something in your project was in Copy Bundle Resources and you didn’t want it copied in the app, you would delete it from the list; this would not delete it from your project, from the Project navigator, or from the Finder, but only from the list of things to be copied into your app.
Build phases are only one aspect of how a target knows how to build the app. The other aspect is build settings. To see them, edit the target and click Build Settings at the top of the editor (Figure 6.10). Here you’ll find a long list of settings, most of which you’ll never touch. But Xcode examines this list in order to know what to do at various stages of the build process. Build settings are the reason your project compiles and builds the way it does.
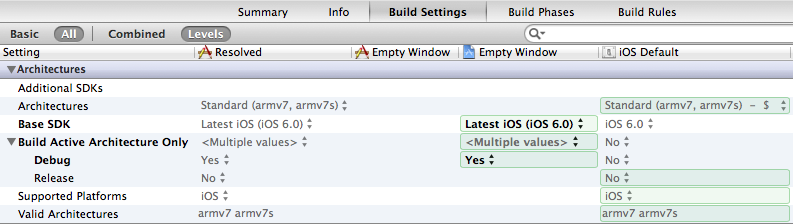
You can determine what build settings are displayed by clicking Basic or All. The settings are combined into categories, and you can close or open each category heading to save room. If you know something about a setting you want to see, such as its name, you can use the search field at the top right to filter what settings are shown.
You can determine how build settings are displayed by clicking Combined or Levels; in Figure 6.10, I’ve clicked Levels, in order to discuss what levels are. It turns out that not only does a target contain values for the build settings, but the project also contains values for the same build settings; furthermore, Xcode has certain built-in default build setting values. The Levels display shows all of these levels at once, so you can understand the derivation of the actual values used for every build setting.
To understand the chart, read from right to left. For example, the iOS default for the Build Active Architecture Only setting’s Debug configuration (far right) is No. But then the project comes along (second column from the right) and sets it to Yes. The target (third column from the right) doesn’t change that setting, so the result (fourth column from the right) is that the setting resolves to Yes.
If you wanted to change this value, you could, here and now. You could change the value at the project level or at the target level. I’m not suggesting that you should do so; indeed, you will rarely have occasion to manipulate build settings directly, as the defaults are usually acceptable. Nevertheless, you can change build setting values, and this is where you would do so. For details on what the various build settings are, consult Apple’s documentation, especially the Xcode Build Setting Reference. Also, you can select a build setting and show Quick Help in the Utilities pane to learn more about it.
There are actually multiple lists of build setting values — though only one such list applies when a build is performed. Each such list is called a configuration. Multiple configurations are needed because you build in different ways at different times for different purposes, and thus you’ll want certain build settings to take on different values under different circumstances.
By default, there are two configurations:
- Debug
- This configuration is used throughout the development process, as you write and run your app.
- Release
- This configuration is used for late-stage testing, when you want to check performance on a device.
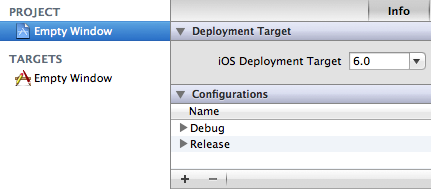
Configurations exist at all because the project says so. To see where the project says so, edit the project and click Info at the top of the editor (Figure 6.11). Note that these configurations are just names. You can make additional configurations, and when you do, you’re just adding to a list of names. The importance of configurations emerges only when those names are coupled with build setting values. Configurations can affect build setting values both at the project level and at the target level.
For example, return to the target build settings (Figure 6.10) and type “Optim” into the search field. Now you can look at the Optimization Level build setting. The Debug configuration value for Optimization Level is None: while you’re developing your app, you build with the Debug configuration, so your code is just compiled line by line in a straightforward way. The Release configuration value for Optimization Level is Fastest, Smallest; when your app is ready to ship, you build it with the Release configuration, so the resulting binary is faster and smaller, which is great for your users installing and running the app on a device, but would be no good while you’re developing the app because breakpoints and stepping in the debugger wouldn’t work properly.
So far, I have said that there are configurations, and I have explained that you may need to switch between configurations in order to get the build setting values appropriate for your current purpose. But I have not said how the configuration is determined as you actually build. It’s determined by a scheme.
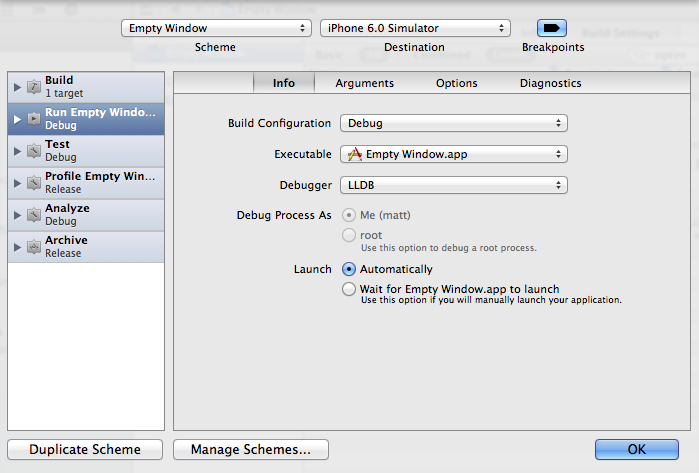
A scheme unites a target (or multiple targets) with a build configuration, with respect to the purpose for which you’re building. A new project comes by default with a single scheme, named after the project’s single target. Thus the Empty Window project’s single scheme is currently called Empty Window. To see it, choose Product → Edit Scheme. The scheme editor dialog opens. Make sure that Info at the top of the dialog is selected.
On the left side of the scheme editor are listed various actions you might perform from the Product menu. Click an action to see its corresponding settings in this scheme. The first action, the Build action, is different from the other actions, because it is common to all of them (the other actions all implicitly involve building); thus the Build action merely determines what target(s) will be built when each of the other actions is performed, and for our simple project this is trivial, because we’ve only one target and we always need it built. So, now consider the Run action.
When you click the Run action at the left, the editor displays the settings that will be used when you build and run (Figure 6.12). As you can see, the Build Configuration pop-up menu is set to Debug. That explains where the current build configuration comes from. At the moment, whenever you build and run, you’re using the Debug build configuration and the build setting values that correspond to it, because you’re using this scheme, and that’s what this scheme says to do when you build and run.
Now dismiss the scheme editor, and consider how you might proceed if you wanted to build and run using the Release build configuration. (The Debug build configuration settings may affect the behavior of the built app, so you want to test the app as an actual user would experience it.) One way would be to return to the scheme editor and change the build configuration for the Run action for this scheme. Xcode makes this convenient: hold the Option key as you choose Product → Run (or as you click the Run button in the toolbar). The scheme editor appears, containing a Run button. So now you can make any changes you like, such as setting the Build Configuration pop-up menu to Release for the Run action, and proceed directly to build and run the app by clicking Run.
(If you’re following along and you did make this change, open the scheme editor again and set the Build Configuration pop-up for the Run action in our Empty Window scheme back to Debug.)
On the other hand, if you were to find yourself often wanting to switch between building and running with the Debug configuration and building and running with the Release configuration, you might create a distinct, additional scheme that uses the Release debug configuration for the Run action. This is easy to do: in the scheme editor, click Duplicate Scheme. The name of the new scheme is editable; let’s call it Release. Change the Build Configuration pop-up for the Run action in our new scheme to Release, and dismiss the scheme editor.
Now you have two schemes, Empty Window (whose build configuration for running is Debug) and Release (whose build configuration for running is Release). To switch between them easily, you can use the Scheme pop-up menu in the project window toolbar (Figure 6.13) before you build and run.
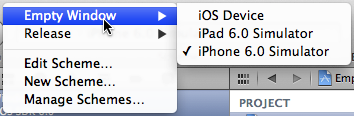
The Scheme pop-up menu lists each scheme, along with each destination on which you might run your built app. A destination is effectively a machine that can run your app. For example, you might want to run the app in the Simulator or on a physical device. There is no configuration of destinations; you are automatically assigned destinations, depending on what system your project is set to run on and what devices are connected to your computer.
Destinations and schemes have nothing to do with one another; your app is built the same way regardless of your chosen destination. The presence of destinations in the Scheme pop-up menu is intended as a convenience, allowing you to use this one pop-up menu to choose either a scheme or a destination, or both, in a single move. To switch easily among destinations without changing schemes, click near the right end of the Scheme pop-up menu. To switch among schemes, possibly also determining the destination (as shown in Figure 6.13), click near the left end of the Scheme pop-up menu. You can also switch among schemes or among destinations by using the scheme editor.
An app file is really a special kind of folder called a package (and a special kind of package called a bundle). The Finder normally disguises a package as a file and does not dive into it to reveal its contents to the user, but you can bypass this protection and investigate an app bundle with the Show Package Contents command. By doing so, you can study the internal structure of your built app bundle.
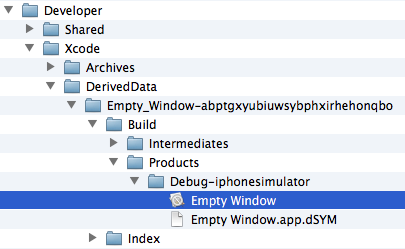
We’ll use the Empty Window app that we built earlier as a sample minimal app to investigate. You’ll have to locate it in the Finder; by default, it should be somewhere in your user Library/Developer/Xcode/DerivedData folder, as shown in Figure 6.14. (If you’re using Mountain Lion, I presume you know how to reveal the user Library directory. In theory, you should be able to select the app under Products in Xcode’s Navigation pane and choose File → Show in Finder, but there seems to be a long-standing bug preventing this.)
In the Finder, Control-click the Empty Window app, and choose Show Package Contents from the contextual menu.
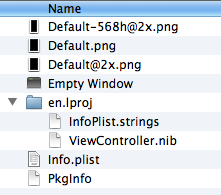
Looking inside our minimal app bundle (Figure 6.15), we see that it contains these files:
- Default.png and friends
- The three launch image files have been copied to the top level of the bundle, where they can be found for display at launch time.
- Empty Window
-
Our app’s compiled code (the binary). When the app is launched, the binary is linked to the various frameworks, and the code begins to run (starting with the entry point in the
mainfunction). - Info.plist
- A configuration file in a strict text format (a property list file). It is derived from the project file Empty Window-Info.plist. It contains instructions to the system about how to treat and launch the app. For example, if our app had an icon, Info.plist would tell the system its name, so that the system could dive into the app bundle, find it, and display it. It also tells the system things like the name of the binary, so that the system can find it and launch the app correctly.
- PkgInfo
-
A tiny text file reading
APPL????, signifying the type and creator codes for this app. The PkgInfo file is something of a dinosaur; it isn’t really necessary for the functioning of an iOS app and is generated automatically. You’ll never need to touch it. - InfoPlist.strings
- A text file intended for text appearing in our Info.plist that might need to be translated into different languages. It is copied directly from InfoPlist.strings in the project. We haven’t edited this file, and our app currently appears only in English, so this file is of no interest at the moment (strings files are discussed in Chapter 9).
- ViewController.nib
- Our app’s only nib file. It contains instructions for generating the initial contents of our app’s main window (currently just a gray rectangle). It is created (“compiled”) from the ViewController.xib file in the project; a .xib file and a .nib file are different forms of the same thing.
In real life, an app bundle will contain more files, but the difference will mostly be one of degree, not kind. For example, our project might have additional nib files, icon image files, and image or sound files. All of these would make their way into the app bundle.
You are now in a position to appreciate, in a general sense, how the components of our project are treated and assembled into an app, and what responsibilities accrue to you, the programmer, in order to ensure that the app is built correctly. The rest of this chapter outlines what goes into the building of an app from a project.
We have already talked about how build settings are determined. Xcode itself, the project, and the target all contribute to the resolved build setting values, some of which may differ depending on the build configuration. Before building, you, the programmer, will have already specified a scheme; the scheme determines the build configuration, the specific set of build setting values that will apply as this build proceeds.
Your project contains a property list file that will be used to generate the built app’s Info.plist file. The target knows what file it is because it is specified in the Info.plist File build setting. For example, in our project, the value of the Info.plist File build setting has been set automatically to Empty Window/Empty Window-Info.plist. (Take a look at the build settings and see!)
Note
Because the name of the file in your project from which the built app’s Info.plist file is generated will vary, depending on the name of the project, I’ll refer to it generically as the project’s Info.plist.
The property list file is a collection of key–value pairs. You can edit it, and you may well need to do so. There are two main ways to edit your project’s Info.plist:
-
Select the Info.plist file in the Project navigator and edit in the editor. By default, the key names (and some of the values) are displayed descriptively, in terms of their functionality; for example, it says “Bundle name” instead of the actual key, which is
CFBundleName. But you can view the actual keys by choosing Editor → Show Raw Keys & Values (you might have to click in the editor to enable this menu item). - Edit the target, and click Info at the top of the editor. This pane shows effectively the same information as editing the Info.plist in the editor.
For a complete list of the possible keys and their meanings, see Apple’s document Information Property List Key Reference. I’ll talk more in Chapter 9 about property list settings that you’re particularly likely to edit.
Every app that you write is likely to have at least one nib file (.xib) or storyboard file (.storyboard), and possibly more.
You edit a nib file to describe graphically some objects that you want instantiated when the nib file loads (Chapter 5). By breaking your interface into multiple nib files, you simplify the relationship between each nib file and your code; also, if nibs that aren’t needed when your app launches aren’t loaded until they are needed, you speed up your app’s launch time, and you streamline your app’s memory usage (because nib objects are not instantiated until the nib is loaded, and can then be destroyed when they are no longer needed).
A storyboard file is like many nib files in one: in it, you describe graphically the various interfaces (called scenes) that you want to appear as the user works with your app. Just as with nib files, a storyboard scene is transformed into actual interface only when it is needed for display, and the memory needed to maintain that interface can be given back when that interface is no longer showing.
The target knows about your nib files and storyboard files because they appear in its Copy Bundle Resources build phase. In the case of a nib file in .xib format, the file is not merely copied into the app bundle; Xcode also translates (compiles) it into a smaller .nib file (using the ibtool tool). Similarly, Xcode translates (compiles) a .storyboard file into a smaller .storyboardc file in the built app (again, using the ibtool tool).
Nib files located inside your app bundle are typically loaded when they are needed as the app runs, usually because code tells them to load. If you elect to use a storyboard as the basis of your main interface, however, it will need to load before any code has a chance to do so. Such a storyboard file is called the main storyboard file.
This situation is handled through the Info.plist file; it contains a key “Main storyboard file base name” (UIMainStoryboardFile), and the system sees this and loads the designated storyboard file automatically as the app launches. (Instead of a main storyboard file, it is possible to have a main nib file that loads automatically when the app launches; this was the standard approach for apps created with Xcode 3.2.x and Xcode 4.0, but none of the current Xcode project templates exemplify this approach, so I don’t discuss it in this edition of the book.)
Note
A universal app — that is, an app that runs both on the iPad and on the iPhone — typically has nib files or storyboard files in pairs, one to be loaded on the iPad and the other to be loaded on the iPhone. Thus the app can have different basic interfaces on the two different types of device. Naming conventions and Info.plist keys allow the runtime to know which nib or storyboard to load depending on the device type. For example, a second Info.plist key, “Main storyboard file base name (iPad)” (UIMainStoryboardFile~ipad), specifies the storyboard file to be loaded at launch time on the iPad.
See Chapter 7 for more about editing nib files (and storyboard files) and how they create instances when your code runs. Full details on how nib files and storyboard files are loaded and why — in particular, their relationship to view controllers — appear in Chapter 19.
The three Default.png launch image files are examples of resource files. The target knows about them because they appear in its Copy Bundle Resources build phase. Such resources are copied more or less unchanged into the app bundle; I say “more or less” because it turns out that some files, such as .png files, may be optimized as they are copied when you build for a device.
In real life, you are likely to add further resources to your project, because you want your running app to be able to fetch them out of its bundle. For example, if your app needs to display a certain image, you’d add the image to your project and make sure it appears in the Copy Bundle Resources build phase. When the app runs, your code (or possibly the code implied by a loaded nib file) reaches into the app bundle, locates the image, and displays it (Chapter 15).
To add a resource to your project, start in the Project navigator and choose File → Add Files to Empty Window (or whatever the name of the project is). Alternatively, drag the resource from the Finder into the Project navigator. Either way, a dialog appears (Figure 6.16) containing a pane in which you make the following settings:
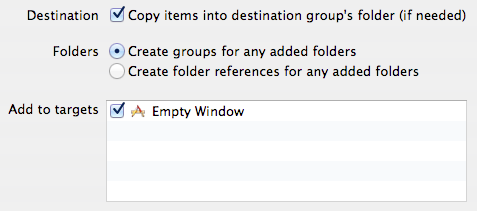
- Copy items into destination group’s folder (if needed)
- You should almost certainly check this checkbox. Doing so causes the resource to be copied into the project folder. If you leave this checkbox unchecked, your project will be relying on a file that’s outside the project folder and that you might delete or change unintentionally. Keeping everything your project needs inside the project folder is far safer.
- Folders
-
This choice matters only if what you’re adding to the project is a folder. In both cases, whether the folder is copied into the project folder depends on whether you checked the checkbox discussed in the previous paragraph; the difference is in how the project references the folder contents:
- Create groups for any added folders
- The folder is expressed as a group within the Project navigator, but its contents all appear individually in the Copy Bundle Resources build phase, so they will all be copied individually into the app bundle.
- Create folder references for any added folders
- The folder itself is shown in blue in the Project navigator and appears as a folder in the Copy Bundle Resources build phase; thus, the build process will copy the entire folder and its contents into the app bundle. This means that the resources inside the folder won’t be at the top level of the bundle, but in a subfolder of it. Such an arrangement can be valuable if you have many resources and you want to separate them into categories (rather than clumping them all at the top level of the app bundle) or if the folder hierarchy among resources is meaningful to your app.
- Add to Targets
- Checking this checkbox causes the resource to be added to the target’s Copy Bundle Resources build phase. Thus you will almost certainly want to check it; why else would you be adding this resource to the project? But if this checkbox is unchecked and you realize later that a resource listed in the Project navigator needs to be added to the Copy Bundle Resources build phase, you can add it manually, as I described earlier.
An alternative way to copy resources from your project into the app bundle while building is through a custom Copy Files build phase that you add to your target. To make one, edit the target, switch to Build Phases, and click Add Build Phase (at the lower right) and choose Add Copy Files. A Copy Files build phase appears; open its triangle, and you’ll find you can specify a custom path within the app bundle. For example, if you leave the Destination pop-up menu set to Resources and type “Pix” in the Subpath field, then any resources you add to this build phase will be copied into a folder called Pix in the app bundle.
A custom Copy Files build phase of this sort can be a good way of keeping resources organized by folder inside your app bundle; I frequently use it for this purpose. Bear in mind, however, that it is entirely up to you to make sure that the desired resources are placed inside the appropriate Copy Files build phase (and that they are not placed in the normal Copy Bundle Resources build phase, because if they are, you’ll end up with two copies of the resource in your app bundle).
Note
If you copy resources into a subfolder of your app bundle, either with a folder reference or a custom Copy Files build phase, your code may have to specify that subfolder in order to fetch the resource from inside the app bundle.
Code for two classes, AppDelegate and ViewController, was created for you when the project was created; the implementation files for these classes (AppDelegate.m and ViewController.m) appear in the target’s Compile Sources build phase. If you create any further class files, you’ll specify that they should be added to the target, and they too will then have their implementation files listed in the Compile Sources build phase. This (the contents of the Compile Sources build phase) is how your target knows what files to compile to create the app’s binary.
The binary that results from compilation of these files is your project’s executable, and is placed into the app bundle, with its name being by default the same as the name of the target.
The system is able to locate the executable inside the app bundle and launch the app because the app bundle’s Info.plist file has an “Executable file” key (CFBundleExecutable) whose value tells the system the name of the binary.
Besides the class code files you create (or that Xcode creates for you), your project contains a main.m file. This too is in the Compile Sources build phase; it had better be, because this file contains the all-important main function, the entry point to your app’s code! Here are the main function’s contents:
int main(int argc, char *argv[])
{
    @autoreleasepool {
        return UIApplicationMain(argc, argv, nil,
                                 NSStringFromClass([AppDelegate class]));
    }
}
The main function is very simple, but it’s crucial. It calls UIApplicationMain, which sets everything else in motion. UIApplicationMain is responsible for solving some tricky problems. As your app starts up, how will any of its code ever run? And how will its starting repertoire of instances ever be generated? UIApplicationMain takes care of these issues. First, your app is a C program, and a C program’s main function is always called, to start the program running; thus, UIApplicationMain will in fact be called. Then, UIApplicationMain does the following things:
-
It creates your very first instance — the shared application instance, subsequently accessible in code by calling
[UIApplication sharedApplication]. The third argument toUIApplicationMainspecifies, as a string, what class the shared application instance should be an instance of. If nil, which will usually be the case, the default class is UIApplication; but you can subclass UIApplication and specify that subclass here by substituting something like this (depending on what the subclass is called) as the third argument:NSStringFromClass([MyUIApplicationSubclass class])
-
Optionally, it also creates your second instance — the application instance’s delegate. Delegation is an important and pervasive Cocoa pattern, described in detail in Chapter 10, but for now let’s just say that it is crucial that every app you write have an app delegate instance. The fourth argument to
UIApplicationMainspecifies, as a string, what class the app delegate instance should be. If this class is specified, as here,UIApplicationMaininstantiates that class and ties that instance to the shared application instance as the latter’s delegate. If this class is not specified (the fourth argument is nil), it is up to you to provide a delegate instance in some other way; since you cannot do this sufficiently early in code, you would have to do it through the loading of the main nib file. (Before iOS 5 and Xcode 4.2, this was in fact the usual way in which the app delegate was instantiated; but Apple has subsequently changed the default pattern so that the app delegate is generated in code by the call toUIApplicationMain.) -
If the Info.plist file specifies a main storyboard file or main nib file,
UIApplicationMainloads it. (In the latter case, the nib file’s owner is the shared application instance.) -
An app delegate instance has now been generated, either because
UIApplicationMaininstantiated it directly in response to the value of its fourth argument, or becauseUIApplicationMainloaded a main nib file which instantiated it.UIApplicationMainnow turns to this app delegate instance and starts calling some of its code — in particular, it callsapplication:didFinishLaunchingWithOptions:, which is typically responsible, in turn, for displaying your app’s initial interface. (Starting in iOS 6, the sequence of calls to the app delegate’s code begins withapplication:willFinishLaunchingWithOptions:if it exists, as I’ll explain in Chapter 19). -
The app is now launched and visible to the user.
UIApplicationMainis still running (like Charlie on the M.T.A.,UIApplicationMainnever returns), and is now just sitting there, watching for the user to do something, maintaining the event loop, which will respond to user actions as they occur.
The call to UIApplicationMain is wrapped in some memory management functionality (the @autoreleasepool curly braces) that I’ll explain in Chapter 12.
Finally, notice the file Empty Window-Prefix.pch in the Project navigator. This is your project’s precompiled header file. It isn’t listed in the Compile Sources build phase because it is actually compiled before that build phase; the target knows about it because it is pointed to by the Prefix Header build setting.
The precompiled header is a device for making compilation go faster. It’s a header file; it is compiled once (or at least, very infrequently) and the results are cached (off in the DerivedData folder) and are implicitly imported by all your code files. So the precompiled header should consist primarily of #import directives for headers that never change (such as the built-in Cocoa headers); it is also a reasonable place to put #defines that will never change and that are to be shared by all your code, as I mentioned in Chapter 4.
The default precompiled header file imports <Foundation/Foundation.h> (the Core Foundation framework header) and <UIKit/UIKit.h> (the Cocoa framework). I’ll talk in the next section about what that means.
A framework is a library of compiled code used by your code. Most of the frameworks you are likely to use will be Apple’s built-in frameworks; they are built-in in the sense that they are part of the system on the device where your app will run — they live in /System/Library/Frameworks on the device, though you can’t tell that on an iPhone or iPad because there’s no way (normally) to view the file hierarchy directly.
However, your code needs to use these frameworks not only when running on a device but also when building on your computer. It also needs them when running in the Simulator. To make all this possible, part of the device’s system — in particular, the part containing its frameworks — is duplicated on your computer, in the Developer folder. This duplicated subset of the device’s system is called an SDK (for “software development kit”).
To use a framework in your code, you must do two things:
- Import the framework’s header
-
A framework has a header file, which provides (usually by importing other header files within the framework) the interface information about classes in that framework. Your code needs this information in order to compile successfully. You import the header with an appropriate
#importdirective. - Link to the framework
- A framework is a package; you must instruct the build system to associate this package with your app’s executable binary, so that your binary’s calls to code within that framework can be routed into the framework’s compiled code. This is necessary in order for your app to run successfully. Such an association is called linking the binary with the framework, and this association must be formed when building. You instruct the build system to do this by including the framework in the target’s Link Binary With Libraries build phase.
You might think that linkage is impossible because the framework that we ultimately want to use is off on a target device somewhere. But linkage is path-based, and the path is determined relative to the current SDK. When the app launches on the device, there is no SDK, and the path becomes absolute.
So, for example, the linkage to the UIKit framework uses the path System/Library/Frameworks/UIKit.framework. This path is relative to the current SDK. Thus:
- When we build for a device, we link to the System/Library/Frameworks/UIKit.framework inside the current SDK, which is /Developer/Platforms/iPhoneOS.platform/Developer/SDKs/iPhoneOS6.1.sdk.
- When we run on a device, there is no SDK, and the established linkage routes our code into the device’s top-level /System/Library/Frameworks/UIKit.framework.
By default, three frameworks are linked into your target:
- Foundation
- Many basic Cocoa classes, such as NSString and NSArray and others whose names begin with “NS,” are part of the Foundation framework. The Foundation framework is imported in the precompiled header file (and, by default, in the headers of new classes that you create). In turn, it imports the Core Foundation headers and loads the Core Foundation framework as a subframework; thus, there is no need for you to import or link explicitly to the Core Foundation framework (which is full of functions and pointer types whose names begin with “CF,” such as CFStringRef).
- UIKit
- Cocoa classes that are specialized for iOS, whose names begin with “UI,” are part of the UIKit framework. The UIKit framework is imported in the precompiled header file (and by class code files that constitute the app templates, such as AppDelegate.h).
- Core Graphics
- The Core Graphics framework defines many structs and functions connected with drawing, whose names begin with “CG.” It is imported by many UIKit headers, so you don’t need to import it explicitly.
You might find that the three default frameworks are sufficient to your needs, or you might find that you need other frameworks to provide additional functionality. How will you know that a class or function you want to use resides outside the three default frameworks? You might get a clue from its name, which won’t begin with “NS,” “UI,” or “CG”, but more often, if you’re like me, you’ll be alerted by banging up against the compiler.
For example, let’s say you’ve just found out about animation (Chapter 17) and you’re raring to try it in your app. So, in your code, you create a CABasicAnimation:
CABasicAnimation* anim = [CABasicAnimation animation];
The next time you try to build your app, the compiler complains that CABasicAnimation is undeclared (and that it therefore can’t make sense of anim either).
That’s when you realize you need to import a framework header. Near the start of the CABasicAnimation class documentation is a line announcing that it’s in QuartzCore.framework. You might guess (correctly) that the way to import the main Quartz Core framework header is to put this line near the start of your implementation file:
#import <QuartzCore/QuartzCore.h>
This works to quiet the compiler. Remember, though, that using a framework requires two things; we’ve done only one of them. So your code still doesn’t build. This time, you get a build error during the link phase of the build process complaining about _OBJC_CLASS_$_CABasicAnimation and saying, “Symbol(s) not found.” That mysterious-sounding error merely means that you’ve forgotten to link your target to the Quartz Core framework.
To link your target to a framework, edit the target, click Summary at the top of the editor, and scroll down to the Linked Frameworks and Libraries section. (This is the same information that appears which you click Build Phases at the top of the editor and open the Link Binary with Libraries build phase.) Click the Plus button at the left just below the frameworks. A dialog appears listing the existing frameworks that are part of the active SDK. Select QuartzCore.framework and click Add. The Quartz Core framework is added to the target’s Link Binary With Libraries build phase. (It also appears in the Project navigator; you might like to drag it manually into the Frameworks group, for the sake of neatness.) Now you can build (and run) your app.
You might wonder why the project isn’t linked by default to all the frameworks, so that you don’t have to go through this process every time you stray beyond the default three frameworks. It’s just a matter of time and resources. Importing headers increases the size of your code; linking to frameworks slows down your app’s launch time. You should link to only the frameworks needed for your code to run.
Where you import a framework header depends on how you intend to use it. It’s simply a matter of scope. If a framework’s classes are to be mentioned only within a single implementation file, then you can import it at the start of that implementation file. If you want to subclass one of the framework’s classes (or adopt one of its protocols, Chapter 10), you’ll need to import it at the start of the interface file that declares the subclass; in that case, every implementation file that imports this interface file imports the framework header, and there’s no need to import the framework header separately in the implementation file. Of course, for maximum scope, you can simply import the framework header in the precompiled header file, making that framework available throughout your code.