Knowledge is of two kinds. We know a subject ourselves, or we know where we can find information upon it.
You don't remember Cocoa; you look it up!
No aspect of Cocoa programming is more important than a fluid and nimble relationship with the documentation. There is a huge number of built-in classes, with many methods and properties and other details. Apple’s documentation, whatever its flaws, is the definitive official word on how you can expect Cocoa to behave and on the contractual rules incumbent upon you in working with this massive framework whose inner workings you cannot see directly.
The Xcode documentation installed on your machine comes in large chunks called documentation sets (or doc sets, also called libraries). You do not merely install a documentation set; you subscribe to it, so that when Apple releases a documentation update (because a new version of iOS has been released, or because there has been an incremental revision of the documentation), you can obtain the updated version.
When you first install Xcode, the bulk of the documentation is not installed on your machine; viewing the documentation in the documentation window (discussed in the next section) requires an Internet connection, so that you can see the online docs at Apple’s site. Therefore, you should start up Xcode immediately after installation to let it download and install your initial documentation sets. The process can be monitored, to some extent, in the Downloads pane of the Preferences window (under Documentation); you can also specify here whether you want updates installed automatically or whether you want to click Check and Install Now manually from time to time. This is also where you specify which doc sets you want; I believe that the iOS 6.1 Documentation Set and the Xcode 4.6 Developer Library are all you need for iOS development. You may have to provide your machine’s admin password when a doc set is first installed.
Your primary access to the documentation is in Xcode, through the Documentation tab of the Organizer window (Window → Organizer and then click Documentation, or Help → Documentation and API Reference). I’ll refer to this as the documentation window, even though it’s really an aspect of the Organizer window.
The documentation window behaves basically as a glorified web browser, because the documentation consists essentially of web pages. Indeed, most of the same pages can be accessed at Apple’s developer site, http://developer.apple.com. And any page open in the documentation window can be opened instead in your web browser: Control-click for the contextual menu and choose Open Page in Browser. Notice too the contextual menu for links within a documentation window, such as Copy Link and Open Link in Browser. When you’re trying to figure something out, the ability to spawn off a page as a secondary window in a browser while you go on searching in the Xcode documentation window can be very useful.
Each doc set has a home page, which you access from the Browse navigator (Editor → Explore Documentation) or from the first component of the jump bar. A typical home page presents a full list of documents, which can be sorted by column and filtered by keyword. Some home pages, such as the iOS 6.1 Documentation Set home page, also have a broad categorical list down the left side, which can similarly be used to filter the document list. In practice I rarely use these home pages, though they can come in handy when you’re looking for broad topic introductions (click Guides on the left). The Browse navigator (and the jump bar) can also be used to explore a doc set by category.
When you encounter a documentation page to which you’re likely to want to return, make it a bookmark (Editor → Add Bookmark). Bookmarks are accessed through the Bookmarks navigator (Editor → Documentation Bookmarks). Documentation bookmark management is simple but effective: you can rearrange bookmarks or delete a bookmark, and that’s all.
My chief way into the documentation — and, I suspect, most users’ chief way — is by searching (Editor → Search Documentation). Type a term into the search field (Help → Documentation and API Reference, Shift-Option-Command-?). Click the magnifying glass to choose Show Find Options if they aren’t showing. It’s important to set these options correctly:
- Hits must
- This pop-up menu determines how your search terms are understood. Your choices are “contain search term”, “start with search term”, and “match search term”. It’s good to be nimble about changing this setting as needed. For example, if you are typing the start of the name of a class you want to search for, do a “start with” search, not a “contain” search.
- Languages
- Check only those languages you’re likely to be interested in (probably Objective-C and C).
- Doc Sets
- Check only those doc sets that interest you; if you’re doing iOS development, for example, uncheck any Mac OS X libraries to eliminate inapplicable and duplicate results.
Enter a search term in the search field, and pause. Search results are displayed in categories, in relevance order, in the navigation pane; click a result to view that page. One would like to perform this move — from seeing a list of results in the navigation pane to viewing the page for one of those results — without using the mouse, but I haven’t discovered a reliable way to do that.
It’s important also to be able to switch nimbly from editing code to consulting the documentation on a term used in that code. Here are two ways:
- Select a term in the editor (or anywhere else that you can select text) and choose Help → Search Documentation for Selected Text (Control-Option-Command-/). This command switches to the documentation window and enters the selected term into the search field, performing the search using the current find options, in a single move.
-
Hold Option and hover the mouse over a likely term in code, until the cursor becomes a question mark (and the term turns blue with a dashed underline); then rapidly Option-double-click the term. This, in my opinion, is much the best way, because it bypasses the search field altogether and actually performs the search for the correct term in the correct class in the main documentation display.
You can perform the same move during code completion (Chapter 9): select one of the terms offered as a completion, and click the More link at the bottom of the pop-up menu.
Don’t confuse searching the documentation with finding within the current page. To find within the current documentation page, make sure the focus is within the page itself (probably by clicking in the page), and then use the Edit → Find menu commands. Command-F summons a find bar, as in Safari.
A major difference between the display of a documentation page in Xcode and the display of the same page as a web page at http://developer.apple.com is that the latter often shows a Table of Contents column at the left side. In Xcode, this Table of Contents column is suppressed, which saves space, but makes it harder to get a sense for where you are in a document or a set of related documents. The intention is presumably that you should use the jump bar both to get your bearings and to navigate, though personally I find this approach clumsy and frustrating.
In the vast majority of cases, your target documentation page will be the documentation for a class. I have frequently spoken already of the importance of class documentation pages. A common move on your part will be to search on a class name in the documentation window. If you search on, say, NSString, the search result whose title is NSString Class Reference is the class documentation for NSString.
Let’s pause to notice the key features of a class documentation page. I’ll use UIButton as an example (Figure 8.1):
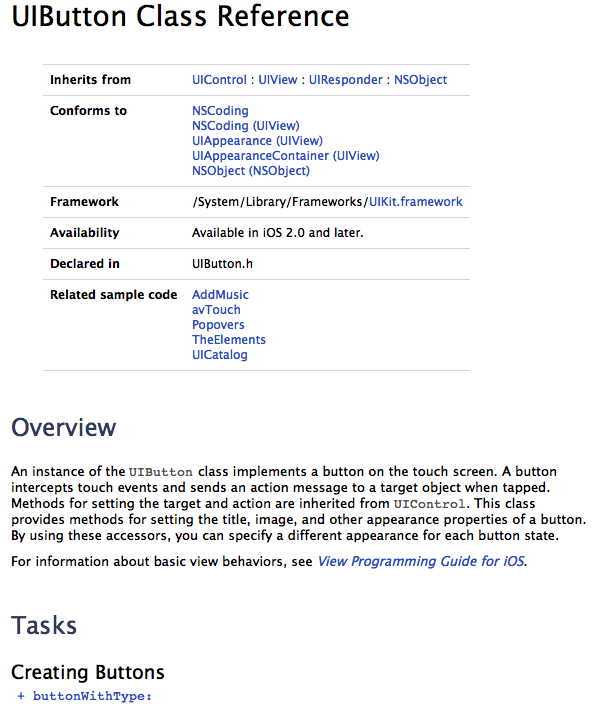
- Inherits from
-
Lists, and links to, the chain of superclasses. One of the biggest beginner mistakes is failing to read the documentation up the superclass chain.
A class inherits from its superclasses, so the functionality or information you’re looking for may be in a superclass. You won’t find out about
addTarget:action:forControlEvents:from the UIButton class page; that information is in the UIControl class page. You won’t find out that a UIButton has aframeproperty from the UIButton class page; that information is in the UIView class page. - Conforms to
- Lists, and links to, the protocols implemented by this class. Protocols are discussed in Chapter 10.
Warning
Methods injected into a class by a category (Chapter 10) are often not listed on that class’s documentation page and can be very difficult to discover. For example, awakeFromNib isn’t mentioned in the document for UIButton or for any of its superclasses or protocols. This is a major weakness in Apple’s organization and display of the documentation. A third-party documentation display application such as AppKiDo can be helpful here (http://appkido.com).
- Framework
- Tells what framework this class is part of. Your code must link to this framework in order to use this class (see Chapter 6).
- Availability
- States the earliest version of the operating system where this class is implemented. For example, EKEventViewController, along with the whole EventKit framework (consisting of classes for querying the user’s calendar; see Chapter 32) wasn’t invented until iOS 4.0. So if you want to use this feature in your app, you must make sure either that your app targets only iOS 4.0 or later or that you take precautions not to call into this framework on earlier versions of the operating system. The availability information also confirms that you’re looking at the right documentation page; if you’re doing iOS programming and this class is available only on Mac OS X, reading this page is pointless. Note that individual methods also have availability information.
- Companion guide
- If a class documentation page lists a companion guide, you might want to click that link and read that guide. Guides are broad surveys of a topic; they provide important information (including, often, useful code examples), and they can serve to orient your thinking and make you aware of your options. (See the UIView class page for an example.)
- Declared in
- The header(s) where this class is declared. Unfortunately this is not a link; I have not found any quick way to view a header starting from within the documentation. That’s a pity, as it can often be worth looking at the header file, which may contain helpful comments or other details. You can open the header file from your project window, as explained later in this chapter.
- Related sample code
- If a class documentation page links to sample code, you might want to examine that code. (But see my remarks on sample code in the next section of this chapter.)
- Overview
- Some class pages provide extremely important introductory information in the Overview section, including links to related guides and further information. (See the UIView class page for an example.)
- Tasks
- This section lists in categorical order, and links to, the properties and methods that appear later on the page. (Recall from Chapter 5 that a property is a syntactic shortcut for calling an accessor method; the documentation lists the property rather than the accessor.) Often, just looking over this list can give you the hint you’re looking for.
- Properties, Class Methods, Instance Methods
-
These sections provide the full documentation for this class’s methods. In recent years, this part of the documentation has become quite splendid, with good hyperlinks. Note the following subsections:
- The property or method name
- This name is suitable for copying and pasting into your code (if, for example, you need to enter the name of a selector).
- The property or method’s purpose
- A short summary of what it does.
- The formal declaration for the property or method
- Read this to learn things like the method’s parameters and return type. (Chapter 12 explains how to read a property declaration.) Suitable for copying and pasting into your code in order to enter a call to this method, though you are more likely to use Xcode’s code completion feature where possible (see Chapter 9).
- Parameters and return value
- Precise information on the meaning and purpose of these.
- Discussion
- Often contains extremely important further details about how this method behaves. Always pay attention to this section!
- Availability
- An old class can acquire new methods as the operating system advances; if a newer method is crucial to your app, you might want to exclude your app from running on older operating systems that don’t implement the method.
- See also
- Lists and links to related methods. Very helpful for giving you a larger perspective on how this method fits into the overall behavior of this class.
- Related sample code
- It can sometimes be worth consulting the sample code to see an example of how this particular method is used.
- Declared in
- The relevant header file.
- Constants
-
Many classes define constants that accompany particular methods. For example, to create a UIButton instance in code, you call the
buttonWithType:class method; the argument value will be a constant, listed under UIButtonType in the Constants section. (To help you get there, there’s a link from thebuttonWithType:method to the UIButtonType section in Constants.) There’s a formal definition of the constant; you won’t usually care about this (but do see Chapter 1 if you don’t know how to read it). Then each value is explained, and the value name is suitable for copying and pasting into your code.
Apple provides plenty of sample code projects. You can view the code directly in the documentation window; sometimes this will be sufficient, but you can see only one class implementation or header file at a time, so it’s difficult to get an overview. The alternative is to open the sample code project in Xcode.
When you look at a sample code page from your browser, there’s a button that reads Download Sample Code. In fact, the sample code may already be on your computer. When you look at the same sample code page in the documentation window, the same button will read Open Project. The sample code on your hard disk is zipped, so even if the code is already on your computer, it is first unzipped (into your Downloads folder). This policy of keeping the sample code projects zipped on your hard disk is a good one, as it prevents you from accidentally altering the original, and you are free to experiment with the unzipped copy.
Warning
If a sample code project was linked against the frameworks of an older SDK that isn’t installed on your computer, the project will be described in the Project navigator with the words “missing base SDK.” In earlier versions of Xcode, this situation could prevent you from building and running the project, and features that depend on indexing might not work. In Xcode 4.2 and later, however, the project should build and run regardless. To remove the “missing base SDK” annotation, edit the target, switch to Build Settings, and change the outdated Base SDK setting to Latest iOS.
As a form of documentation, sample code is both good and bad. It can be a superb source of working code that you can often copy and paste and use with very little alteration in your own projects. It is usually heavily commented, because the Apple folks are aware, as they write the code, that it is intended for instructional purposes. Sample code also illustrates concepts that users have difficulty extracting from the documentation. (Users who have not grasped UITouch handling, for instance, often find that the lightbulb goes on when they discover the MoveMe example.) But the logic of a project is often spread over multiple files, and nothing is more difficult to understand than someone else’s code (except, perhaps, your own code). Moreover, what learners most need is not the fait accompli of a fully written project but the reasoning process that constructed the project, which no amount of commentary can provide.
My own assessment is that Apple’s sample code is generally very thoughtful and instructive and definitely a major component of the documentation, and that it deserves more appreciation and usage than it seems to get. But it is most useful, I think, after you’ve reached a certain level of competence and comfort.
Here is a survey of other useful resources that supplement the documentation.
Quick Help is a condensed rendering of the documentation on some single topic, usually a symbol name (a class or method).
It appears with regard to the current selection or insertion point automatically in the Quick Help inspector (Option-Command-2) if the inspector is showing. Thus, for example, if you’re editing code and the insertion point or selection is within the term CGPointMake, documentation for CGPointMake appears in the Quick Help inspector if it is visible.
Quick Help is also available in the Quick Help inspector for interface objects selected while editing a nib, for build settings while editing a project or target, and so forth.
A slightly reduced version of the same Quick Help documentation can be displayed as a small floating window, without the Quick Help inspector. Select a term and choose Help → Quick Help for Selected Item (Shift-Control-Command-?). Alternatively, hold down Option and hover the mouse over a term until the cursor becomes a question mark (and the term turns blue with a dashed underline); then Option-click the term.
The Quick Help documentation contains links. For example, click the Reference link to open the full documentation in the documentation window; click the header link to open the appropriate header file.
A symbol is a nonlocally defined term, such as the name of a class, method, or instance variable. If you can see the name of a symbol in your code in an editor in Xcode, you can jump quickly to the definition of the symbol. Select text and choose Navigate → Jump to Definition (Control-Command-J). Alternatively, hold down Command and hover the mouse over a prospective term, until the cursor becomes a pointing finger (and the term becomes blue with a solid underline); Command-click the term to jump to the definition for that symbol.
If the symbol is defined in a Cocoa framework, you jump to the declaration in the header file. If the symbol is defined in your code, you jump to the class or method definition; this can be very helpful not only for understanding your code but also for navigating it.
The precise meaning of the notion “jump” depends upon the modifier keys you use in addition to the Command key, and on your settings in the General pane of Xcode’s preferences. For example, if you haven’t changed these settings from the default, Command-click jumps in the same editor, Command-Option-click jumps in an assistant pane, and Command-double-click jumps in a new window. Similarly, Control-Option-Command-J jumps in an assistant pane to the definition of the selected term.
Another way to see a list of your project’s symbols, and navigate to a symbol definition, is through the Symbol navigator (Chapter 6).
An important and often neglected way to jump to a method or class definition whose name you know, even if you can’t see the name in the code before you, is to choose File → Open Quickly (Shift-Command-O). In the search field, type key letters from the name, which will be interpreted intelligently; for example, to search for applicationDidFinishLaunching:, you might type “appdid”. Header file declarations are intermingled with your definitions; for example, for applicationDidFinishLaunching: the first listing is this method’s declaration in the Cocoa header file UIApplication.h, while the second listing is your own AppDelegate class’s implementation of this method.
Sometimes a header file can be a useful form of documentation. It compactly summarizes a class’s instance variables and methods and may contain comments and other helpful information — information that might be documented nowhere else. A single header file can contain declarations for multiple class interfaces and protocols. So it can be an excellent quick reference.
There are various ways to see a header file from an Xcode editor:
- If the class is your own and you’re in the implementation file, choose Navigate → Jump to Next Counterpart (Control-Command-Up).
- Click the Related Files button at the left of the jump bar (Control-1). The menu lets you jump to any header files imported in the current file (as well as any files that import the current file) and to the header files of the current class file’s superclasses and subclasses and so forth. Hold Option to jump in an assistant pane.
- Select text and choose File → Open Quickly (Shift-Command-O). This command brings up a dialog listing all source and header files containing a given symbol, as I mentioned in the previous section.
- Command-click a symbol, choose Navigate → Jump to Definition, or pass through Quick Help, as described in the previous sections.
- Use the Symbol navigator (Chapter 6).
All of these approaches require that a project window be open; File → Open Quickly requires an active SDK for effective operation, and the others all operate on specific windows or words in an open project. An alternative that works under all circumstances, even when no project is open, is to switch to the Terminal and use the open -h command to open a header file in Xcode. The argument may represent part of a header file’s name. The command is interactive if there’s an ambiguity; for example, open -h NSString proposes to open NSString.h or NSStringDrawing.h (or both, or neither). I wish this command were built into Xcode itself.
Programming has become a lot easier since the Internet came along and Google started indexing it. It’s amazing what you can find out with a Google search. Your problem is very likely one that someone else has faced, solved, and written about on the Internet. Often you’ll find sample code that you can paste into your project and adapt.
Apple’s documentation resources are available at http://developer.apple.com. These resources are updated before the changes are rolled into your doc sets for download. There are also some materials here that aren’t part of the Xcode documentation on your computer. As a registered iOS developer, you have access to iTunes videos, including the videos for all WWDC 2012 sessions (as well as for some earlier years), and to Apple’s developer forums (https://devforums.apple.com). Also, much of Apple’s documentation comes in an alternative PDF format, convenient for storing and viewing on an iPad. Even better, Ole Zorn’s Docsets app will let you download and browse entire docsets on an iPad or iPhone; it isn’t freeware, but it’s open source (https://github.com/omz/DocSets-for-iOS), so it’s free if you’re willing to build it yourself.
Apple maintains some public mailing lists (http://lists.apple.com/mailman/listinfo). I have long subscribed to the Xcode-users group (for questions about use of the Xcode tools) and the Cocoa-dev group (for questions about programming Cocoa). Cocoa-dev does permit iOS questions, but it is not heavily used for these. The lists are searchable, but Apple’s own search doesn’t work very well; you’re better off using Google with a site:lists.apple.com term, or http://www.cocoabuilder.com, which archives the lists. Apple has not added a mailing list devoted to iOS programming; that’s what the developer forums are supposed to be for, but the interface for these is extraordinarily clunky, and this — plus the lack of openness (to Google and to the world in general) — has limited their usefulness.
Other online resources, such as forums, have sprung up spontaneously as iOS programming has become more popular, and lots of iOS and Cocoa programmers blog about their experiences. I am particularly fond of Stack Overflow (http://www.stackoverflow.com); it isn’t devoted exclusively to iOS programming, of course, but lots of iOS programmers hang out there, questions are answered succinctly and correctly, and the interface lets you focus on the right answer quickly and easily.