Instances are the heart of the action in an Objective-C program. Most of the methods you’ll define when creating your own classes will be instance methods; most of the messages you’ll send in your code will call instance methods. This chapter describes how instances come into existence and how they work.
Your class objects are created for you automatically as your program starts up, but instances must be created deliberately as the program runs. The entire question of where instances come from is thus crucial. Ultimately, every instance comes into existence in just one way: someone deliberately asks a class to instantiate itself. But there are three different ways in which this can occur: ready-made instances, instantiation from scratch, and nib-based instantiation.
One way to create an instance is indirectly, by calling code that does the instantiation for you. You can think of an instance obtained in this indirect manner as a “ready-made instance.” (That’s my made-up phrase, not an official technical term.) Consider this simple code:
NSString* s2 = [s uppercaseString];
The documentation for the NSString instance method uppercaseString says that it returns “a string with each character from the receiver changed to its corresponding uppercase value.” In other words, you send the uppercaseString message to an NSString, and you get back a different, newly created NSString. After that line of code, s2 points to an NSString instance that didn’t exist beforehand.
The NSString produced by the uppercaseString method is a ready-made NSString instance. Your code didn’t say anything about instantiation; it just sent the uppercaseString message. But clearly someone said something about instantiation, because instantiation took place; this is a newly minted NSString instance. That someone is presumably some code inside the NSString class. But we don’t have to worry about the details. We are guaranteed of receiving a complete brand spanking new ready-to-roll NSString, and that’s all we care about.
Similarly, any class factory method instantiates the class and dispenses the resulting instance as a ready-made instance. So, for example, the NSString class method stringWithContentsOfFile:encoding:error: reads a file and produces an NSString representing its contents. All the work of instantiation has been done for you. You just accept the resulting string and away you go.
Note
A Cocoa class factory method is likely to have its return value typed as id. As I mentioned in Chapter 3, this can lead to trouble if you mistakenly assign the resulting instance where a different class of object is expected; the compiler doesn’t complain (because id is the universal donor) but you can mysteriously crash later when the wrong message is sent to the instance.
Not every method that returns an instance returns a new instance, of course. For example, this is how you ask an array (an NSArray) for its last element:
id last = [myArray lastObject];
The NSArray myArray didn’t create the object that it hands you. That object already existed; myArray was merely containing it, as it were — it was holding the object, pointing to it. Now it’s sharing that object with you, that’s all.
Similarly, many classes dispense one particular object. For example, your app has exactly one instance of the UIApplication class (we call this the singleton UIApplication instance); to access it, you send the sharedApplication class method to the UIApplication class:
UIApplication* theApp = [UIApplication sharedApplication];
This singleton instance existed before you asked for it; indeed, it existed before any code of yours could possibly run. You don’t care how it was brought into being; all you care is that you can get hold of it when you want it. I’ll talk more about globally available singleton objects of this kind in Chapter 13.
The alternative to requesting a ready-made instance is to tell a class, yourself, directly, to instantiate itself. There is basically one way to do this: you send a class the alloc message. The alloc class method is implemented by the NSObject class, the root class from which all other classes inherit. It causes memory to be set aside for the instance so that an instance pointer can point to it. (Management of that memory is a separate issue, discussed in Chapter 12.)
You must never, never, never call alloc by itself. You must immediately call another method, an instance method that initializes the newly created instance, placing it into a known valid state so that it can be sent other messages. Such a method is called an initializer. Moreover, an initializer returns an instance — usually the same instance, initialized. Therefore you can, and always should, call alloc and the initializer in the same line of code. The minimal initializer is init. So the basic pattern, known informally as “alloc-init,” looks like Example 5.1.
Example 5.1. The basic pattern for instantiation from scratch
SomeClass* aVariable = [[SomeClass alloc] init];
You cannot instantiate from scratch if you do not also know how to initialize, so we turn immediately to a discussion of initialization.
Every class defines or inherits at least one initializer. This is an instance method; the instance has just been created, by calling alloc on the class, and it is to this newly minted instance that the initializer message must be sent. An initialization message must be sent to an instance immediately after that instance is created by means of the alloc message, and it must not be sent to an instance at any other time.
The basic initialization pattern, as shown in Example 5.1, is to nest the alloc call in the initialization call, assigning the result of the initialization (not the alloc!) to a variable. One reason for this is that if something goes wrong and the instance can’t be created or initialized, the initializer will return nil; therefore it’s important to capture the result of the initializer and treat that, not the result of alloc, as the pointer to the instance.
To help you identify initializers, all initializers are named in a conventional manner. The convention is that all initializers, and only initializers, begin with the word init. The ultimate bare-bones initializer is called simply init, and takes no parameters. Other initializers do take parameters, and usually begin with the phrase initWith followed by descriptions of their parameters. For example, the NSArray class documentation lists these methods:
– initWithArray:
– initWithArray:copyItems:
– initWithContentsOfFile:
– initWithContentsOfURL:
– initWithObjects:
– initWithObjects:count:
Let’s try a real example. A particularly easy and generally useful initializer for NSArray is initWithObjects:. It takes a list of objects; the list must be terminated by nil. In Chapter 3, we illustrated this by creating an NSArray from three strings, by means of a class factory method that returned a ready-made instance:
NSArray* pep =
    [NSArray arrayWithObjects:@"Manny", @"Moe", @"Jack", nil];
Now we’ll do what amounts to exactly the same thing, except that we’ll create the instance ourselves, from scratch:
NSArray* pep =
    [[NSArray alloc] initWithObjects:@"Manny", @"Moe", @"Jack", nil];
In that particular case, there exist both a factory method and an initializer that work from the same set of data. Ultimately, it makes no difference which you use; given the same arguments, both approaches result in NSArray instances that are indistinguishable from one another. It will turn out in the discussion of memory management (Chapter 12) that there might be a reason to choose instantiation from scratch over ready-made instances (though not, perhaps, under ARC).
In modern Objective-C, as I mentioned in Chapter 3, you are unlikely to call arrayWithObjects:, because there is now a convenient literal array syntax that calls it for you. For the same reason, you are unlikely to call initWithObjects:. So I’ll give another example. Suppose that, one way or another, you now have an array pep containing the three strings @"Manny", @"Moe", and @"Jack", and that you want to instantiate a second array based on it and containing those same three strings. It is not sufficient to assign pep to another NSArray variable:
NSArray* pep2 = pep; // no, that isn't another array
Object references are pointers, and pointer assignment merely points two references at the same thing (Chapter 3). So pep2 in that code isn’t a second array; it’s the same array, which isn’t what we said we wanted. To make a new array instance based on the first, we can call the class method arrayWithArray:, like this:
NSArray* pep2 = [NSArray arrayWithArray: pep];
Now pep2 is a newly minted instance, separate from pep. It’s a ready-made instance, returned from a class factory method. To create the instance ourselves, from scratch, we call the corresponding initializer:
NSArray* pep2 = [[NSArray alloc] initWithArray: pep];
In looking through the documentation for an initializer, don’t forget to look upward through the class hierarchy. For example, the class documentation for UIWebView lists no initializers, but UIWebView inherits from UIView, and in UIView’s class documentation you’ll discover initWithFrame:. Moreover, the init method is defined as an instance method of the NSObject class, so every class inherits it and every newly minted instance can be sent the init message. Thus it is a given that if a class defines no initializers of its own, you can initialize an instance of it with init. For example, the UIResponder class documentation lists no initializers at all (and no factory methods). So to create a UIResponder instance from scratch, you’d call alloc and init.
Note
In just the single case where init is the initializer you want to call, you can collapse the successive calls to alloc and init into a call to new. In other words, [MyClass new] is a synonym for [[MyClass alloc] init]. I used to avoid new as confusing, chiefly because it conceals the initialization that guarantees this is a proper instance (and, before ARC, the need for memory management). But recently I’ve reversed course; I now use new quite a bit, and I’ll use it freely in this book.
If a class does define initializers, one of them may be described in the documentation as the designated initializer. (There’s nothing about a method’s name that tells you it’s the designated initializer; you must peruse the documentation to find out.) For example, in the UIView class documentation, the initWithFrame: method is described as the designated initializer. A class that does not define a designated initializer inherits its designated initializer; the ultimate designated initializer, inherited by all classes without any other designated initializer anywhere in their superclass chain, is init.
The designated initializer is the initializer on which any other initializers depend, in this class or any subclasses: ultimately, they must call it. The designated initializer might have the most parameters, allowing the most instance variables to be set explicitly, with the other initializers supplying default values for some instance variables, for convenience. Or it might just be the most basic form of initialization. But in any case, it is a bottleneck through which all other initializers pass. Here are some examples:
-
The NSDate class documentation says that
initWithTimeIntervalSinceReferenceDate:is the designated initializer, and thatinitWithTimeIntervalSinceNow:calls it. -
The UIView class documentation says that
initWithFrame:is the designated initializer. UIView contains no other initializers, but some of its subclasses do. UIWebView, a UIView subclass, has no initializer, soinitWithFrame:is its inherited designated initializer. UIImageView, a UIView subclass, has initializers such asinitWithImage:, but none of them is a designated initializer; soinitWithFrame:is its inherited designated initializer as well, andinitWithImage:must callinitWithFrame:.
Moreover, a class that implements a designated initializer will override the designated initializer inherited from its superclass. The idea is typically that even the inherited designated initializer, if called, will be overridden so as to call this class’s designated initializer. For example, UIView overrides the inherited init to call its own designated initializer, initWithFrame:, with a value of (CGRect){{0, 0}, {0, 0}}.
The third means of instantiation is through a nib file (or storyboard file). A nib file is where Xcode lets you “draw” parts of the user interface. Most Xcode projects will include at least one nib file, which will be built into the app bundle, and will then be loaded as the app runs. A nib file consists, in a sense, of the names of classes along with instructions for instantiating and initializing them. When the app runs and a nib file is loaded, those instructions are carried out — those classes are instantiated and initialized.
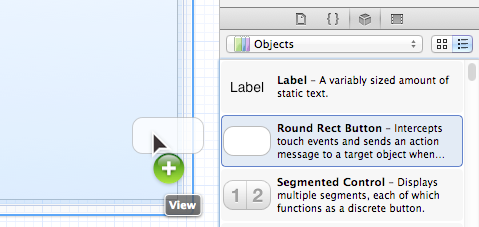
For example, suppose you’d like the user to be presented with a view containing a button whose title is “Howdy.” Xcode lets you arrange this graphically by editing a nib file: you drag a button from the Object library into the view, place it at a certain position in the view, and then set its title to “Howdy” (Figure 5.1). In effect, you create a drawing of what you want the view and its contents to look like.
When the app runs, the nib file loads, and that drawing is turned into reality. To do this, the drawing is treated as a set of instructions for instantiating objects. The button that you dragged into the view is treated as a representative of the UIButton class. The UIButton class is told to instantiate itself, and that instance is then initialized, giving it the same position you gave it in the drawing (the instance’s frame), the same title you gave it in the drawing (the instance’s title), and putting it into the window. In effect, the loading of your nib file is equivalent to this code (assuming that view is a reference to the view object):
UIButton* b =
    [UIButton buttonWithType:UIButtonTypeRoundedRect]; // instantiate
[b setTitle:@"Howdy!" forState:UIControlStateNormal];  // set up title
[b setFrame: CGRectMake(100,100,100,35)];              // set up frame
[view addSubview:b];                                   // place button in view
The fact that nib files are a source of instances, and that those instances are brought into existence as the nib file is loaded, is a source of confusion to beginners. I’ll discuss nib files and how they are used to generate instances in much more detail in Chapter 7.
The compiler, even in the world of static typing, is perfectly happy for you to supply a subclass instance where a superclass type is declared. To see this, let’s start with the first line of the previous example:
UIButton* b = [UIButton buttonWithType:UIButtonTypeRoundedRect];
UIButton is a subclass of UIControl, which is a subclass of UIView. So it would be perfectly legal and acceptable to say this:
UIButton* b = [UIButton buttonWithType:UIButtonTypeRoundedRect];
UIView* v = b;
The variable b is a UIButton instance, but I’m assigning it to a variable declared as a UIView. That’s legal and acceptable because UIView is an ancestor (up the superclass chain) of UIButton. Putting it another way, I’m behaving as if a UIButton were a UIView, and the compiler accepts this because a UIButton is a UIView.
What’s important when the app runs, however, is not the declared class of a variable, but the actual class of the object to which that variable points. Even if I assign the UIButton instance b to a UIView variable v, the object to which the variable v points is still a UIButton. So I can send it messages appropriate to a UIButton. For example:
UIButton* b = [UIButton buttonWithType:UIButtonTypeRoundedRect];
UIView* v = b;
[v setTitle:@"Howdy!" forState:UIControlStateNormal];
That code will cause the compiler to complain, because UIView doesn’t implement setTitle:forState:; under ARC, in fact, that code won’t even compile. So I’ll calm the compiler’s fears by typecasting:
UIButton* b = [UIButton buttonWithType:UIButtonTypeRoundedRect];
UIView* v = b;
[(UIButton*)v setTitle:@"Howdy!" forState:UIControlStateNormal];
The typecast calms the compiler’s fears, but the important thing is what happens when the program runs. What happens is that this code works just fine! It works fine not because I typecast v to a UIButton (typecasting doesn’t magically convert anything to anything else; it’s just a hint to the compiler), but because v really is a UIButton. So when the message setTitle:forState: arrives at the object pointed to by v, everything is fine. If v had been a UIView but not a UIButton, on the other hand, the program would have crashed at that instant.
An object, then, responds to a message sent to it on the basis of what it really is, not on the basis of anything said about what it is — and what it really is cannot be known until the program actually runs and the message is actually sent to that object.
Now let’s turn the tables. We called a UIButton a UIView and sent it a UIButton message. Now we’re going to call a UIButton a UIButton and send it a UIView message.
What an object really is depends not just upon its class but also upon that class’s inheritance. A message is acceptable even if an object’s own class doesn’t implement a corresponding method, provided that the method is implemented somewhere up the superclass chain. For example, returning again to the same code:
UIButton* b = [UIButton buttonWithType:UIButtonTypeRoundedRect];
[b setFrame: CGRectMake(100,100,100,35)];
This code works fine. But you won’t find setFrame: in the documentation for the UIButton class. That’s because you’re looking in the wrong place. A UIButton is a UIControl, and a UIControl is a UIView. To find out about setFrame:, look in the UIView class’s documentation. (Okay, it’s more complicated than that; you won’t find setFrame: there either. But you will find a term frame which is called a “property,” and this amounts to the same thing, as I’ll explain later in this chapter.) So the setFrame: message is sent to a UIButton, but it corresponds to a method defined on a UIView. Yet it works fine, because a UIButton is a UIView.
Tip
A common beginner mistake is to consult the documentation without following the superclass chain. If you want to know what you can say to a UIButton, don’t just look in the UIButton class documentation: also look in the UIControl class documentation, the UIView class documentation, and so on.
To sum up: we treated a UIButton object as a UIView, yet we were still able to send it a UIButton message. We treated a UIButton as a UIButton, yet we were still able to send it a UIView message. What matters when a message is sent to an object is not how the variable pointing to that object is declared but what class the object really is. What an object really is depends upon its class, along with that class’s inheritance from the superclass chain; these facts are innate to the object and are independent of how your code characterizes the variable pointing to the object. This independent maintenance of object type integrity is the basis of what is called polymorphism.
But it is not quite the whole of polymorphism. To understand the whole of polymorphism, we must go further into the dynamics of message sending.
A common situation is that code in an instance method defined in a class must call another instance method defined within the same class. We have not yet discussed how to do this. A method is called by sending a message to an object; in this situation, what object would that be? The answer is supplied by a special keyword, self. Here’s a simple example:
@implementation MyClass

- (NSString*) greeting {
    return @"Goodnight, Gracie!";
}

- (NSString*) sayGoodnightGracie {
    return [self greeting];
}

@end
When the sayGoodnightGracie message is sent to a MyClass instance, the sayGoodnightGracie method runs. It sends the greeting message to self. As a result, the greeting instance method is called; it returns the string @"Goodnight, Gracie!", and this same string is then returned from the sayGoodnightGracie method.
The example seems straightforward enough, and it is. In real life, your code when you define a class will sometimes consist of a few public instance methods along with lots of other instance methods on which they rely. The instance methods within this class will be calling each other constantly. They do this by sending messages to self.
Behind this simple example, though, is a subtle and important mechanism having to do with the real meaning of the keyword self. The keyword self does not actually mean “in the same class.” It’s an instance, after all, not a class. What instance? It’s this same instance. The same as what? The same instance to which the message was sent that resulted in the keyword self being encountered in the first place.
So let’s consider in more detail what happens when we instantiate MyClass and send the sayGoodnightGracie message to that instance:
MyClass* thing = [MyClass new];
NSString* s = [thing sayGoodnightGracie];
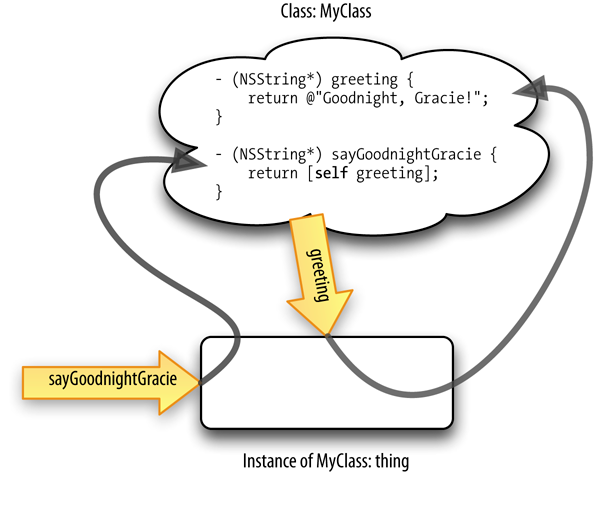
We instantiate MyClass and assign the instance to a variable thing. We then send the sayGoodnightGracie message to thing, the instance we just created. The message arrives, and it turns out this instance is a MyClass. Sure enough, MyClass implements a sayGoodnightGracie instance method, and this method is called. As it runs, the keyword self is encountered. It means “the instance to which the original message was sent in the first place.” That, as it happens, is the instance pointed to by the variable thing. So now the greeting message is sent to that instance (Figure 5.2).
This mechanism may seem rather elaborate, considering that the outcome is just what you’d intuitively expect. But the mechanism needs to be elaborate in order to get the right outcome. This is particularly evident when superclasses are involved and a class overrides a method of its superclass. To illustrate, suppose we have a class Dog with an instance method bark. And suppose Dog also has an instance method speak, which simply calls bark. Now suppose we subclass Dog with a class Basenji, which overrides bark (because Basenjis can’t bark). What happens when we send the speak message to a Basenji instance, as in Example 5.2?
Example 5.2. Polymorphism in action
@implementation Dog

- (NSString*) bark {
    return @"Woof!";
}

- (NSString*) speak {
    return [self bark];
}

@end

@implementation Basenji : Dog

- (NSString*) bark {
    return @""; // empty string, Basenjis can't bark
}

@end

// So, in some other class:

Basenji* b = [Basenji new];
NSString* s = [b speak];
If the keyword self meant merely “the same class where this keyword appears,” then when we send the speak message to a Basenji instance, we would arrive at the implementation of speak in the Dog class (because that’s where speak is implemented), and the Dog class’s bark method would be called. This would be terrible, because it would make nonsense of the notion of overriding; we’d return @"Woof!", which is wrong for a Basenji. But that is not what the keyword self means. It has to do with the instance, not the class.
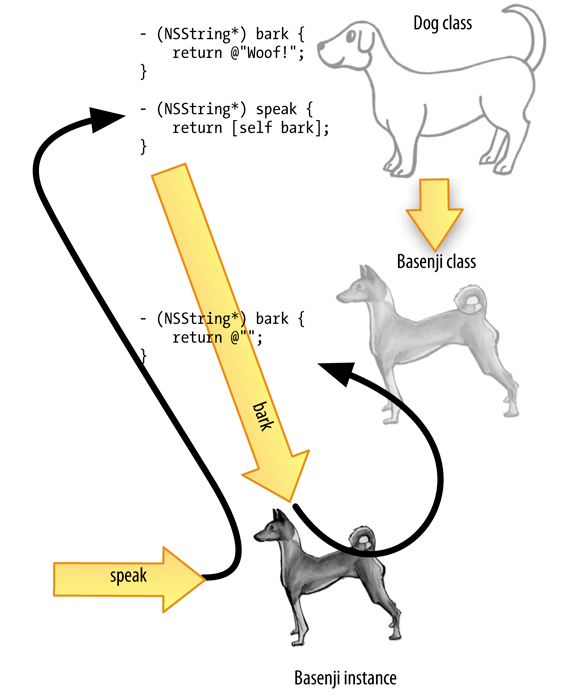
So here’s what happens. The speak message is sent to our Basenji instance, b. The Basenji class doesn’t implement a speak method, so we look upward in the class hierarchy and discover that speak is implemented in the superclass, Dog. We call Dog’s instance method speak, the speak method runs, and the keyword self is encountered. It means “the instance to which the original message was sent in the first place.” That instance is still our Basenji instance b. So we send the bark message to the Basenji instance b. The Basenji class implements a bark instance method, so this method is found and called, and the empty string is returned (Figure 5.3).
Of course, if the Basenji class had not overridden bark, then when the bark message was sent to the Basenji instance, we would have looked upward in the class hierarchy again and found the bark method implemented in the Dog class and called that. Thus, thanks to the way the keyword self works, inheritance works correctly both when there is overriding and when there is not.
If you understand that example, you understand polymorphism. The mechanism I’ve just described is crucial to polymorphism and is the basis of object-oriented programming. (Observe that I now speak of object-oriented programming, not just object-based programming as in Chapter 2. That’s because, in my view, the addition of polymorphism is what turns object-based programming into object-oriented programming.)
Sometimes (quite often, in Cocoa programming) you want to override an inherited method but still access the overridden functionality. To do so, you’ll use the keyword super. Like self, the keyword super is something you send a message to. But its meaning has nothing to do with “this instance” or any other instance. The keyword super is class-based, and it means: “Start the search for messages I receive in the superclass of this class” (where “this class” is the class where the keyword super appears).
You can do anything you like with super, but its primary purpose, as I’ve already said, is to access overridden functionality — typically from within the very functionality that does the overriding, so as to get both the overridden functionality and some additional functionality.
For example, suppose we define a class NoisyDog, a subclass of Dog. When told to bark, it barks twice:
@implementation NoisyDog : Dog

- (NSString*) bark {
    return [NSString stringWithFormat: @"%@ %@", [super bark], [super bark]];
}

@end
That code calls super’s implementation of bark, twice; it assembles the two resulting strings into a single string with a space between, and returns that (using the stringWithFormat: method). Because Dog’s bark method returns @"Woof!", NoisyDog’s bark method returns @"Woof! Woof!". Notice that there is no circularity or recursion here: NoisyDog’s bark method will never call itself.
A nice feature of this architecture is that by sending a message to the keyword super, rather than hard-coding @"Woof!" into NoisyDog’s bark method, we ensure maintainability: if Dog’s bark method is changed, the result of NoisyDog’s bark method will change to match. For example, if we later go back and change Dog’s bark method to return @"Arf!", NoisyDog’s bark method will return @"Arf! Arf!" with no further change on our part.
In real Cocoa programming, it will very often be Cocoa’s own methods that you’re overriding. For example, the UIViewController class, which is built into Cocoa, implements a method viewDidAppear:, defined as follows:
- (void)viewDidAppear:(BOOL)animated
The documentation says that UIViewController is a class for which you are very likely to define a subclass (so as to get all of UIViewController’s mighty powers — we’ll find out what they are in Chapter 19 — along with your own custom behavior). The documentation proceeds to suggest that in your subclass of UIViewController you might want to override this method, but cautions that if you do, “you must call super at some point in your implementation.” The phrase “call super” is a kind of shorthand, meaning “pass on to super the very same call and arguments that were sent to you.” So your own implementation might look like this:
@implementation MyViewController : UIViewController
// ...
- (void) viewDidAppear: (BOOL) animated {
    [super viewDidAppear: animated];
    // ... do more stuff here ...
}
The result is that when viewDidAppear: is called in a MyViewController instance, we do both the standard stuff that its superclass UIViewController does in response to viewDidAppear: and the custom stuff pertaining to our own class MyViewController. In this particular case, we don’t even know exactly what the UIViewController stuff is, and we don’t care. When the documentation tells you to call super when overriding, call super when overriding!
In Chapter 3, I explained that one of the main reasons there are instances and not just classes is that instances can have instance variables. Instance variables, you remember, are declared when you define the class, and in Chapter 4 I said that these declarations go into curly braces at the start of the class’s interface section or, in modern Objective-C, its implementation section. But the value of an instance variable differs for each instance.
Note
The term “instance variable” arises so often that it is often abbreviated to ivar. I’ll use both terms indiscriminately from now on.
Let’s write a class that uses an instance variable. Suppose we have a Dog class and we want every Dog instance to have a number, which should be an int. (For example, this number might correspond to the dog’s license number, or something like that.) In modern Objective-C, we would probably declare number in the implementation section for the Dog class, like this:
@implementation Dog {
    int number;
}
// method implementations go here
@end
(You might ask why, for this example, I don’t use instead the concept of giving the dog a name. The reason is that a name would be an NSString instance, which is an object; instance variables that are pointers to objects raise some additional issues I don’t want to discuss just now. But instance variables that are simple C data types raise no such issues. We’ll return to this matter in Chapter 12.)
By default, instance variables are protected, meaning that other classes (except for subclasses) can’t see them. So if, somewhere else, I instantiate a Dog, I won’t be able to access that Dog instance’s number instance variable. This is a deliberate feature of Objective-C; you can work around it if you like, but in general you should not. Instead, if you want to provide public access to an instance variable, write an accessor method and make the method declaration public.
Within a class, on the other hand, that class’s own instance variables are global. Any Dog method can just use the variable name number and access this instance variable, just like any other variable. But code that does this can be confusing when you’re reading it; suddenly there’s a variable called number and you don’t understand what it is, because there’s no nearby declaration for it. So I often use a different notation, like this: self->ivarName. The “arrow” operator, formed by a minus sign and a greater-than sign, is called the structure pointer operator, because of its original use in C (K&R 6.2).
So let’s write, in Dog’s implementation section, a method that allows setting a value for the number ivar:
- (void) setNumber: (int) n {
    self->number = n;
}
Of course, to make setNumber: public to any other class that imports Dog’s interface file, we must also declare it in Dog’s interface section:
@interface Dog : NSObject
- (void) setNumber: (int) n;
@end
We can now instantiate a Dog and assign that instance a number:
Dog* fido = [Dog new];
[fido setNumber: 42];
We can now set a Dog’s number, but we can’t get it (from outside that Dog instance). To correct this problem, we’ll write a second accessor method, one that allows for getting the value of the number ivar:
- (int) number {
    return self->number;
}
Again, we declare the number method in Dog’s interface section. Now we can both set and get a Dog instance’s number:
Dog* fido = [Dog new];
[fido setNumber: 42];
int n = [fido number];
// sure enough, n is now 42!
This architecture is very typical. Your class can have as many ivars as you like, but if you want them to be publicly accessible, you must provide accessor methods. Luckily, Objective-C 2.0 — which is what you’re using to program for iOS — provides a mechanism for generating accessor methods automatically (discussed in Chapter 12), so you won’t have to go through the tedium of writing them by hand every time you want to make an ivar publicly accessible. (Though, to be honest, I don’t see why you shouldn’t have to go through that tedium; before Objective-C 2.0, we all had to, so why shouldn’t you? We also had to clean the roads with our tongues on the way to school. And we liked it! You kids today, you don’t know what real programming is.)
You’ve probably noticed that Dog now has both a number method and a number instance variable. This fact should not confuse you. It doesn’t confuse the compiler, because the method name and the instance variable name are used in completely different ways in code. If the compiler can tell the difference, so can you. Nevertheless, a convention that is becoming increasingly common, for reasons that I’ll explain in Chapter 12, is to begin ivar names with an underscore: _number, not number.
If we follow this convention and rename our ivar, we’ll also have to rewrite (but not rename) the methods that access it:
@implementation Dog {
    int _number;
}

- (void) setNumber: (int) n {
    self->_number = n;
}

- (int) number {
    return self->_number;
}

@end
Objective-C provides a means for translating from a string to an instance variable accessor, called key–value coding. Such translation is useful, for example, when the name of the desired instance variable will not be known until runtime. So instead of calling [fido number], we might have a string @"number" that tells us what accessor to call. This string is the “key.” The key–value coding equivalent of calling a getter is valueForKey:; the equivalent of calling a setter is setValue:forKey:.
Thus, for example, suppose we wish to get the value of the number instance variable from the fido instance. We can do this by sending valueForKey: to fido. However, even though the number instance variable is an int, the value returned by valueForKey: is an object — in this case, an NSNumber, the object equivalent of a number (see Chapter 10). If we want the actual int, NSNumber provides an instance method, intValue, that lets us extract it:
NSNumber* num = [fido valueForKey: @"number"];
int n = [num intValue];
Similarly, to use key–value coding to set the value of the number instance variable in the fido instance, we would say:
NSNumber* num = [NSNumber numberWithInt:42];
[fido setValue: num forKey: @"number"];
Before handing off the number 42 as the value argument in setValue:forKey:, we had to wrap it up as an object — in this case, an NSNumber object. Starting with LLVM compiler version 4.0 (Xcode 4.4), there’s a syntactic shorthand for doing that; just as we can create an NSString by wrapping text in a compiler directive @"...", we can create an NSNumber by wrapping a numeric expression in a compiler directive @(...) — or, if the numeric expression is just a literal number, by preceding that literal number with @. So we can rewrite the previous example like this:
NSNumber* num = @42;
[fido setValue: num forKey: @"number"];
In real life, you’d probably omit the intermediate variable num and write the whole thing as a single line of code:
[fido setValue: @42 forKey: @"number"];
In these examples there is no advantage to using key–value coding over just calling the accessors. But suppose we had received the value @"number" in a variable (as the result of a method call, perhaps). Suppose that variable is called something. Then we could say:
id result = [fido valueForKey: something];
Thus we could access a different instance variable under different circumstances. This powerful flexibility is possible because Objective-C is such a dynamic language that a message to be sent to an object does not have to be formed until the program is already running.
When you call valueForKey: or setValue:forKey:, the correct accessor method is called if there is one. Thus, when we use @"number" as the key, a number method and a setNumber: method are called if they exist. (This is one reason why your accessors should be properly named.) On the other hand, if there isn’t an accessor method, the instance variable is accessed directly. Such direct access violates the privacy of instance variables, so there’s a way to turn off this feature for a particular class if you don’t like it. (I’ll explain what it is, with more about key–value coding, in Chapter 12.)
A property is a syntactic feature of Objective-C 2.0 designed to provide an alternative to the standard syntax for calling an accessor method. As syntactic sugar for formally calling a method, you can append the property name to an instance reference using dot-notation. You can use the resulting expression either on the left side of an equal sign (to call the corresponding setter) or elsewhere (to call the corresponding getter). The name of the property relies, by default, on the accessor naming conventions.
I’ll use the Dog class as an example. If the Dog class has a public getter method called number and a public setter method called setNumber:, then the Dog class also has a number property. This means that, instead of saying things like this:
[fido setNumber: 42];
int n = [fido number];
You can talk like this:
fido.number = 42;
int n = fido.number;
Your use of property syntax is entirely optional. The existence of a property is equivalent to the existence of the corresponding getter and setter methods, and you’re free to call those methods by either syntax. When you use property syntax in code, it is translated behind the scenes into a call to the corresponding getter or setter method, so it’s all the same if you call the corresponding getter or setter method explicitly. In the case of Dog, you can use number as a property, or you can call the getter and setter methods number and setNumber:.
(Naturally, there are verbal quasi-religious wars on this topic, with one side claiming that property syntax is convenient and compact, and makes Objective-C more like other languages that use dot-notation, and the other side retorting that it does no such thing, because it is so limited. For example, property syntax opponents would argue, a UIScrollView has a contentView property, but when setting it you are most likely to want to animate the scroll view at the same time, which you do by calling setContentView:animated:. That’s a kind of setter, but it takes two parameters; property syntax can’t express that, so we’re back to using an explicit method call, and property syntax has saved us nothing, and in fact is more likely to mislead us into forgetting to add the animation. Another objection to property notation is that the compiler restricts its use; for example, you can use a formal method call to send the number message to a Dog instance typed as an id, but you can’t append the number property with dot-notation to such an instance.)
To use a property within the class that has that property, you must use self explicitly. So, for example:
self.number = 42;
Warning
Do not confuse a property with an instance variable. An expression like self->number = n, or even simply number = n, sets the instance variable directly (and is possible only within the class, because instance variables are protected by default). An expression like fido.number or self.number involves a property and is equivalent to calling a getter or setter method. That getter or setter method may access an instance variable, and that instance variable may even have the same name as the property, but that doesn’t make them the same thing.
Properties will be taken up again in Chapter 12, where it will turn out that they are much more powerful and interesting beasts than I’m suggesting here. But I’m telling you about properties now because they are so widely used in Cocoa and because you’ll encounter them so frequently in the documentation. For example, in Chapter 1, I talked about setting a UIView’s autoresizingMask property:
myView.autoresizingMask =
    UIViewAutoresizingFlexibleTopMargin | UIViewAutoresizingFlexibleWidth;
How did I know I could talk that way? Because the UIView documentation says that UIView has an autoresizingMask property. Near the top of the documentation page, we see this line:
autoresizingMaskproperty
And further down, we get the details:
autoresizingMask
An integer bit mask that determines how the receiver resizes itself when its superview’s bounds change.
@property(nonatomic) UIViewAutoresizing autoresizingMask
That last line is a property declaration. From the point of view of the UIView class’s client — in this case, that’s you — the property declaration is simply a shorthand, telling you that such a property exists, rather than bothering to tell you about the two accessor methods autoresizingMask and setAutoresizingMask:. (Never mind for now what nonatomic means.) That’s how I knew there was a setter setAutoresizingMask:. In my code, I used property syntax as a way of calling that setter method; alternatively, I could have called setAutoresizingMask: explicitly.
Similarly, earlier in this chapter I called UIView’s setFrame: method, even though no such method is mentioned in the UIView documentation. What the UIView documentation does say is this:
frame
The frame rectangle, which describes the view’s location and size in its superview’s coordinate system.
@property(nonatomic) CGRect frame
The documentation is telling me about the UIView property name frame, but that’s the same thing as telling me about the existence of UIView instance methods frame and setFrame:; I can use these methods either through the frame property and dot-notation or by calling them explicitly.
Objective-C uses dot-notation for properties, and C uses dot-notation for structs; these can be chained. So, for example, UIView’s frame is a property whose value is a struct (a CGRect); thus, you can say myView.frame.size.height, where frame is a property that returns a struct, size is an element of that struct, and height is an element of that struct. But there are limitations on this syntax; you cannot (for example) set a frame’s height directly through a chain starting with the UIView, like this:
myView.frame.size.height = 36.0; // error, "Expression is not assignable"
Instead, if you want to change a component of a struct property, you must fetch the property value into a struct variable, change the struct variable’s value, and set the entire property value from the struct variable:
CGRect f = myView.frame;
f.size.height = 0;
myView.frame = f;
Now that you know about self and super and instance variables, we can return to a topic that I blithely skipped over earlier. I described how to initialize a newly minted instance by calling an initializer, and emphasized that you must always do so, but I said nothing about how to write an initializer in your own classes. You will wish to do so only when you want your class to provide a convenient initializer that goes beyond the functionality of the inherited initializers. Often your purpose will be to accept some parameters and use them to set the initial values of some instance variables.
For example, in the case of a Dog with a number, let’s say we don’t want any Dog instances to come into existence without a number; every Dog must have one. So having a value for its number ivar is a sine qua non of a Dog being instantiated in the first place. An initializer publicizes this rule and helps to enforce it — especially if it is the class’s designated initializer. So let’s decide that this initializer will be Dog’s designated initializer.
Moreover, let’s say that a Dog’s number should not be changed. Once the Dog has come into existence, along with a number, that number should remain attached to that Dog instance for as long as that Dog instance persists.
So delete the setNumber: method and its declaration, thus destroying any ability of other classes to set a Dog instance’s number after it has been initialized. Instead, we’re going to set a Dog’s number as it is initialized, using a method we’ll declare like this:
- (id) initWithNumber: (int) n
Our return value is typed as id, not as a pointer to a Dog, even though in fact we will return a Dog object. This is a convention that we should obey. The name is conventional as well; as you know, the init beginning tells the world this is an initializer.
Now I’m just going to show you the actual code for the initializer (Example 5.3). Much of this code is conventional — a dance you are required to do. You should not question this dance: just do it. I’ll describe the meaning of the code, but I’m not going to try to justify all the parts of the convention.
The parts of the convention are:
|
We send some sort of initialization message, calling a designated initializer. If the method we are writing is our class’s designated initializer, this message is sent to |
|
|
We capture the result of the initialization message to |
|
|
If |
|
|
We return |
Note
All instance variables are set to a form of zero by alloc. Therefore, any instance variables not initialized explicitly in an initializer remain 0. This means, among other things, that by default a BOOL instance variable is NO and an object reference instance variable is nil. It is common practice to take advantage of these defaults in your program; if the default values are satisfactory initial values, you won’t bother to set them in your designated initializer.
But we are not finished. Recall from earlier in this chapter that a class that defines a designated initializer should also override the inherited designated initializer (in this case, init). And you can see why: if we don’t, someone could say [[Dog alloc] init] (or [Dog new]) and create a dog without a number — the very thing our initializer is trying to prevent. Just for the sake of the example, I’ll make the overridden init assign a negative number as a signal that there’s a problem. Notice that we’re still obeying the rules: this initializer is not the designated initializer, so it calls this class’s designated initializer.
- (id) init {
    return [self initWithNumber: -9999];
}
Just to complete the story, here’s some code showing how we now would instantiate a Dog:
Dog* fido = [[Dog alloc] initWithNumber:42];
int n = [fido number];
// n is now 42; our initialization worked!