The user’s address book, which the user sees through the Contacts app, is effectively a database that can be accessed directly through a C API provided by the Address Book framework. You’ll link to AddressBook.framework and import <AddressBook/AddressBook.h>.
A user interface for interacting with the address book is also provided, through Objective-C classes, by the Address Book UI framework. You’ll link to AddressBookUI.framework and import <AddressBookUI/AddressBookUI.h>.
The address book is an ABAddressBookRef obtained by calling ABAddressBookCreateWithOptions. This method is new in iOS 6. There are in fact no options to pass, so the first parameter is always nil. The important thing is the second parameter, a pointer to a CFErrorRef; if the result is nil, the CFErrorRef describes the error. The reason there can be an error is that the user can now deny your app access to the address book:
CFErrorRef err = nil;
ABAddressBookRef adbk = ABAddressBookCreateWithOptions(nil, &err);
if (nil == adbk) {
    NSLog(@"error: %@", err);
    return;
}
The very first time your app tries to access the address book, a system alert will appear, prompting the user to grant your app permission to access the user’s Contacts. You can modify the body of this alert by setting the “Privacy — Contacts Usage Description” key (NSContactsUsageDescription) in your app’s Info.plist to tell the user why you want to access the address book. This is a kind of “elevator pitch”; you need to persuade the user in very few words.
You can learn beforehand whether access has been explicitly denied by calling ABAddressBookGetAuthorizationStatus:
ABAuthorizationStatus stat = ABAddressBookGetAuthorizationStatus();
if (stat==kABAuthorizationStatusDenied ||
    stat==kABAuthorizationStatusRestricted) {
    NSLog(@"%@", @"no access");
    return;
}
If the user has denied your app access, you can’t make the system alert appear again. You can, of course, use some other interface to request that the user grant access in the Settings app, under Privacy → Contacts.
Note
To retest the system alert and other access-related behaviors, go to the Settings app and choose General → Reset → Reset Location & Privacy. This causes the system to forget that it has ever asked about access for any app.
Warning
If the user in fact switches to the Settings app and enables access for your app under Privacy → Contacts, your app will crash in the background! This is unfortunate, but is probably not a bug; Apple presumably feels that in this situation your app cannot continue coherently and should start over from scratch.
Another new iOS 6 function, ABAddressBookRequestAccessWithCompletion, is pointless, and I don’t recommend using it. If the user has already denied your app access, this function won’t make the system alert appear again; if the user has already granted your app access, this function is needless; and if the user has never seen the app before, the system alert will appear anyway when you try to access the address book. Thus this function does nothing that you can’t accomplish by a combination of ABAddressBookGetAuthorizationStatus and ABAddressBookCreateWithOptions.
Assuming that access has been granted, ABAddressBookCreateWithOptions returns an actual ABAddressBookRef object. This method’s name contains “Create,” so you must CFRelease the ABAddressBookRef when you’re finished with it, as discussed in Chapter 12. (But don’t release it until you are finished with it!) The address book’s data starts out exactly the same as the user’s Contacts data. If you make any changes to the data, they are not written through to the user’s real address book until you call ABAddressBookSave.
The primary constituent record of the address book database is the ABPerson. You’ll typically extract persons from the address book by using these functions:
-
ABAddressBookGetPersonCount -
ABAddressBookGetPersonWithRecordID -
ABAddressBookCopyPeopleWithName -
ABAddressBookCopyArrayOfAllPeople
The result of the latter two is a CFArrayRef. Their names contain “Copy,” so you must CFRelease the array when you’re finished with it. (I’m going to stop reminding you about memory management from here on.)
An ABPerson doesn’t formally exist as a type; it is actually an ABRecord (ABRecordRef), and by virtue of this has an ID, a type, and properties with values. To fetch the value of a property, you’ll call ABRecordCopyValue, supplying a property identifier to specify the property that interests you. ABPerson properties, as you might expect, include things like first name, last name, and email.
Working with a property value is a little tricky because the way you treat it depends on what type of value it is. You can learn a property value’s type dynamically by calling ABPersonGetTypeOfProperty, but usually you’ll know in advance. Some values are simple, but some are not. For example, a last name is a string, which is straightforward. But a person can have more than one email, so an email value is a “multistring.” To work with it, you’ll treat it as an ABMultiValue (ABMultiValueRef). This is like an array of values where each value also has a label and an identifier. The label categorizes (for example, a Home email as opposed to a Work email) but is not a unique specifier (because a person might have, say, two or more Work emails); the identifier is the unique specifier.
A person’s address is even more involved because not only is it an ABMultiValue (a person can have more than one address), but also a particular address is itself a dictionary (a CFDictionary). Each dictionary may have a key for street, city, state, country, and so on.
There is a lot more to parsing address book information, but that’s enough to get you started. We are now ready to illustrate by an example. Assume we have successfully obtained a reference to the address book, adbk, as I showed earlier. Now I’ll fetch my own record out of the address book database on my device and detect that I’ve got two email addresses:
ABRecordRef moi = nil;
CFArrayRef matts =
    ABAddressBookCopyPeopleWithName(adbk, (CFStringRef)@"Matt");
// might be multiple matts, but let's find the one with last name Neuburg
for (CFIndex ix = 0; ix < CFArrayGetCount(matts); ix++) {
    ABRecordRef matt = CFArrayGetValueAtIndex(matts, ix);
    CFStringRef last = ABRecordCopyValue(matt, kABPersonLastNameProperty);
    if (last && CFStringCompare(last, (CFStringRef)@"Neuburg", 0) == 0)
        moi = matt;
    if (last) CFRelease(last);
}
if (nil == moi) {
    NSLog(@"Couldn't find myself");
    if (matts) CFRelease(matts);
    if (adbk) CFRelease(adbk);
    return;
}
// parse my emails
ABMultiValueRef emails = ABRecordCopyValue(moi, kABPersonEmailProperty);
for (CFIndex ix = 0; ix < ABMultiValueGetCount(emails); ix++) {
    CFStringRef label = ABMultiValueCopyLabelAtIndex(emails, ix);
    CFStringRef value = ABMultiValueCopyValueAtIndex(emails, ix);
    NSLog(@"I have a %@ address: %@", label, value);
    if (label) CFRelease(label);
    if (value) CFRelease(value);
}
if (emails) CFRelease(emails);
if (matts) CFRelease(matts);
/*
output:
I have a _$!<Home>!$_ address: matt@tidbits.com
I have a _$!<Work>!$_ address: mattworking@tidbits.com
*/
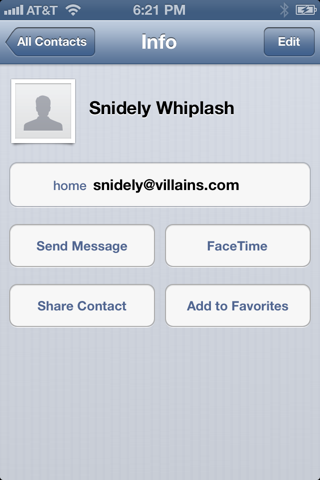
You can also modify an existing record, add a new record (ABAddressBookAddRecord), and delete a record (ABAddressBookRemoveRecord). In this example, I’ll create a person called Snidely Whiplash with a Home email snidely@villains.com, add him to the database, and save the database:
ABRecordRef snidely = ABPersonCreate();
ABRecordSetValue(snidely, kABPersonFirstNameProperty, @"Snidely", nil);
ABRecordSetValue(snidely, kABPersonLastNameProperty, @"Whiplash", nil);
ABMutableMultiValueRef addr =
    ABMultiValueCreateMutable(kABStringPropertyType);
ABMultiValueAddValueAndLabel(addr, @"snidely@villains.com",
                             kABHomeLabel, nil);
ABRecordSetValue(snidely, kABPersonEmailProperty, addr, nil);
ABAddressBookAddRecord(adbk, snidely, nil);
ABAddressBookSave(adbk, nil);
if (addr) CFRelease(addr);
if (snidely) CFRelease(snidely);
Sure enough, if we then check the state of the database through the Contacts app, the new person exists (Figure 31.1).
There are also groups (ABGroup); a group, like a person, is a record (ABRecord), so you can add a new group, delete an existing group, add a person to a group, and remove a person from a group (which is more than the Contacts app allows the user to do!). A group doesn’t own a person, nor a person a group; they are independent, and a person can be associated with multiple groups just as a group is associated with multiple persons. At an even higher level, there are sources (yet another kind of ABRecord): a person or group might be on the device, but it might instead come from an Exchange server or a CardDAV server. In this case the source really does, in a sense, own the group or person; a person can’t belong to two sources. A complicating factor, however, is that the same real person might appear in two different sources as two different ABPersons; to deal with this, it is possible for multiple persons to be linked, indicating that they are the same person. For a practical introduction to groups and sources, see Apple’s ABUIGroups sample code.
The Address Book UI framework puts a user interface, similar to the Contacts app, in front of common tasks involving the address book database. This is a great help, because designing your own interface to do the same thing would be tedious and involved. The framework provides four UIViewController subclasses:
-
ABPeoplePickerNavigationController - Presents a navigation interface, effectively the same as the Contacts app but without an Edit button: it lists the people in the database and allows the user to pick one and view the details.
-
ABPersonViewController - Presents an interface showing the properties of a specific person in the database, possibly editable.
-
ABNewPersonViewController - Presents an interface showing the editable properties of a new person.
-
ABUnknownPersonViewController - Presents an interface showing a proposed person with a partial set of noneditable properties.
These view controllers operate coherently with respect to the question of whether your app has access to the address book. For example, if the user has never granted or denied your app access to the address book, attempting to use ABPeoplePickerNavigationController will cause the system alert to appear, requesting access. If the user has denied your app access to the address book, the ABPeoplePickerNavigationController’s view will appear, but it will be empty (like Figure 30.2). ABNewPersonViewController, similarly, will lack interface for saving into the database if your app has been denied access, and the user’s only option will be to back out of the view controller. On the other hand, you can’t even get started usefully with ABPersonViewController if you don’t already have access, so if you lack access, you’ll discover that fact beforehand.
An ABPeoplePickerNavigationController is a UINavigationController. With it, the user can survey groups, along with the names of all persons in each group. Presenting it can be as simple as instantiating it, assigning it a delegate, and showing it as a presented view controller. On the iPad, you’ll probably use a popover; presenting the view controller does work, but a popover looks better. (For the structure of a universal app, see Example 29.1.) Here’s the code for an iPhone:
ABPeoplePickerNavigationController* picker =
    [ABPeoplePickerNavigationController new];
picker.peoplePickerDelegate = self; // note: not merely "delegate"
[self presentViewController:picker animated:YES completion:nil];
You should certainly provide a delegate, because without it the presented view will never be dismissed. This delegate is not the controller’s delegate property! It is the controller’s peoplePickerDelegate property. You should implement all three delegate methods:
-
peoplePickerNavigationController:shouldContinueAfterSelectingPerson: -
The user has tapped a person in the contacts list, provided to you as an ABRecordRef. You have two options:
- Return NO. The user has chosen a person and that’s all you wanted done. The selected person remains selected unless the user chooses another person. You are likely to dismiss the picker at this point.
-
Return YES (and don’t dismiss the picker). The view will navigate to a view of the person’s properties. You can limit the set of properties the user will see at this point by setting the ABPeoplePickerNavigationController’s
displayedItems. This is an array of NSNumbers wrapping the property identifiers such askABPersonEmailProperty.
-
peoplePickerNavigationController:shouldContinueAfterSelectingPerson:property:identifier: -
The user is viewing a person’s properties and has tapped a property. Note that you are not handed the value of this property! You can fetch that yourself if desired, because you have the person and the property; plus, if the property has multiple values, you are handed an identifier so you can pick the correct one out of the array of values by calling
ABMultiValueGetIndexForIdentifierand fetching the value at that index. You have two options:- Return NO. The view is now still sitting there, displaying the person’s properties. You are likely to dismiss the picker at this point.
- Return YES. This means that if the property is one that can be displayed in some other app, we will switch to that app. For example, if the user taps an address, it will be displayed in the Maps app; if the user taps an email, we will switch to the Mail app and compose a message addressed to that email.
-
peoplePickerNavigationControllerDidCancel: - The user has cancelled; you should dismiss the picker.
In this example, we want the user to pick an email. We have limited the display of properties to emails only:
picker.displayedProperties = @[@(kABPersonEmailProperty)];
We return YES from the first delegate method. The second delegate method fetches the value of the tapped email and dismisses the picker:
- (BOOL)peoplePickerNavigationController:
        (ABPeoplePickerNavigationController *)peoplePicker
        shouldContinueAfterSelectingPerson:(ABRecordRef)person
        property:(ABPropertyID)property
        identifier:(ABMultiValueIdentifier)identifier {
    ABMultiValueRef emails = ABRecordCopyValue(person, property);
    CFIndex ix = ABMultiValueGetIndexForIdentifier(emails, identifier);
    CFStringRef email = ABMultiValueCopyValueAtIndex(emails, ix);
    NSLog(@"%@", email); // do something with the email here
    if (email) CFRelease(email);
    if (emails) CFRelease(emails);
    [self dismissViewControllerAnimated:YES completion:nil];
    return NO;
}
An ABPersonViewController is a UIViewController. To use it, instantiate it, set its displayedPerson and personViewDelegate (not delegate), and push it onto an existing navigation controller’s stack. The user’s only way out of the resulting interface will be through the Back button. Presuming that the displayed person is to be someone in the database, you’ll need access to the address book in order to get started. For example:
CFErrorRef err = nil;
ABAddressBookRef adbk = ABAddressBookCreateWithOptions(nil, &err);
if (nil == adbk) {
    NSLog(@"error: %@", err);
    return;
}
CFArrayRef snides =
    ABAddressBookCopyPeopleWithName(adbk, (CFStringRef)@"Snidely Whiplash");
if (CFArrayGetCount(snides) < 1) {
    NSLog(@"%@", @"No Snidely!");
    return;
}
ABRecordRef snidely = CFArrayGetValueAtIndex(snides, 0);
ABPersonViewController* pvc = [ABPersonViewController new];
pvc.displayedPerson = snidely;
pvc.personViewDelegate = self;
[self.navigationController pushViewController:pvc animated:YES];
if (snides) CFRelease(snides);
if (adbk) CFRelease(adbk);
On the iPad, the same interface works, or alternatively you can use a popover. In the latter case you’ll probably make the ABPersonViewController the root view of a UINavigationController created on the fly, especially if you intend to set allowsEditing to YES, since without the navigation interface the Edit button won’t appear. No Back button is present or needed, because the user can dismiss the popover by tapping outside it.
You can limit the properties to be displayed, as with ABPeoplePickerNavigationController, by setting the displayedProperties. You can highlight a property with setHighlightedItemForProperty:withIdentifier:.
The delegate is notified when the user taps a property. As with ABPeoplePickerNavigationController’s second delegate method, you’ll return YES to allow some other app, such as Maps or Mail, to open the tapped value; return NO to prevent this.
If ABPersonViewController’s allowsActions is YES, then buttons such as Send Message, FaceTime, Share Contact, and Add to Favorites appear in the interface. (Exactly what buttons appear depends on what categories of information are displayed.)
If ABPersonViewController’s allowsEditing is YES, the right bar button is an Edit button. If the user taps this, the interface is transformed into the same sort of editing interface as ABNewPersonViewController. The user can tap Done or Cancel; if Done, the edits are automatically saved into the database. Either way, the user returns to the original display of the person’s properties.
Your code is not notified that the user has edited the person, or that the user has returned from the person view controller to the main interface. If that’s the kind of thing you need to know, consider one of the next two view controllers.
An ABNewPersonController is a UIViewController. To use it, instantiate it, set its newPersonViewDelegate (not delegate), instantiate a UINavigationController with the ABNewPersonController as its root view, and present the navigation controller:
ABNewPersonViewController* npvc = [ABNewPersonViewController new];
npvc.newPersonViewDelegate = self;
UINavigationController* nc =
    [[UINavigationController alloc] initWithRootViewController:npvc];
[self presentViewController:nc animated:YES completion:nil];
The presented view controller works on the iPad as well. Alternatively, you can display the UINavigationController in a popover; the resulting popover is effectively modal.
The interface allows the user to fill in all properties of a new contact. You cannot limit the properties displayed. You can provide properties with default values by creating a fresh ABRecordRef representing an ABPerson with ABPersonCreate, giving it any property values you like, and assigning it to the displayedPerson property.
The delegate has one method, newPersonViewController:didCompleteWithNewPerson:, which is responsible for dismissing the presented view or popover. If the new person is nil, the user tapped Cancel. Otherwise, the user tapped Done; the new person is an ABRecordRef and has already been saved into the database.
But what if you don’t want the new person saved into the database? What if you were presenting this interface merely because it’s such a convenient way of letting the user fill in the property values of an ABPerson? Then simply remove the newly created person from the database, like this:
- (void)newPersonViewController:
            (ABNewPersonViewController*)newPersonViewController
        didCompleteWithNewPerson:(ABRecordRef)person {
    if (nil != person) {
        // if we didn't have access, we wouldn't be here!
        ABAddressBookRef adbk = ABAddressBookCreateWithOptions(nil, nil);
        ABAddressBookRemoveRecord(adbk, person, nil);
        ABAddressBookSave(adbk, nil);
        CFStringRef name = ABRecordCopyCompositeName(person);
        NSLog(@"I have a person named %@", name);
        // do something with new person
        if (name) CFRelease(name);
        if (adbk) CFRelease(adbk);
    }
    [self dismissViewControllerAnimated:YES completion:nil];
}
An ABUnknownPersonViewController is a UIViewController. It presents, as it were, a proposed partial person. You can set the name displayed as the controller’s alternateName property, and the text below this as the controller’s message property. You can add actual person property values just as for an ABNewPersonViewController, namely, by creating a fresh ABRecordRef representing an ABPerson with ABPersonCreate, giving it some property values, and assigning it to the displayedPerson property.
To use ABUnknownPersonViewController, instantiate it, set the properties listed in the foregoing paragraph, set its unknownPersonViewDelegate (not delegate), and push it onto the stack of an existing navigation controller. The user’s only way out of the resulting interface will be through the Back button. For example:
ABUnknownPersonViewController* unk =
    [ABUnknownPersonViewController new];
unk.alternateName = @"Johnny Appleseed";
unk.message = @"Person who really knows trees";
unk.allowsAddingToAddressBook = YES;
ABRecordRef person = ABPersonCreate();
ABMutableMultiValueRef addr =
    ABMultiValueCreateMutable(kABStringPropertyType);
ABMultiValueAddValueAndLabel(addr, @"johnny@seeds.com",
                             kABHomeLabel, nil);
ABRecordSetValue(person, kABPersonEmailProperty, addr, nil);
unk.displayedPerson = person;
unk.unknownPersonViewDelegate = self;
[self.navigationController pushViewController:unk animated:YES];
if (person) CFRelease(person);
if (addr) CFRelease(addr);
On the iPad, make the ABUnknownPersonViewController the root view of a UINavigationController and present the navigation controller as a popover. No Back button is present or needed, because the user can dismiss the popover by tapping outside it.
What the user can do here depends on two other properties:
-
allowsAddingToAddressBook -
If YES, and if your app has access to the address book, a Create New Contact button and an Add to Existing Contact button appear:
-
If the user taps Create New Contact, the editing interface appears (as in ABNewPersonViewController and an editable ABPersonViewController). It is filled in with the property values of the
displayedPerson. If the user taps Done, the person is saved into the database. -
If the user taps Add to Existing Contact, a list of all contacts appears (as in the first screen of ABPersonViewController). The user can Cancel or tap a person. If the user taps a person, the properties from the
displayedPersonare merged into that person’s record.
-
If the user taps Create New Contact, the editing interface appears (as in ABNewPersonViewController and an editable ABPersonViewController). It is filled in with the property values of the
-
allowsActions - If YES, buttons such as Send Message, FaceTime, and Share Contact appear. (Exactly what buttons appear depends on what categories of information are displayed.)
The delegate has two methods, the first of which is required:
-
unknownPersonViewController:didResolveToPerson: -
Called if
allowsAddingToAddressBookis YES and the user finishes working in a presented editing view. The editing view has already been dismissed and the user has either cancelled (the second parameter is nil) or has tapped Done (the second parameter is the ABPerson already saved into the database). -
unknownPersonViewController:shouldPerformDefaultActionForPerson:property:identifier: - Return NO, as with ABPeoplePickerNavigationController, to prevent a tap on a property value from navigating to another app.