Basic video playback is performed in a view owned by an MPMoviePlayerController. You’ll need to link to MediaPlayer.framework and import <MediaPlayer/MediaPlayer.h>. There are two relevant classes supplied by the Media Player framework:
- MPMoviePlayerController
- Vends a view that plays a movie, along with controls letting the user regulate playback.
- MPMoviePlayerViewController
- A UIViewController subclass that owns an MPMoviePlayerController and displays its view, along with controls letting the user regulate playback.
Warning
The behavior of MPMoviePlayerController has changed significantly from one system version to the next. It is difficult to use it compatibly with multiple system versions. In this chapter, I describe only its current behavior, with no attempt to discuss earlier differences or to advise you on backward compatibility.
A simple interface for letting the user trim video (UIVideoEditorController) is also supplied.
Sophisticated video playing and editing can be performed through AV Foundation. I’ll introduce it at the end of this chapter, describing AVPlayer, an alternative class for playing a movie or a sound, and demonstrating AV Foundation’s video- and audio-editing capabilities.
A movie file can be in a standard movie format, such as .mov or .mp4, but it can also be a sound file. An MPMoviePlayerController or MPMoviePlayerViewController is thus an easy way to play a sound file, including a sound file obtained in real time over the Internet, along with standard controls for pausing the sound and moving the playhead (unlike AVAudioPlayer, which lacks a user interface: see Chapter 27).
A mobile device does not have unlimited power for decoding and presenting video in real time. A video that plays on your computer might not play at all on an iOS device. See the “Media Layer” chapter of Apple’s iOS Technology Overview for a list of specifications and limits within which video is eligible for playing.
A web view (Chapter 24) supports the HTML 5 <video> tag. This can be a simple lightweight way to present video and to allow the user to control playback. Both web view video and MPMoviePlayerController support AirPlay.
Note
If an MPMoviePlayerController or an AVPlayer produces sound, you may need to concern yourself with your application’s audio session; see Chapter 27. However, both MPMoviePlayerController and AVPlayer deal gracefully with the app being sent into the background, and will pause when your app is backgrounded and resume when your app comes back to the foreground.
An MPMoviePlayerController vends and controls a view, its view property; you assign it a movie described by a URL, its contentURL, which it will present in that view. You are responsible for instantiating and retaining the MPMoviePlayerController, and you’ll provide the contentURL in its initializer, initWithContentURL:. The movie URL can be a local file URL, so that the player can show, for example, a movie stored as a file in the app’s bundle, or obtained from the Camera Roll / Saved Photos group in the user’s photo library (see Chapter 30); or it can be a resource (possibly streamed) to be fetched over the Internet, in which case the MPMoviePlayerController initiates the download automatically as soon as it has the contentURL.
You are also responsible for placing the MPMoviePlayerController’s view into your interface. (MPMoviePlayerController is not a UIViewController, so you can put its view directly into your interface.) No law says you have to put the MPMoviePlayerController’s view into your interface, but if you don’t, the user won’t be able to see the movie or the controls that accompany it by default. An MPMoviePlayerController’s view is a real view; you can set its frame, its autoresizingMask, and so forth, and you can give it subviews. An MPMoviePlayerController also has a backgroundView which automatically appears behind its view; you can give the backgroundView subviews as well.
Before you can display a movie in your interface with an MPMoviePlayerController, you must call prepareToPlay, which is part of the MPMediaPlayer protocol, adopted by MPMoviePlayerController.
Things happen slowly with a movie. Even when a movie is a local file, a certain amount of it has to load before the MPMoviePlayerController knows enough about the movie and the movie’s specifications to begin playing it. The delay can be perceptible. In the case of a remote resource, this loading process will take even longer. I’ll talk in a moment about how you can know when the movie is ready to play.
Note
If an MPMoviePlayerController fails to load its movie into its view when you’re testing your app in the Simulator, this may be due to an All Exceptions breakpoint. Try turning off breakpoints. This seems to be a bug in Xcode’s interaction with the Simulator.
If the MPMoviePlayerController’s shouldAutoplay property is YES (the default), play will begin as soon as possible, with no further action from you; indeed, play will begin even if you don’t put the MPMoviePlayerController’s view into your interface! If the movie has sound, the user will then hear it without being able to see it, which could be confusing. To prevent this, put the view into your interface, or set shouldAutoplay to NO (or both).
In this example, we create an MPMoviePlayerController, give it a reference to a movie from our app bundle, retain it through a property, and put its view into our interface:
NSURL* m = [[NSBundle mainBundle] URLForResource:@"ElMirage"
                                   withExtension:@"mp4"];
MPMoviePlayerController* mp =
    [[MPMoviePlayerController alloc] initWithContentURL:m];
self.mpc = mp; // retain policy
self.mpc.shouldAutoplay = NO;
[self.mpc prepareToPlay];
self.mpc.view.frame = CGRectMake(10, 10, 300, 250);
self.mpc.backgroundView.backgroundColor = [UIColor redColor];
[self.view addSubview:self.mpc.view];
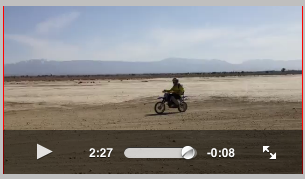
The controls (controlStyle is MPMovieControlStyleEmbedded) include a play/pause button, a slider for changing the current frame of the movie (which may be omitted if the runtime feels the view isn’t wide enough to display it), and a fullscreen button (Figure 28.1); there may also be an AirPlay route button, if an appropriate device is found on the network.
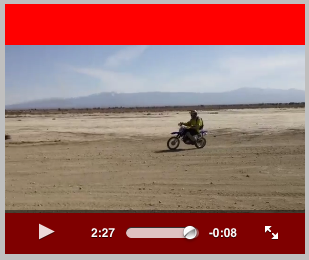
The user can tap the view to show or hide the controls at the bottom; the controls may also disappear automatically after play begins.
The controls, when controlStyle is MPMovieControlStyleEmbedded, appear at the bottom of the view. The movie itself is centered and scaled to fill the size of the view in accordance with the MPMoviePlayerController’s scalingMode; the default is MPMovieScalingModeAspectFit, which scales to fit, keeping the correct aspect ratio, and fills the unfilled dimension with the color of the MPMoviePlayerController’s backgroundView.
That explains why Figure 28.1 doesn’t look very good. Our code is not sophisticated about the size of the movie; it just tells the movie’s view to adopt a certain size. Within that size, the movie itself is scaled and centered, and the controls appear at the bottom. It would be better to set the size of the view in relation to the size of the movie. You can learn the actual size and aspect ratio of the movie, perhaps so as to eliminate the excess unfilled dimension. To do this, you get the MPMoviePlayerController’s naturalSize, but, as I mentioned earlier, it takes time, after the content URL is set and you call prepareToPlay, before this value can be determined. I’ll show an example in a moment.
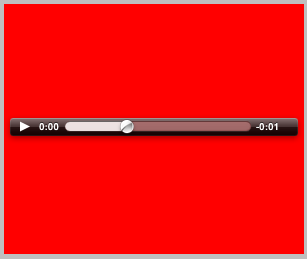
If the movie is actually a sound file, the controls are drawn differently: there is a start/pause button, a slider, and possibly an AirPlay route button, and that’s all. The controls are centered in the view (Figure 28.2).
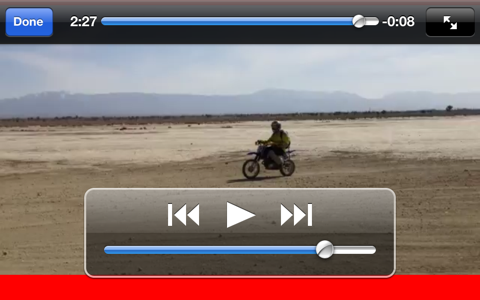
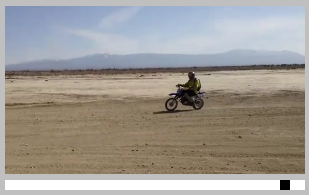
If the user taps the fullscreen button (or pinches outwards) to enter fullscreen mode, the controls (controlStyle is MPMovieControlStyleFullscreen) at the top include a Done button, a slider, and an increased fullscreen button, and a second set of controls appears at the bottom with a play/pause button and rewind and fast-forward buttons, plus possibly a volume slider and an AirPlay route button. The user can tap to dismiss or summon the controls, double-tap to toggle increased fullscreen mode, and tap Done to stop play and leave fullscreen mode (Figure 28.3).
You can also set the style of the controls (controlStyle) manually, though this would be an odd thing to do, because each style of control goes with a display mode (fullscreen or otherwise); you are most likely to use this feature to make it impossible for the user to summon the controls at all (MPMovieControlStyleNone).
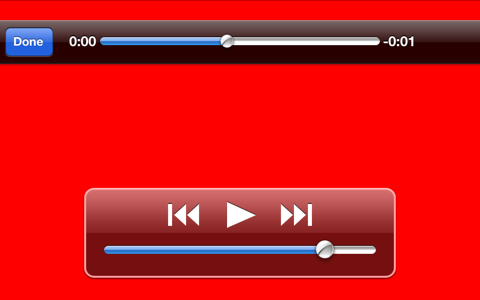
The fullscreen rendering will rotate to compensate for a change in device orientation if the interface in which the MPMoviePlayerController’s view is embedded will do so. You can programmatically toggle between fullscreen and not, with setFullscreen:animated:. You can set an MPMoviePlayerController to fullscreen programmatically even if the movie is just a sound, whose controller lacks a fullscreen button (Figure 28.4).
The movie can be made to repeat automatically (repeatMode) when it reaches its end. You can get the movie’s duration. You can change its initialPlaybackTime and endPlaybackTime (effectively trimming the start and end off the movie). Further programmatic control over the actual playing of the movie is obtained through the MPMediaPlayback protocol, which (as I mentioned a moment ago) MPMoviePlayerController adopts. This gives you the expected play, pause, and stop methods, as well as commands for seeking quickly forward and backward, and you can get and set the currentPlaybackTime to position the playhead. You can also set the currentPlaybackRate, making the movie play slower or faster than normal, and even backward (though in my experience backward play doesn’t always work very well; it skips backward, playing little forward excerpts, rather than running backward as one might have hoped).
An MPMoviePlayerController doesn’t have a delegate. Instead, to learn of events as they happen, you must register for notifications. These notifications are how you know when, after assigning a content URL and calling prepareToPlay, it is safe for you to query properties of the movie such its naturalSize and duration. In this example, I’ll use a notification to embed the movie view into the interface, at the correct aspect ratio, as soon as the naturalSize is known (Figure 28.5):
- (void) setUpMPC {
    NSURL* m = [[NSBundle mainBundle] URLForResource:@"ElMirage"
                                       withExtension:@"mp4"];
    // ... the rest as before; do NOT add to view yet ...
    // [self.view addSubview:self.mpc.view];
    [[NSNotificationCenter defaultCenter]
        addObserver:self
          selector:@selector(finishSetup:)
              name:MPMoviePlayerReadyForDisplayDidChangeNotification
            object:self.mpc];
}

- (void) finishSetup: (id) n {
    [[NSNotificationCenter defaultCenter]
        removeObserver:self
                  name:MPMoviePlayerReadyForDisplayDidChangeNotification
                object:self.mpc];
    CGRect f = self.mpc.view.bounds;
    f.size = self.mpc.naturalSize;
    // make width 300, keep ratio
    CGFloat ratio = 300.0/f.size.width;
    f.size.width *= ratio;
    f.size.height *= ratio;
    self.mpc.view.bounds = f;
    [self.view addSubview:self.mpc.view];
}
Warning
MPMoviePlayerReadyForDisplayDidChangeNotification is new in iOS 6, and supersedes MPMovieNaturalSizeAvailableNotification from iOS 5 and before. Unfortunately, it really does supersede it: MPMovieNaturalSizeAvailableNotification is no longer sent. No major iOS update has lacked changes to MPMoviePlayerController that break your existing code; why should iOS 6 be different?
Additional notifications tell such things as when fullscreen mode is entered and exited, and when the movie finishes playing. One of the most important notifications is MPMoviePlayerPlaybackStateDidChangeNotification; to learn the actual playback state, query the MPMoviePlayerController’s playbackState, which will be one of these:
-
MPMoviePlaybackStateStopped -
MPMoviePlaybackStatePlaying -
MPMoviePlaybackStatePaused -
MPMoviePlaybackStateInterrupted -
MPMoviePlaybackStateSeekingForward -
MPMoviePlaybackStateSeekingBackward
If the content comes from the Internet, there is of course many a slip possible. Things take time; the Internet might slow down, or go away completely; the resource to be fetched might not exist. You’ll want to register for notifications that tell you when things happen, and especially when things go wrong. What I do in the TidBITS News app, where an MPMoviePlayerController is used to play a sound file located remotely across the Internet, is to register for MPMoviePlayerLoadStateDidChangeNotification. When the notification arrives, I check the MPMoviePlayerController’s loadState; it’s a bitmask, and I look to see whether the MPMovieLoadStatePlaythroughOK bit is set:
if (self.mpc.loadState & MPMovieLoadStatePlaythroughOK) { // ...
If, on the other hand, the MPMovieLoadStateStalled bit is set, we can assume that the network is in trouble. Play will not stop automatically; the MPMoviePlayerController will keep trying to obtain data. If we want to prevent that, we have to stop it manually (at which point I’d put up an alert informing the user that there’s a problem).
Another way to detect a problem is by registering for MPMoviePlayerPlaybackDidFinishNotification. If there’s an error, the userInfo dictionary’s MPMoviePlayerPlaybackDidFinishReasonUserInfoKey will be an NSNumber wrapping MPMovieFinishReasonPlaybackError, and the dictionary may also have a key called @"error", which will be an NSError; the localizedDescription of this NSError could be suitable for presentation to the user as a statement of the difficulty.
For extended information about the playback of a movie streamed across the Internet, look into MPMoviePlayerController’s accessLog and errorLog properties.
There Can Be Only One
Only one MPMoviePlayerController can display a movie in your interface. Judicious use of prepareToPlay can make any MPMoviePlayerController’s view the One, but if your interface displays the views of any other MPMoviePlayerControllers, those views may become empty, which doesn’t look good and may puzzle the user. To avoid confusion about why one of your MPMoviePlayerControllers is not playing its movie successfully, the simplest solution is to restrict your interface so that it contains only one MPMoviePlayerController’s view.
An MPMoviePlayerViewController is, as its name implies, a view controller (a UIViewController subclass). It manages an MPMoviePlayerController (its moviePlayer) and automatically provides a fullscreen presentation of the MPMoviePlayerController’s view. Thus, an MPMoviePlayerViewController has some strong advantages of simplicity.
The documentation says that you can use an MPMoviePlayerViewController wherever you would use a UIViewController, such as a child view controller in a tab bar interface or navigation interface, but the MPMoviePlayerViewController’s own interface seems to make the most sense when it is a presented view controller. A category on UIViewController even provides a special method for presenting it, presentMoviePlayerViewControllerAnimated:, which uses a style of animation otherwise unavailable, whereby the current view slides out to reveal the movie view. To remove the view in code, you could then call dismissMoviePlayerViewControllerAnimated. Here’s a simple example:
NSURL* m = [[NSBundle mainBundle] URLForResource:@"ElMirage"
                                   withExtension:@"mp4"];
MPMoviePlayerViewController* mpvc =
    [[MPMoviePlayerViewController alloc] initWithContentURL: m];
mpvc.moviePlayer.shouldAutoplay = NO; // optional
[self presentMoviePlayerViewControllerAnimated:mpvc];
In that code, I’ve set the MPMoviePlayerViewController’s moviePlayer’s shouldAutoplay property just to show that it can be done; the moviePlayer is an MPMoviePlayerController, and can be sent the same sorts of message you’d send it if you were using it on its own. For example, you can register for its notifications. You will not, however, need to send it prepareToPlay.
At present, there appears to be a bug where initWithContentURL: on the iPhone triggers a half dozen spurious console log messages complaining of an “invalid context.” These messages do no harm, but having them appear in the log is rather unpleasant; a workaround is to wrap that call in a fake graphics context, like this:
UIGraphicsBeginImageContext(CGSizeMake(1,1));
MPMoviePlayerViewController* mpvc =
    [[MPMoviePlayerViewController alloc] initWithContentURL: m];
UIGraphicsEndImageContext();
You can detect the user pressing the Done button by registering for the MPMoviePlayerPlaybackDidFinishNotification. If the user tapped Done, the MPMoviePlayerPlaybackDidFinishReasonUserInfoKey in the notification’s userInfo dictionary will be an NSNumber wrapping MPMovieFinishReasonUserExited. If the MPMoviePlayerViewController is a presented view controller, it is dismissed automatically when the user taps the Done button or when the movie plays to its end (in which case the MPMoviePlayerPlaybackDidFinishReasonUserInfoKey is MPMovieFinishReasonPlaybackEnded). If you use the MPMoviePlayerViewController in some other way, the Done button stops play but that’s all, and dealing with the interface is up to you.
MPMoviePlayerViewController is a view controller, so if it is used as a presented view controller, it takes charge of whether to rotate in response to a change in the device orientation (Chapter 19). By default, it does nothing, meaning that it will rotate to any orientation permitted by the app and the app delegate. You can subclass MPMoviePlayerViewController to override supportedInterfaceOrientations if that isn’t what you want.
Note
In general, the simplicity of MPMoviePlayerViewController means that a number of choices are made for you, and you may find yourself struggling against them. (For example, when an MPMoviePlayerViewController’s view is showing, it becomes a recipient of remote control events; see Chapter 27. This feature is convenient, but if it’s not what you want, it is not easily overcome; there is no property for turning it off.) A better approach may be to use an MPMoviePlayerController instead. In the current version of the TidBITS News app, I’ve switched from using MPMoviePlayerViewController to using MPMoviePlayerController and my own view controller, and I’m much happier: with a little more work, I get much more control.
After an MPMoviePlayerViewController’s view is dismissed, if your app’s revealed interface contains an MPMoviePlayerController’s view, that view will be unable to play its movie, because of the rule I stated a moment ago: There Can Be Only One. The MPMoviePlayerViewController’s view was the One, so now the MPMoviePlayerController’s view is broken. To fix it, send prepareToPlay to the MPMoviePlayerController.
UIVideoEditorController is a view controller that presents an interface where the user can trim video. Its view and internal behavior are outside your control, and you’re not supposed to subclass it. You are expected to show the view controller’s view as a presented view on the iPhone or in a popover on the iPad, and respond by way of its delegate.
Before summoning a UIVideoEditorController, be sure to call its class method canEditVideoAtPath:. Not every video format is editable, and not every device supports video editing. If this call returns NO, don’t instantiate UIVideoEditorController to edit the given file. (This call can take some noticeable time to return.) You must also set the UIVideoEditorController instance’s delegate and videoPath before presenting it; the delegate should adopt both UINavigationControllerDelegate and UIVideoEditorControllerDelegate:
NSURL* m = [[NSBundle mainBundle] URLForResource:@"ElMirage"
                                   withExtension:@"mp4"];
BOOL can = [UIVideoEditorController canEditVideoAtPath:path];
if (!can) {
    NSLog(@"can't edit this video");
    return;
}
UIVideoEditorController* vc = [UIVideoEditorController new];
vc.delegate = self;
vc.videoPath = path;
if ([[UIDevice currentDevice] userInterfaceIdiom] == UIUserInterfaceIdiomPad) {
    UIPopoverController* pop =
        [[UIPopoverController alloc] initWithContentViewController:vc];
    pop.delegate = self;
    self.currentPop = pop;
    [pop presentPopoverFromRect:[sender bounds]
        inView:sender permittedArrowDirections:UIPopoverArrowDirectionAny
                                      animated:NO];
}
else {
    [self presentViewController:vc animated:YES completion:nil];
}
Warning
In actual fact I have never been able to get a UIVideoEditorController to work properly on the iPad! I can summon the interface in a popover, but it is not the correct interface — its title is Choose Video, the right button says Use, and the Cancel button does nothing — and trying to summon the interface as a presented view controller causes a crash. This is a very long-standing bug, and I am astounded that Apple has done nothing about it.
The view’s interface (on the iPhone) contains Cancel and Save buttons, a trimming box displaying thumbnails from the movie, a Play/Pause button, and the movie itself. The user slides the ends of the trimming box to set the beginning and end of the saved movie. The Cancel and Save buttons do not dismiss the presented view; you must do that in your implementation of the delegate methods. There are three of them, and you should implement all three and dismiss the presented view in all of them:
-
videoEditorController:didSaveEditedVideoToPath: -
videoEditorControllerDidCancel: -
videoEditorController:didFailWithError:
It’s important to implement the didFail... method, because things can go wrong even at this stage.
Saving the trimmed video takes time. When videoEditorController:didSaveEditedVideoToPath: is called, the trimmed video has already been saved to a file in your app’s temporary directory (the same directory returned from a call to NSTemporaryDirectory). Doing something useful with the saved file is up to you; if you merely leave it in the temporary directory, you can’t rely on it to persist. In this example, I copy the edited movie into the user’s Camera Roll photo album (called Saved Photos if the device has no camera). That takes time too, so when I call UISaveVideoAtPathToSavedPhotosAlbum, I use the second and third arguments to call a method that dismisses the editor after the saving is over:
- (void) videoEditorController: (UIVideoEditorController*) editor
        didSaveEditedVideoToPath: (NSString*) editedVideoPath {
    if (UIVideoAtPathIsCompatibleWithSavedPhotosAlbum(editedVideoPath))
        UISaveVideoAtPathToSavedPhotosAlbum(editedVideoPath, self,
            @selector(video:savedWithError:ci:), nil);
    else
        // need to think of something else to do with it
}
In our secondary method (here, video:savedWithError:ci:), it’s important to check for errors, because things can still go wrong. In particular, on iOS 6, the user could deny us access to the Photos library (see Chapter 30 for more about that). If that’s the case, we’ll get an NSError whose domain is ALAssetsLibraryErrorDomain.
My implementation also has to grapple with the fact that my app’s revealed interface, after the presented UIVideoEditorController is dismissed, will contain an MPMoviePlayerController’s view (as described earlier in this chapter). That view will be broken — unable to show its movie — because, as I’ve already explained, There Can Be Only One. The solution, once again, is to call prepareToPlay, but this call won’t succeed until the dismissal animation is over and the video editor’s movie view has been released; even then, in iOS 6, I have to add an extra delay:
-(void)video:(NSString*)path savedWithError:(NSError*)err ci:(void*)ci {
    if (err)
        // ... do something ...
    [self dismissViewControllerAnimated:YES completion:^{
        dispatch_async(dispatch_get_main_queue(), ^{
            [self.mpc prepareToPlay];
        });
    }];
}
A large suite of AV Foundation classes provides detailed access to media components. To access AV Foundation, you’ll need to link to AVFoundation.framework (and probably CoreMedia.framework as well), and import <AVFoundation/AVFoundation.h>. For a list of classes, see the AV Foundation Framework Reference.
AV Foundation is a huge topic, so there isn’t space here to do more than introduce the concepts involved.
The AV Foundation class that performs actual playing of media is AVPlayer. An AVPlayer has an AVPlayerItem; this is its media. An AVPlayerItem comprises tracks (AVPlayerItemTrack), which can be individually enabled or disabled. It gets these from its underlying AVAsset; this is the basic media unit, as it were, providing you with access to actual tracks (AVAssetTrack) and metadata. As with an MPMoviePlayerController, you might use an AVPlayer to play a pure sound rather than a full-fledged movie.
An AVPlayer can be an AVQueuePlayer, a subclass that allows multiple AVPlayerItems to be loaded up and then played in sequence; I’ll give an example in Chapter 29 of using an AVQueuePlayer to play a series of songs. AVQueuePlayer also has an advanceToNextItem method, and its list of items can be changed dynamically, so you could use it to give the user access to a set of “chapters.”
To display an AVPlayer’s movie, you need an AVPlayerLayer (a CALayer subclass). You are unlikely to take this approach unless you need the extended powers of AV Foundation or the sequential playing power of AVQueuePlayer or the flexibility of working directly with a layer and Core Animation. The AVPlayerLayer doesn’t even come with controls for letting the user play and pause a movie and visualize its progress; you have to create these yourself. Nevertheless, simply displaying a movie in this way is quite easy:
NSURL* m = [[NSBundle mainBundle] URLForResource:@"ElMirage"
                                   withExtension:@"mp4"];
AVPlayer* p = [AVPlayer playerWithURL:m];
self.player = p; // might need a reference later
AVPlayerLayer* lay = [AVPlayerLayer playerLayerWithPlayer:p];
lay.frame = CGRectMake(10,10,300,200);
[self.view.layer addSublayer:lay];
To let the user start playing the movie, we might provide a Play button. In this example, the button toggles the playing status of the movie by changing its rate:
- (IBAction) doButton: (id) sender {
    CGFloat rate = self.player.rate;
    if (rate < 0.01)
        self.player.rate = 1;
    else
        self.player.rate = 0;
}
Another intriguing feature of an AVPlayer is that you can coordinate animation in your interface (Chapter 17) with the playing of the movie. You attach an animation to a layer in more or less the usual way, but the animation takes place in movie playback time: if the movie is stopped, the animation is stopped, and if the movie is run at double rate, the animation runs at double rate. This is done by embedding the layer to be animated in an AVSynchronizedLayer, which is coupled with an AVPlayerItem.
To demonstrate, I’ll extend the previous example; after we insert our AVPlayerLayer into the interface, we also create and insert an AVSynchronizedLayer:
// create synch layer, put it in the interface
AVPlayerItem* item = p.currentItem;
AVSynchronizedLayer* syncLayer =
    [AVSynchronizedLayer synchronizedLayerWithPlayerItem:item];
syncLayer.frame = CGRectMake(10,220,300,10);
syncLayer.backgroundColor = [[UIColor whiteColor] CGColor];
[self.view.layer addSublayer:syncLayer];
// give synch layer a sublayer
CALayer* subLayer = [CALayer layer];
subLayer.backgroundColor = [[UIColor blackColor] CGColor];
subLayer.frame = CGRectMake(0,0,10,10);
[syncLayer addSublayer:subLayer];
// animate the sublayer
CABasicAnimation* anim = [CABasicAnimation animationWithKeyPath:@"position"];
anim.fromValue = [NSValue valueWithCGPoint: subLayer.position];
anim.toValue = [NSValue valueWithCGPoint: CGPointMake(295,5)];
anim.removedOnCompletion = NO;
anim.beginTime = AVCoreAnimationBeginTimeAtZero; // important trick
anim.duration = CMTimeGetSeconds(item.asset.duration);
[subLayer addAnimation:anim forKey:nil];
The result is shown in Figure 28.6. The white rectangle is the AVSynchronizedLayer, tied to our movie. The little black square inside it is its sublayer; when we animate the black square, that animation will be synchronized to the movie, changing its position from the left end of the white rectangle to the right end, starting at the beginning of the movie and with the same duration as the movie. Thus, although we attach this animation to the black square layer in the usual way, the black square doesn’t move until we tap the button to call doButton: and start the movie playing. Moreover, if we tap the button again to pause the movie, the black square stops. The black square is thus automatically representing the current play position within the movie!
For the sake of simplicity, I built the structure in that example from the top down: I started with the AVPlayer and the URL of the media, and extracted the AVPlayerItem and the corresponding AVAsset only when I needed them. That, however, is not typical. In the more general case, you would likely build the structure from the bottom up, starting from the AVAsset, which you can obtain from the URL of the media through a subclass, AVURLAsset. This, then, amounts to the very same thing in bottom-up order:
AVURLAsset* asset = [AVURLAsset URLAssetWithURL:m options:nil];
AVPlayerItem* item = [AVPlayerItem playerItemWithAsset:asset];
AVPlayer* p = [AVPlayer playerWithPlayerItem:item];
self.player = p;
AVPlayerLayer* lay = [AVPlayerLayer playerLayerWithPlayer:p];
lay.frame = CGRectMake(10,10,300,200);
[self.view.layer addSublayer:lay];
We are now ready to create the synchronized layer. But the synchronization will initially be incorrect unless the AVPlayerLayer is itself ready to display the movie. At that moment, the AVPlayerLayer’s readyForDisplay property will be YES. To wait for that moment, we use key–value observing (Chapter 13); AV Foundation doesn’t generally use notifications, as you’re expected to use KVO instead:
[lay addObserver:self forKeyPath:@"readyForDisplay" options:0 context:nil];
When the AVPlayerLayer is ready for display, we complete the interface by creating the synchronized layer:
- (void) observeValueForKeyPath:(NSString *)keyPath ofObject:(id)object
        change:(NSDictionary *)change context:(void *)context {
    if ([keyPath isEqualToString:@"readyForDisplay"]) {
        AVPlayerLayer* lay = (AVPlayerLayer*) object;
        if (lay.readyForDisplay) {
            [lay removeObserver:self forKeyPath:@"readyForDisplay"];
            AVPlayerItem* item = self.player.currentItem;
            AVSynchronizedLayer* syncLayer =
                [AVSynchronizedLayer synchronizedLayerWithPlayerItem:item];
            // ... and the rest is as before ...
It takes time for media values to become available. Just as, with MPMoviePlayerController, we couldn’t fetch a movie’s naturalSize immediately, so too, when examining an AVAsset or AVAssetTrack property, you have to wait until that property has been loaded. To do so, you’ll call loadValuesAsynchronouslyForKeys:completionHandler:; see the AVAsynchronousKeyValueLoading protocol documentation. I’ll give an example in Chapter 29.
AV Foundation also allows you to construct your own media asset in code (AVComposition, an AVAsset subclass, along with its subclass, AVMutableComposition). For example, you might combine part of the sound from one asset and part of the video from another into a single movie. In this (oversimplified) example, I extract two five-second snippets from a video file and put them together with a ten-second snippet from an audio file:
NSString* type = AVMediaTypeVideo;
NSArray* arr = [myVideoAsset tracksWithMediaType:type];
AVAssetTrack* track = [arr lastObject];

AVMutableComposition* comp = [AVMutableComposition composition];
AVMutableCompositionTrack* comptrack =
    [comp addMutableTrackWithMediaType:type
     preferredTrackID:kCMPersistentTrackID_Invalid];
[comptrack insertTimeRange:CMTimeRangeMake(CMTimeMakeWithSeconds(0,1),
                                           CMTimeMakeWithSeconds(5,1))
                   ofTrack:track atTime:CMTimeMakeWithSeconds(0,1) error:nil];
[comptrack insertTimeRange:CMTimeRangeMake(CMTimeMakeWithSeconds(30,1),
                                           CMTimeMakeWithSeconds(5,1))
                   ofTrack:track atTime:CMTimeMakeWithSeconds(5,1) error:nil];

type = AVMediaTypeAudio;
NSURL* s = [[NSBundle mainBundle] URLForResource:@"snd" withExtension:@"m4a"];
AVAsset* asset = [AVURLAsset URLAssetWithURL:s options:nil];
arr = [asset tracksWithMediaType:type];
track = [arr lastObject];

comptrack = [comp addMutableTrackWithMediaType:type
             preferredTrackID:kCMPersistentTrackID_Invalid];
[comptrack insertTimeRange:CMTimeRangeMake(CMTimeMakeWithSeconds(0,1),
                                           CMTimeMakeWithSeconds(10,1))
                   ofTrack:track atTime:CMTimeMakeWithSeconds(0,1) error:nil];

AVPlayerItem* item = [AVPlayerItem playerItemWithAsset:[comp copy]];
You can also apply audio volume changes and video opacity and transform changes to the playback of individual tracks. In this example, continuing on from the previous example, we apply a fadeout to the last three seconds of the existing audio:
AVMutableAudioMixInputParameters* params =
    [AVMutableAudioMixInputParameters
        audioMixInputParametersWithTrack:comptrack];
[params setVolume:1 atTime:CMTimeMakeWithSeconds(0,1)];
[params setVolumeRampFromStartVolume:1 toEndVolume:0
        timeRange:CMTimeRangeMake(CMTimeMakeWithSeconds(6,1),
                                  CMTimeMakeWithSeconds(2,1))];
AVMutableAudioMix* mix = [AVMutableAudioMix audioMix];
mix.inputParameters = [NSArray arrayWithObject: params];

item.audioMix = mix; // item is our existing AVPlayerItem
Here are some other things you can do with AV Foundation:
- Extract single images (“thumbnails”) from a movie (AVAssetImageGenerator).
- Export a movie in a different format (AVAssetExportSession), or read/write raw uncompressed data through a buffer to or from a track (AVAssetReader, AVAssetReaderOutput, AVAssetWriter, AVAssetWriterInput, and so on).
- Capture audio, video, and stills, on a device that supports it (such as an iPhone, or another device connected to external hardware), including capturing video frames as still images (see Technical Q&A QA1702). I’ll say more about this in Chapter 30.
It should be evident from even so brief a summary that you could use AV Foundation to write a movie editor or a sound mixer. To learn more, you’ll want to read the AV Foundation Programming Guide.