The tale told in Chapter 14 and Chapter 15 of how a UIView works and how it draws itself is only half the story. A UIView has a partner called its layer, a CALayer. A UIView does not actually draw itself onto the screen; it draws itself into its layer, and it is the layer that is portrayed on the screen. As I’ve already mentioned, a view is not redrawn frequently; instead, its drawing is cached, and the cached version of the drawing (the bitmap backing store) is used where possible. The cached version is, in fact, the layer. What I spoke of in Chapter 15 as the view’s graphics context is actually the layer’s graphics context.
This might seem like a mere implementation detail, but layers are important and interesting. To understand layers is to understand views more deeply; layers extend the power of views. In particular:
- Layers have properties that affect drawing.
- Layers have drawing-related properties beyond those of a UIView. Because a layer is the recipient and presenter of a view’s drawing, you can modify how a view is drawn on the screen by accessing the layer’s properties. In other words, by reaching down to the level of its layer, you can make a view do things you can’t do through UIView methods alone.
- Layers can be combined within a single view.
- A UIView’s partner layer can contain additional layers. Since the purpose of layers is to draw, portraying visible material on the screen, this allows a UIView’s drawing to be composited of multiple distinct pieces. This can make drawing easier, with the constituents of a drawing being treated as objects.
- Layers are the basis of animation.
- Animation allows you to add clarity, emphasis, and just plain coolness to your interface. Layers are made to be animated (the “CA” in “CALayer” stands for “Core Animation”). Animation is the subject of Chapter 17; understanding layers is a prerequisite for reading that chapter.
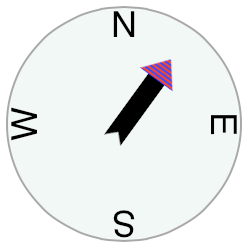
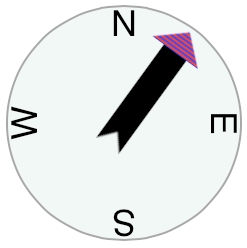
For example, suppose we want to add a compass indicator to our app’s interface. Figure 16.1 portrays a simple version of such a compass. It takes advantage of the arrow that we figured out how to draw in Chapter 15; the arrow is drawn into a layer of its own. The other parts of the compass are layers too: the circle is a layer, and each of the cardinal point letters is a layer. The drawing is thus easy to composite in code (and later in this chapter, that’s exactly what we’ll do); even more intriguing, the pieces can be repositioned and animated separately, so it’s easy to rotate the arrow without moving the circle (and in Chapter 17, that’s exactly what we’ll do).
The documentation discusses layers chiefly in connection with animation (in particular, in the Core Animation Programming Guide). This categorization gives the impression that layers are of interest only if you intend to animate. That’s misleading. Layers are the basis of animation, but they are also the basis of view drawing, and are useful and important even if you don’t use them for animation.
CALayer is not part of UIKit. It’s part of the Quartz Core framework, which is not linked by default into the project template.
If your app contains code that refers to CALayer or related classes, you must link your target to QuartzCore.framework, and you must import <QuartzCore/QuartzCore.h> into any file containing such code.
A UIView instance has an accompanying CALayer instance, accessible as the view’s layer property. This layer has a special status: it is partnered with this view to embody all of the view’s drawing. The layer has no corresponding view property, but the view is the layer’s delegate. The documentation sometimes speaks of this layer as the view’s “underlying layer.”
By default, when a UIView is instantiated, its layer is an instance of CALayer. But if you subclass UIView and you want your subclass’s underlying layer to be an instance of a CALayer subclass (built-in or your own), implement the UIView subclass’s layerClass class method.
That, for example, is how the compass in Figure 16.1 is created. We have a UIView subclass, CompassView, and a CALayer subclass, CompassLayer. CompassView contains these lines:
+ (Class) layerClass {
    return [CompassLayer class];
}
Thus, when CompassView is instantiated, its underlying layer is a CompassLayer. In this example, there is no drawing in CompassView; its job is to give CompassLayer a place in the visible interface, because a layer cannot appear without a view.
Because every view has an underlying layer, there is a tight integration between the two. The layer portrays all the view’s drawing; if the view draws, it does so by contributing to the layer’s drawing. The view is the layer’s delegate. And the view’s properties are often merely a convenience for accessing the layer’s properties. For example, when you set the view’s backgroundColor, you are really setting the layer’s backgroundColor, and if you set the layer’s backgroundColor directly, the view’s backgroundColor is set to match. Similarly, the view’s frame is really the layer’s frame and vice versa.
Warning
A CALayer’s delegate property is settable, but you must never set the delegate property of a UIView’s underlying layer. To do so would be to break the integration between them, thereby causing drawing to stop working correctly.
A UIView must be the delegate of its underlying layer; moreover, it must not be the delegate of any other layer. Don’t do anything to mess this up.
The view draws into its layer, and the layer caches that drawing; the layer can then be manipulated, changing the view’s appearance, without necessarily asking the view to redraw itself. This is a source of great efficiency in the drawing system. It also explains such phenomena as the content stretching that we encountered in the last section of Chapter 15: when the view’s bounds size changes, the drawing system, by default, simply stretches or repositions the cached layer image, until such time as the view is told to generate a new drawing of itself (drawRect:) to replace the layer’s content.
Mac OS X Programmer Alert
On Mac OS X, NSView existed long before CALayer was introduced, so today a view might have no layer, or, if it does have a layer, it might relate to it in various ways. You may be accustomed to terms like layer-backed view or layer-hosting view. On iOS, layers were incorporated from the outset: every UIView has an underlying layer and relates to it in the same way.
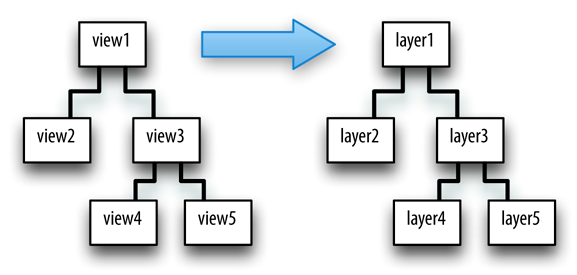
A layer can have sublayers, and a layer has at most one superlayer. Thus there is a tree of layers. This is similar and parallel to the tree of views (Chapter 14). In fact, so tight is the integration between a view and its underlying layer that these hierarchies are effectively the same hierarchy. Given a view and its underlying layer, that layer’s superlayer is the view’s superview’s underlying layer, and that layer has as sublayers all the underlying layers of all the view’s subviews. Indeed, because the layers are how the views actually get drawn, one might say that the view hierarchy really is a layer hierarchy (Figure 16.2).
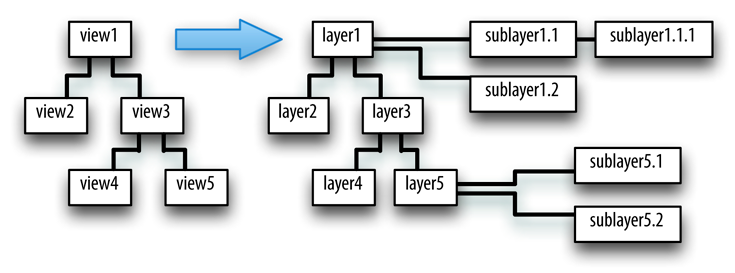
At the same time, the layer hierarchy can go beyond the view hierarchy. A view has exactly one underlying layer, but a layer can have sublayers that are not the underlying layers of any view. So the hierarchy of layers that underlie views exactly matches the hierarchy of views (Figure 16.2), but the total layer tree may be a superset of that hierarchy. In Figure 16.3, we see the same view-and-layer hierarchy as in Figure 16.2, but two of the layers have additional sublayers that are theirs alone (that is, sublayers that are not any view’s underlying layers).
From a visual standpoint, there may be nothing to distinguish a hierarchy of views from a hierarchy of layers. For example, in Chapter 14 we drew three overlapping rectangles using a hierarchy of views (Figure 14.1). This code gives exactly the same visible display by manipulating layers:
UIView* v = self.window.rootViewController.view;
CALayer* lay1 = [CALayer new];
lay1.frame = CGRectMake(113, 111, 132, 194);
lay1.backgroundColor =
    [[UIColor colorWithRed:1 green:.4 blue:1 alpha:1] CGColor];
[v.layer addSublayer:lay1];
CALayer* lay2 = [CALayer new];
lay2.backgroundColor =
    [[UIColor colorWithRed:.5 green:1 blue:0 alpha:1] CGColor];
lay2.frame = CGRectMake(41, 56, 132, 194);
[lay1 addSublayer:lay2];
CALayer* lay3 = [CALayer new];
lay3.backgroundColor =
    [[UIColor colorWithRed:1 green:0 blue:0 alpha:1] CGColor];
lay3.frame = CGRectMake(43, 197, 160, 230);
[v.layer addSublayer:lay3];
There are, indeed, situations in which it is not clear whether a piece of interface should be constructed as a view hierarchy or a layer hierarchy. Several of my apps have an interface that is a rectangular grid of objects of the same type; in some cases, I implement these as layers, in some cases I implement them as views, and sometimes it isn’t clear to me that my choice is much more than arbitrary. A layer on its own is more lightweight than a view; on the other hand, a view is a UIResponder, so it can respond to touches, and layers lack any form of automatic layout.
Layers come with a full set of methods for reading and manipulating the layer hierarchy, parallel to the methods for reading and manipulating the view hierarchy. A layer has a superlayer property and a sublayers property; there are methods addSublayer:, insertSublayer:atIndex:, insertSublayer:below:, insertSublayer:above:, replaceSublayer:with:, and removeFromSuperlayer.
Unlike a view’s subviews property, a layer’s sublayers property is writable; thus, you can give a layer multiple sublayers in a single move, by assigning to its sublayers property. To remove all of a layer’s sublayers, set its sublayers property to nil.
Although a layer’s sublayers have an order, reflected in the sublayers order and regulated with the methods I’ve just mentioned, this is not necessarily the same as their back-to-front drawing order. By default, it is, but a layer also has a zPosition property, a CGFloat, and this also determines drawing order.
The rule is that all sublayers with the same zPosition are drawn in the order they are listed among their sublayers siblings, but lower zPosition siblings are drawn before higher zPosition siblings. (The default zPosition is 0.)
Sometimes, the zPosition property is a more convenient way of dictating drawing order than sibling order is. For example, if layers represent playing cards laid out in a solitaire game, it will likely be a lot easier and more flexible to determine how the cards overlap by setting their zPosition than by rearranging their sibling order.
Methods are also provided for converting between the coordinate systems of layers within the same layer hierarchy: convertPoint:fromLayer:, convertPoint:toLayer:, convertRect:fromLayer:, and convertRect:toLayer:.
Layer coordinate systems and positioning are similar to those of views. A layer’s own internal coordinate system is expressed by its bounds, just like a view; its size is its bounds size, and its bounds origin is the internal coordinate at its top left.
However, a sublayer’s position within its superlayer is not described by its center, like a view; a layer does not have a center. Instead, a sublayer’s position within its superlayer is defined by a combination of two properties, its position and its anchorPoint. Think of the sublayer as pinned to its superlayer; then you have to say both where the pin passes through the sublayer and where it passes through the superlayer. (I didn’t make up that analogy, but it’s pretty apt.)
-
position - A point expressed in the superlayer’s coordinate system.
-
anchorPoint -
Where the
positionpoint is with respect to the layer’s own bounds. It is a pair of floating-point numbers (a CGPoint) describing a fraction (or multiple) of the layer’s own bounds width and bounds height. Thus, for example,{0,0}is the layer’s top left, and{1,1}is its bottom right.
If the anchorPoint is {0.5,0.5} (the default), the position property works like a view’s center property. A view’s center is thus a special case of a layer’s position. This is quite typical of the relationship between view properties and layer properties; the view properties are often a simpler, more convenient, and less powerful version of the layer properties.
A layer’s position and anchorPoint are orthogonal (independent); changing one does not change the other. Therefore, changing either of them without changing the other changes where the layer is drawn within its superlayer.
For example, in Figure 16.1, the most important point in the circle is its center; all the other objects need to be positioned with respect to it. Therefore they all have the same position: the center of the circle. But they differ in their anchorPoint. For example, the arrow’s anchorPoint is {0.5,0.8}, the middle of the shaft, near the end. On the other hand, the anchorPoint of a cardinal point letter is more like {0.5,3}, well outside the letter’s bounds, so as to place the letter near the edge of the circle.
A layer’s frame is a purely derived property. When you get the frame, it is calculated from the bounds size along with the position and anchorPoint. When you set the frame, you set the bounds size and position. In general, you should regard the frame as a convenient façade and no more. Nevertheless, it is convenient! For example, to position a sublayer so that it exactly overlaps its superlayer, you can just set the sublayer’s frame to the superlayer’s bounds.
If you’re going to be moving a layer’s bounds origin as a way of repositioning its sublayers en masse, you might like to make the layer a CAScrollLayer, a CALayer subclass that provides convenience methods for this sort of thing. (Despite the name, a CAScrollLayer provides no scrolling interface; the user can’t scroll it by dragging, for example.) By default, a CAScrollLayer’s masksToBounds property is YES; thus, the CAScrollLayer acts like a window through which you see can only what is within its bounds. (You can set its masksToBounds to NO, but this would be an odd thing to do, as it somewhat defeats the purpose.)
To move the CAScrollLayer’s bounds, you can talk either to it or to a sublayer (at any depth):
- Talking to the CAScrollLayer
-
-
scrollToPoint: - Changes the CAScrollLayer’s bounds origin to that point.
-
scrollToRect: - Changes the CAScrollLayer’s bounds origin minimally so that the given portion of the bounds rect is visible.
-
- Talking to a sublayer
-
-
scrollPoint: - Changes the CAScrollLayer’s bounds origin so that the given point of the sublayer is at the top left of the CAScrollLayer.
-
scrollRectToVisible: -
Changes the CAScrollLayer’s bounds origin so that the given rect of the sublayer’s bounds is within the CAScrollLayer’s bounds area. You can also ask the sublayer for its
visibleRect, the part of this sublayer now within the CAScrollLayer’s bounds.
-
The view hierarchy is actually a layer hierarchy (Figure 16.2). The positioning of a view within its superview is actually the positioning of its layer within its superlayer (the superview’s layer). It follows as the night the day that what I described in Chapter 14 as layout of views is actually layout of layers. Whether a view is positioned manually (by setting its frame or bounds and center) or automatically through its autoresizingMask or automatically through autolayout based on its constraints, what’s really being laid out is a layer.
But what about a sublayer that isn’t any view’s underlying layer (Figure 16.3)? The system obviously keeps such a sublayer at the same position with respect to its superlayer’s bounds; but that’s all it does, and it doesn’t really count as layout. The only option for layout of such sublayers is manual layout that you perform in code.
When a layer needs layout, either because its bounds have changed or because you called setNeedsLayout, you can respond in either of two ways:
-
The layer’s
layoutSublayersmethod is called; to respond, overridelayoutSublayersin your CALayer subclass. -
Alternatively, implement
layoutSublayersOfLayer:in the layer’s delegate. (Remember, if the layer is a view’s underlying layer, the view is its delegate.)
To do effective manual layout of sublayers, you’ll probably need a way to identify or refer to the sublayers. There is no layer equivalent of viewWithTag:, so such identification and reference is entirely up to you. Key–value coding can be helpful here; layers implement key–value coding in a special way, discussed at the end of this chapter.
Mac OS X Programmer Alert
On Mac OS X, layers have extensive layout support, including both constraints and custom layout managers. But iOS lacks all of this.
For a view’s underlying layer, layoutSublayers or layoutSublayersOfLayer: is called after the view’s layoutSubviews. Under autolayout, you must call super or else autolayout will break. Moreover, these methods may be called more than once during the course of autolayout; if you’re looking for an automatically generated signal that it’s time to do manual layout of sublayers (because the device has been rotated, for example), the view’s layoutSubviews might be a better choice.
There are various ways to make a layer display something (apart from having a partnered view draw into it, as discussed in Chapter 15).
The simplest way to make something appear in a layer is through its contents property.
This is parallel to the image in a UIImageView (Chapter 15). It is expected to be a CGImageRef (or nil, signifying no image). A CGImageRef is not an object type, but the contents property is typed as an id; in order to quiet the compiler, you’ll have to typecast your CGImageRef to an id as you assign it, like this:
layer.contents = (id)[im CGImage];
You may be wondering why, under ARC, we don’t also have to “cross the bridge” from the CFTypeRef world of a CGImageRef
to the object world of an id by supplying a __bridge cast, as discussed in Chapter 12. It’s because the CGImage method is a Cocoa method and supplies ARC with the memory management information it needs. Coming back the other way, though, we would need an explicit __bridge cast:
CGImageRef imref = (__bridge CGImageRef)layer.contents;
Warning
Setting a layer’s contents to a UIImage, rather than a CGImage, will fail silently — the image doesn’t appear, but there is no error either. This is absolutely maddening, and I wish I had a nickel for every time I’ve done it and then wasted hours figuring out why my layer isn’t appearing.
There are also four methods that can be implemented to provide or draw a layer’s content on demand, similar to a UIView’s drawRect:. A layer is very conservative about calling these methods (and you must not call any of them directly). When a layer does call these methods, I will say that the layer redisplays itself. Here is how a layer can be caused to redisplay itself:
-
If the layer’s
needsDisplayOnBoundsChangeproperty is NO (the default), then the only way to cause the layer to redisplay itself is by callingsetNeedsDisplay(orsetNeedsDisplayInRect:). Even this might not cause these methods to be called right away; if that’s crucial, then you will also calldisplayIfNeeded. -
If the layer’s
needsDisplayOnBoundsChangeproperty is YES, then the layer will also redisplay itself when the layer’s bounds change (rather like a UIView’sUIViewContentModeRedraw).
Here are the four methods that can be called when a layer redisplays itself; pick one to implement (don’t try to combine them, you’ll just confuse things):
-
displayin a subclass -
Your CALayer subclass can override
display. There’s no graphics context at this point, sodisplayis pretty much limited to setting thecontentsimage. -
displayLayer:in the delegate -
You can set the CALayer’s
delegateproperty and implementdisplayLayer:in the delegate. As withdisplay, there’s no graphics context, so you’ll just be setting thecontentsimage. -
drawInContext:in a subclass -
Your CALayer subclass can override
drawInContext:. The parameter is a graphics context into which you can draw directly; it is not automatically made the current context. -
drawLayer:inContext:in the delegate -
You can set the CALayer’s
delegateproperty and implementdrawLayer:inContext:. The second parameter is a graphics context into which you can draw directly; it is not automatically made the current context.
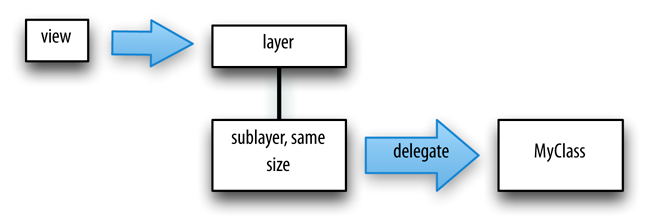
Remember, you must not set the delegate property of a view’s underlying layer! The view is its delegate and must remain its delegate. This restriction is not as onerous as it seems; there’s generally an easy architectural way to draw into a layer by way of some other delegate if that’s what you want to do.
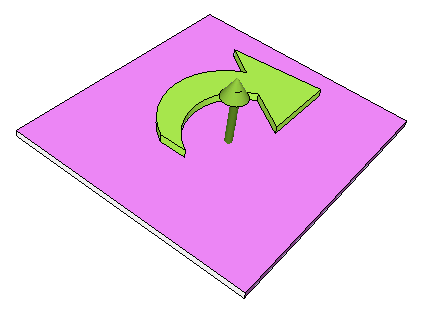
For example, in one of my apps there’s an overlay view, sitting on top of everything else on the screen; the user is unaware of this, because the view is transparent and usually does no drawing, and the view ignores touches, which fall through to the visible views, as if the overlay were not there at all. But every once in a while I want the overlay view to display something (this is its purpose). I don’t want the overhead of making an image, and my app has a main controller, which already knows what needs drawing, so I want to draw using this controller as a layer delegate. But it can’t be the delegate of the overlay view’s underlying layer, so I give that layer a sublayer and make my main controller that sublayer’s delegate. Thus we have a view and its underlying layer that do nothing, except to serve as a host for this sublayer (Figure 16.4) — and there’s nothing wrong with that.
Assigning a layer a contents image and drawing directly into the layer are, in effect, mutually exclusive. So:
-
If a layer’s
contentsis assigned an image, this image is shown immediately and replaces whatever drawing may have been displayed in the layer. -
If a layer redisplays itself and
drawInContext:ordrawLayer:inContext:draws into the layer, the drawing replaces whatever image may have been displayed in the layer. -
If a layer redisplays itself and none of the
displaymethods provides content (perhaps because you didn’t override any of them), the layer will be empty of content.
A layer has a scale, its contentsScale, which maps point distances in the layer’s graphics context to pixel distances on the device. A layer that’s managed by Cocoa, if it has contents, will adjust its contentsScale automatically as needed; for example, if a UIImageView has a double-resolution image (its scale is 2), and if we’re running on a device with a double-resolution screen, then the image view’s underlying layer is assigned a contentsScale of 2. A layer that you are creating and managing yourself, however, has no such automatic behavior; it’s up to you, if you plan to draw into the layer, to set its contentsScale appropriately. Content drawn into a layer with a contentsScale of 1 may appear pixellated or fuzzy on a double-resolution screen.
Three layer properties strongly affect what the layer displays, in ways that can be baffling to beginners: its backgroundColor property, its opaque property, and its opacity property. Here’s what you need to know:
-
Think of the
backgroundColoras separate from the layer’s own drawing, and as painted behind the layer’s own drawing. It is equivalent to a view’sbackgroundColor(and if this layer is a view’s underlying layer, it is the view’sbackgroundColor). Changing thebackgroundColortakes effect immediately. -
The
opaqueproperty determines whether the layer’s graphics context is opaque. An opaque graphics context is black; you can draw on top of that blackness, but the blackness is still there. A non-opaque graphics context is clear; where no drawing is, it is completely transparent. Changing theopaqueproperty has no effect until the layer redisplays itself.If a layer is a view’s underlying layer, then setting the view’s
backgroundColorto an opaque color (alpha component of1) sets the layer’sopaque, though not the view’sopaque, to YES. I regard this as extremely weird. (It is the reason behind the strange behavior ofCGContextClearRectdescribed in Chapter 15.) -
The
opacityproperty affects the overall apparent transparency of the layer. It is equivalent to a view’salpha(and if this layer is a view’s underlying layer, it is the view’salpha). It affects the apparent transparency of the layer’s sublayers as well. It affects the apparent transparency of the background color and the apparent transparency of the layer’s content separately (just as with a view’salpha). Changing theopacityproperty takes effect immediately.
When drawing directly into a layer, the behavior of GCContextClearRect differs from what was described in Chapter 15: instead of punching a hole through the background color, it effectively paints with the layer’s background color. (This can have curious side effects.)
Once a layer has content, regardless of whether this content came from an image (setting the contents property) or from direct drawing into its context (drawInContext:, drawLayer:inContext:), various properties dictate how the content should be drawn in relation to the layer’s bounds. It is as if the cached content is itself treated as an image, which can then be resized, repositioned, cropped, and so on. These properties are:
-
contentsGravity -
This property, a string, is parallel to a UIView’s
contentModeproperty, and describes how the content should be positioned or stretched in relation to the bounds. For example,kCAGravityCentermeans the content is centered in the bounds without resizing;kCAGravityResize(the default) means the content is sized to fit the bounds, even if this means distorting its aspect; and so forth.
Note
For historical reasons, the terms “bottom” and “top” in the names of the contentsGravity settings have the opposite of their expected meanings.
-
contentsRect -
A CGRect expressing the proportion of the content that is to be displayed. The default is
{{0,0},{1,1}}, meaning the entire content is displayed. The specified part of the content is sized and positioned in relation to the bounds in accordance with thecontentsGravity. Thus, for example, you can scale up part of the content to fill the bounds, or slide part of a larger image into view without redrawing or changing thecontentsimage.You can also use the
contentsRectto scale down the content, by specifying a largercontentsRectsuch as{{-.5, -.5}, {1.5, 1.5}}; but any content pixels that touch the edge of thecontentsRectwill then be extended outwards to the edge of the layer (to prevent this, make sure that the outermost pixels of the content are all empty). -
contentsCenter -
A CGRect expressing the central region of nine rectangular regions of the
contentsRectthat are variously allowed to stretch if thecontentsGravitycalls for stretching. The central region (the actual value of thecontentsCenter) stretches in both directions. Of the other eight regions (inferred from the value you provide), the four corner regions don’t stretch, and the four side regions stretch in one direction. (This should remind you of how a resizable image stretches.)
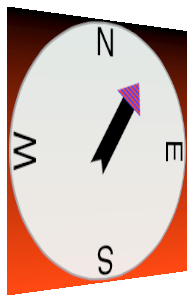
If you’re drawing directly into the layer’s graphics context (e.g., with drawLayer:inContext:), and the contentsRect is the entire content, then if the layer redisplays itself, the contentsGravity won’t matter, because the graphics context fills the layer. But if the layer’s bounds are resized when needsDisplayOnBoundsChange is NO, then its cached content from the last time you drew is treated as an image. By a judicious combination of settings, you can attain some fairly sophisticated automatic behavior, with no need to redraw the content yourself. For example, Figure 16.5 shows the result of the following settings:
arrow.needsDisplayOnBoundsChange = NO;
arrow.contentsCenter = CGRectMake(0.0, 0.4, 1.0, 0.6);
arrow.contentsGravity = kCAGravityResizeAspect;
arrow.bounds = CGRectInset(arrow.bounds, -20, -20);
Because needsDisplayOnBoundsChange is NO, the content is not redisplayed when the arrow’s bounds are increased; instead, the cached content is used. The contentsGravity setting tells us to resize proportionally; therefore, the arrow is both longer and wider than in Figure 16.1, but not in such a way as to distort its proportions. However, notice that although the triangular arrowhead is wider, it is not longer; the increase in length is due entirely to the stretching of the shaft. That’s because the contentsCenter region is restricted to the shaft of the arrow.
If the content is larger than the bounds of the layer (which can easily happen if you’re assigning a contents image), and if the contentsGravity and contentsRect do not resize the content to fit the bounds, then by default the content will be drawn larger than the layer; the layer does not automatically clip its content to its bounds (just as it does not automatically clip its sublayers to its bounds). To get such clipping, for both content and sublayers, set the layer’s masksToBounds property to YES.
Note
The value of a layer’s bounds origin does not affect where its content is drawn. It affects only where its sublayers are drawn.
A few built-in CALayer subclasses provide some basic but extremely helpful self-drawing ability:
- CATextLayer
-
A CATextLayer has a
stringproperty, which can be an NSString or NSAttributedString, along with other text formatting properties; it draws itsstring. The default text color, theforegroundColorproperty, is white, which is unlikely to be what you want. The text is different from thecontentsand is mutually exclusive with it: either the contents image or the text will be drawn, but not both, so in general you should not give a CATextLayer any contents image. In Figure 16.1, the cardinal point letters are CATextLayer instances.
Warning
Text drawing has changed in iOS 6. If you were using CATextLayer in iOS 5 or before, you may find that your text appears differently in iOS 6 (for example, its position may be shifted).
- CAShapeLayer
-
A CAShapeLayer has a
pathproperty, which is a CGPath. It fills or strokes this path, or both, depending on itsfillColorandstrokeColorvalues, and displays the result; the default is afillColorof black and nostrokeColor. A CAShapeLayer may also havecontents; the shape is displayed on top of the contents image, but there is no property permitting you to specify a compositing mode. In Figure 16.1, the background circle is a CAShapeLayer instance, stroked with gray and filled with a lighter, slightly transparent gray. - CAGradientLayer
-
A CAGradientLayer covers its background with a simple linear gradient; thus, it’s an easy way to composite a gradient into your interface (and if you need something more elaborate you can always draw with Core Graphics instead). The gradient is defined much as in the Core Graphics gradient example in Chapter 15, an array of locations and an array of corresponding colors (except that these are NSArrays, not C arrays), along with a start and end point. To clip the gradient, you can add a mask to the CAGradientLayer (masks are discussed later in this chapter). A CAGradientLayer’s
contentsare not displayed.The
colorsarray requires CGColors, not UIColors. But CGColorRef is not an object type, whereas NSArray expects objects, so to quiet the compiler you’ll need to typecast (toid).
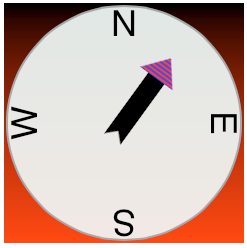
Figure 16.6 shows our compass drawn with an extra CAGradientLayer behind it.
The way a layer is drawn on the screen can be modified though a transform. This is not surprising, because a view can have a transform (see Chapter 14), and a view is drawn on the screen by its layer. As with the bounds and other properties, a view and its underlying layer are tightly linked; when you change the transform of one, you are changing the transform of the other. But, as so often happens, the layer’s transform is more powerful than the view’s transform. Thus, you can use the transform of the underlying layer to accomplish things with a view that you can’t accomplish with the view’s transform alone.
In the simplest cases, when a transform is two-dimensional, you can use the setAffineTransform: and affineTransform methods. The value is a CGAffineTransform, familiar from Chapter 14 and Chapter 15. The transform is applied around the anchorPoint. Thus, the anchorPoint has a second purpose that I didn’t tell you about when discussing it earlier.
You now know everything you need to know in order to understand the code that generated Figure 16.6, so here is that code. Notice how the four cardinal point letters are drawn by a CATextLayer and placed using a transform. They are drawn at the same coordinates, but they have different rotation transforms. Moreover, even though the CATextLayers are small (just 40 by 40) and appear near the perimeter of the circle, they are anchored, and so their rotation is centered, at the center of the circle. In this code, self is the CompassLayer; it does no drawing of its own, but merely assembles and configures its sublayers. To generate the arrow, we make ourselves the arrow layer’s delegate and call setNeedsDisplay; this causes drawLayer:inContext: to be called in CompassLayer (that code is just the same code we developed for drawing the arrow into a context in Chapter 15, and is not repeated here):
// the gradient
CAGradientLayer* g = [CAGradientLayer new];
g.contentsScale = [UIScreen mainScreen].scale;
g.frame = self.bounds;
g.colors = @[(id)[[UIColor blackColor] CGColor],
            (id)[[UIColor redColor] CGColor]];
g.locations = @[@0.0f,
               @1.0f];
[self addSublayer:g];

// the circle
CAShapeLayer* circle = [CAShapeLayer new];
circle.contentsScale = [UIScreen mainScreen].scale;
circle.lineWidth = 2.0;
circle.fillColor =
[[UIColor colorWithRed:0.9 green:0.95 blue:0.93 alpha:0.9] CGColor];
circle.strokeColor = [[UIColor grayColor] CGColor];
CGMutablePathRef p = CGPathCreateMutable();
CGPathAddEllipseInRect(p, nil, CGRectInset(self.bounds, 3, 3));
circle.path = p;
[self addSublayer:circle];
circle.bounds = self.bounds;
circle.position = CGPointMake(CGRectGetMidX(self.bounds),
                              CGRectGetMidY(self.bounds));

// the four cardinal points
NSArray* pts = @[@"N", @"E", @"S", @"W"];
for (int i = 0; i < 4; i++) {
    CATextLayer* t = [CATextLayer new];
    t.contentsScale = [UIScreen mainScreen].scale;
    t.string = pts[i];
    t.bounds = CGRectMake(0,0,40,40);
    t.position = CGPointMake(CGRectGetMidX(circle.bounds),
                             CGRectGetMidY(circle.bounds));
    CGFloat vert = CGRectGetMidY(circle.bounds) / CGRectGetHeight(t.bounds);
    t.anchorPoint = CGPointMake(0.5, vert);
    t.alignmentMode = kCAAlignmentCenter;
    t.foregroundColor = [[UIColor blackColor] CGColor];
    [t setAffineTransform:CGAffineTransformMakeRotation(i*M_PI/2.0)];
    [circle addSublayer:t];
}

// the arrow
CALayer* arrow = [CALayer new];
arrow.contentsScale = [UIScreen mainScreen].scale;
arrow.bounds = CGRectMake(0, 0, 40, 100);
arrow.position = CGPointMake(CGRectGetMidX(self.bounds),
                             CGRectGetMidY(self.bounds));
arrow.anchorPoint = CGPointMake(0.5, 0.8);
arrow.delegate = self;
[arrow setAffineTransform:CGAffineTransformMakeRotation(M_PI/5.0)];
[self addSublayer:arrow];
[arrow setNeedsDisplay];
A full-fledged layer transform, the value of the transform property, takes place in three-dimensional space; its description includes a z-axis, perpendicular to both the x-axis and y-axis. (By default, the positive z-axis points out of the screen, toward the viewer’s face.) Layers do not magically give you realistic three-dimensional rendering — for that you would use OpenGL, which is beyond the scope of this discussion. Layers are two-dimensional objects, and they are designed for speed and simplicity. Nevertheless, they do operate in three dimensions, quite sufficiently to give a cartoonish but effective sense of reality, especially when performing an animation. We’ve all seen the screen image flip like turning over a piece of paper to reveal what’s on the back; that’s a rotation in three dimensions.
A three-dimensional transform takes place around a three-dimensional extension of the anchorPoint, whose z-component is supplied by the anchorPointZ property. Thus, in the reduced default case where anchorPointZ is 0, the anchorPoint is sufficient, as we’ve already seen in using CGAffineTransform.
The transform itself is described mathematically by a struct called a CATransform3D. The Core Animation Function Reference lists the functions for working with these transforms. They are a lot like the CGAffineTransform functions, except they’ve got a third dimension. For example, here’s the declaration of the function for making a 2D scale transform:
CGAffineTransform CGAffineTransformMakeScale (
   CGFloat sx,
   CGFloat sy
);
And here’s the declaration of the function for making a 3D scale transform:
CATransform3D CATransform3DMakeScale (
    CGFloat sx,
    CGFloat sy,
    CGFloat sz
);
The rotation 3D transform is a little more complicated. In addition to the angle, you also have to supply three coordinates describing the vector around which the rotation takes place. Perhaps you’ve forgotten from your high-school math what a vector is, or perhaps trying to visualize three dimensions boggles your mind, so think of it this way.
Pretend for purposes of discussion that the anchor point is the origin, {0,0,0}. Now imagine an arrow emanating from the anchor point; its other end, the pointy end, is described by the three coordinates you provide. Now imagine a plane that intersects the anchor point, perpendicular to the arrow. That is the plane in which the rotation will take place; a positive angle is a clockwise rotation, as seen from the side of the plane with the arrow (Figure 16.7). In effect, the three points you supply describe, relative to the anchor point, where your eye would have to be to see this rotation as an old-fashioned two-dimensional rotation.
The three values you give specify a direction, not a point. Thus it makes no difference on what scale you give them: {1,1,1} means the same thing as {10,10,10}. If the three values are {0,0,1}, with all other things being equal, the case is collapsed to a simple CGAffineTransform, because the rotational plane is the screen. On the other hand, if the three values are {0,0,-1}, it’s a backward CGAffineTransform, so that a positive angle looks counterclockwise (because we are looking at the “back side” of the rotational plane).
A layer can itself be rotated in such a way that its “back” is showing. For example, the following rotation flips a layer around its y-axis:
someLayer.transform = CATransform3DMakeRotation(M_PI, 0, 1, 0);
By default, the layer is considered double-sided, so when it is flipped to show its “back,” what’s drawn is an appropriately reversed version of the content of the layer (along with its sublayers, which by default are still drawn in front of the layer, but reversed and positioned in accordance with the layer’s transformed coordinate system). But if the layer’s doubleSided property is NO, then when it is flipped to show its “back,” the layer disappears (along with its sublayers); its “back” is transparent and empty.
There are two ways to place layers at different nominal depths with respect to their siblings.
One is through the z-component of their position, which is the zPosition property. Thus the zPosition, too, has a second purpose that I didn’t tell you about earlier. The other is to apply a transform that translates the layer’s position in the z-direction. These two values (the z-component of a layer’s position and the z-component of its translation transform) are related; in some sense, the zPosition is a shorthand for a translation transform in the z-direction. (If you provide both a zPosition and a z-direction translation, you can rapidly confuse yourself.)
In the real world, changing an object’s zPosition would make it appear larger or smaller, as it is positioned closer or further away; but this, by default, is not the case in the world of layer drawing. There is no attempt to portray perspective; the layer planes are drawn at their actual size and flattened onto one another, with no illusion of distance. (This is called orthographic projection, and is the way blueprints are often drawn to display an object from one side.)
However, there’s a widely used trick for introducing a quality of perspective into the way layers are drawn: make them sublayers of a layer whose sublayerTransform property maps all points onto a “distant” plane. (This is probably just about the only thing the sublayerTransform property is ever used for.) Combined with orthographic projection, the effect is to apply one-point perspective to the drawing, so that things do get perceptibly smaller in the negative z-direction.
For example, let’s try applying a sort of “page-turn” rotation to our compass: we’ll anchor it at its right side and then rotate it around the y-axis. For purposes of the example, the sublayer we’re actually rotating is accessed through a property, rotationLayer:
self.rotationLayer.anchorPoint = CGPointMake(1,0.5);
self.rotationLayer.position =
    CGPointMake(CGRectGetMaxX(self.bounds), CGRectGetMidY(self.bounds));
self.rotationLayer.transform = CATransform3DMakeRotation(M_PI/4.0, 0, 1, 0);

The results are disappointing (Figure 16.8); the compass looks more squashed than rotated. Now, however, we’ll also apply the distance-mapping transform. The superlayer here is self:
CATransform3D transform = CATransform3DIdentity;
transform.m34 = -1.0/1000.0;
self.sublayerTransform = transform;
The results (shown in Figure 16.9) are better, and you can experiment with values to replace 1000.0; for example, 500.0 gives an even more exaggerated effect. Also, the zPosition of the rotationLayer will now affect how large it is.
Another way to draw layers with depth is to use CATransformLayer. This CALayer subclass doesn’t do any drawing of its own; it is intended solely as a host for other layers. It has the remarkable feature that you can apply a transform to it and it will maintain the depth relationships among its own sublayers. For example:
// lay1 is a layer, f is a CGRect
CALayer* lay2 = [CALayer layer];
lay2.frame = f;
lay2.backgroundColor = [UIColor blueColor].CGColor;
[lay1 addSublayer:lay2];
CALayer* lay3 = [CALayer layer];
lay3.frame = CGRectOffset(f, 20, 30);
lay3.backgroundColor = [UIColor greenColor].CGColor;
lay3.zPosition = 10;
[lay1 addSublayer:lay3];
lay1.transform = CATransform3DMakeRotation(M_PI, 0, 1, 0);
In that code, the superlayer lay1 is flipped like a page being turned by setting its transform. Normally, as I mentioned earlier, the sublayer drawing order doesn’t change; the green layer is drawn in front of the blue layer, even after the transform is applied. But if lay1 is a CATransformLayer, the green layer is drawn behind the blue layer after the transform; they are both sublayers of lay1, so their depth relationship is maintained.
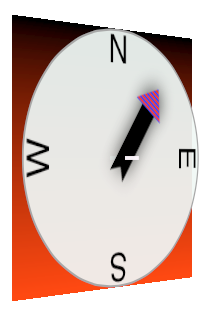
Figure 16.10 shows our page-turn rotation yet again, still with the sublayerTransform applied to self, but this time the only sublayer of self is a CATransformLayer. The CATransformLayer, to which the page-turn transform is applied, holds the gradient layer, the circle layer, and the arrow layer. Those three layers are at different depths (using different zPosition settings), and you can see that the circle layer floats in front of the gradient layer. (This is clear from its apparent offset, but I wish you could see this page-turn as an animation, which makes the circle jump right out from the gradient as the rotation proceeds.) I’ve also tried to emphasize the arrow’s separation from the circle by adding a shadow.
Even more remarkable, note the little white peg sticking through the arrow and running into the circle. It is a CAShapeLayer, rotated to be perpendicular to the CATransformLayer. Normally, it runs straight out of the circle toward the viewer, so it is seen end-on, and because a layer has no thickness, it is invisible. But as the CATransformLayer pivots forward in our page-turn rotation, the peg maintains its orientation relative to the circle, and comes into view.
There is, I think, a slight additional gain in realism if the same sublayerTransform is applied also to the CATransformLayer, but I have not done so here.
A CALayer has many additional properties that affect details of how it is drawn. Once again, all of these drawing details can, of course, be applied equally to a UIView; changing these properties of the UIView’s underlying layer changes how the view is drawn. Thus, these are effectively view features as well.
A CALayer can have a shadow, defined by its shadowColor, shadowOpacity, shadowRadius, and shadowOffset properties. To make the layer draw a shadow, set the shadowOpacity to a nonzero value. The shadow is normally based on the shape of the layer’s nontransparent region, but deriving this shape can be calculation-intensive (so much so that in early versions of iOS, layer shadows weren’t implemented). You can vastly improve performance by defining the shape yourself and assigning this shape as a CGPath to the shadowPath property.
A CALayer can have a border (borderWidth, borderColor); the borderWidth is drawn inward from the bounds, potentially covering some of the content unless you compensate.
A CALayer can be bounded by a rounded rectangle, by giving it a cornerRadius greater than zero. If the layer has a border, the border has rounded corners too. If the layer has a backgroundColor, that background is clipped to the shape of the rounded rectangle. If the layer’s masksToBounds is YES, the layer’s content and its sublayers are clipped by the rounded corners.
Like a UIView, a CALayer has a hidden property that can be set to take it and its sublayers out of the visible interface without actually removing it from its superlayer.
A CALayer can have a mask.
This is itself a layer, whose content must be provided somehow. The transparency of the mask’s content in a particular spot becomes (all other things being equal) the transparency of the layer at that spot. The hues in the mask’s colors are irrelevant; only transparency matters. To position the mask, pretend it’s a sublayer.
For example, Figure 16.11 shows our arrow layer, with the gray circle layer behind it, and a mask applied to the arrow layer. The mask is silly, but it illustrates very well how masks work: it’s an ellipse, with an opaque fill and a thick, semitransparent stroke. Here’s the code that generates and applies the mask:
CAShapeLayer* mask = [CAShapeLayer new];
mask.frame = arrow.bounds;
CGMutablePathRef p2 = CGPathCreateMutable();
CGPathAddEllipseInRect(p2, nil, CGRectInset(mask.bounds, 10, 10));
mask.strokeColor = [[UIColor colorWithWhite:0.0 alpha:0.5] CGColor];
mask.lineWidth = 20;
mask.path = p2;
arrow.mask = mask;
CGPathRelease(p2);

Using a mask, we can do manually and in a more general way what the cornerRadius and masksToBounds properties do, clipping all our content drawing and our sublayers (and, if this layer is a view’s underlying layer, the view’s subviews) to a desired path. Here’s a utility method that generates a CALayer suitable for use as a rounded rectangle mask:
- (CALayer*) maskOfSize:(CGSize)sz roundingCorners:(CGFloat)rad {
    CGRect r = (CGRect){CGPointZero, sz};
    UIGraphicsBeginImageContextWithOptions(r.size, NO, 0);
    CGContextRef con = UIGraphicsGetCurrentContext();
    CGContextSetFillColorWithColor(
        con,[UIColor colorWithWhite:0 alpha:0].CGColor);
    CGContextFillRect(con, r);
    CGContextSetFillColorWithColor(
        con,[UIColor colorWithWhite:0 alpha:1].CGColor);
    UIBezierPath* p =
        [UIBezierPath bezierPathWithRoundedRect:r cornerRadius:rad];
    [p fill];
    UIImage* im = UIGraphicsGetImageFromCurrentImageContext();
    UIGraphicsEndImageContext();
    CALayer* mask = [CALayer layer];
    mask.frame = r;
    mask.contents = (id)im.CGImage;
    return mask;
}
By now, you’re probably envisioning all sorts of compositing fun, with layers masking sublayers and laid semitransparently over other layers. There’s nothing wrong with that, but when an iOS device is asked to animate the movement of its drawing from place to place, the animation may stutter because the device lacks the necessary computing power to composite repeatedly and rapidly. This sort of issue is likely to emerge particularly when your code performs an animation (Chapter 17) or when the user is able to animate drawing through touch, as when scrolling a table view (Chapter 21). You may be able to detect these problems by eye, and you can quantify them on a device by using the Core Animation template in Instruments, which shows the frame rate achieved during animation. Also, both the Core Animation template and the Simulator’s Debug menu let you summon colored overlays that provide clues as to possible sources of inefficient drawing which can lead to such problems.
In general, opaque drawing is most efficient. (Nonopaque drawing is what Instruments marks in red as “blended layers.”) If a layer will always be shown over a background consisting of a single color, you can give the layer its own background of that same color; when additional layer content is supplied, the visual effect will be the same as if that additional layer content were composited over a transparent background. For example, instead of an image masked to a rounded rectangle (with a layer’s cornerRadius or mask property), you could use Core Graphics to clip the drawing of that image into the graphics context of a layer whose background color is the same as that of the destination in front of which the drawing will be shown. Here’s an example from a view’s drawRect: in one of my own apps:
// clip to rounded rect
CGRect r = CGRectInset(rect, 1, 1);
[[UIBezierPath bezierPathWithRoundedRect:r cornerRadius:6] addClip];
// draw image
UIImage* im = [UIImage imageNamed: @"linen.jpg"];
// simulate UIViewContentModeScaleAspectFill
// make widths the same, image height will be too tall
CGFloat scale = im.size.width/rect.size.width;
CGFloat y = (im.size.height/scale - rect.size.height) / 2.0;
CGRect r2 = CGRectMake(0,-y,im.size.width/scale, im.size.height/scale);
r2 = CGRectIntegral(r2); // looks a whole lot better if we do this
[im drawInRect:r2];
Another way to gain some efficiency is by “freezing” the entirety of the layer’s drawing as a bitmap. In effect, you’re drawing everything in the layer to a secondary cache and using the cache to draw to the screen. Copying from a cache is less efficient than drawing directly to the screen, but this inefficiency may be more than compensated for, if there’s a deep or complex layer tree, by not having to composite that tree every time we render. To do this, set the layer’s shouldRasterize to YES and its rasterizationScale to some sensible value (probably [UIScreen mainScreen].scale). You can always turn rasterization off again by setting shouldRasterize to NO, so it’s easy to rasterize just before some massive or sluggish rearrangement of the screen and then unrasterize afterward. (In addition, you can get some cool “out of focus” effects by setting the rasterizationScale to around 0.3.)
New in iOS 6 is a layer property drawsAsynchronously. The default is NO. If set to YES, the layer’s graphics context accumulates drawing commands and obeys them later on a background thread. Your drawing commands thus run very quickly, because they are not in fact being obeyed at the time you give them. I haven’t had occasion to use this, but presumably there could be situations where it keeps your app responsive when drawing would otherwise be time-consuming.
All of a layer’s properties are accessible through key–value coding by way of keys with the same name as the property. Thus, to apply a mask to a layer, instead of saying this:
layer.mask = mask;
we could have said:
[layer setValue: mask forKey: @"mask"];
In addition, CATransform3D and CGAffineTransform values can be expressed through key–value coding and key paths. For example, instead of writing this earlier:
self.rotationLayer.transform = CATransform3DMakeRotation(M_PI/4.0, 0, 1, 0);
we could have written this:
[self.rotationLayer setValue:[NSNumber numberWithFloat:M_PI/4.0]
                  forKeyPath:@"transform.rotation.y"];
This notation is possible because CATransform3D is key–value coding compliant for a repertoire of keys and key paths. These are not properties, however; a CATransform3D doesn’t have a rotation property. It doesn’t have any properties, because it isn’t even an object. You cannot say:
self.rotationLayer.transform.rotation.y = //... No, sorry
The transform key paths you’ll use most often are rotation.x, rotation.y, rotation.z, rotation (same as rotation.z), scale.x, scale.y, scale.z, translation.x, translation.y, translation.z, and translation (two-dimensional, a CGSize).
The Quartz Core framework also injects KVC compliance into CGPoint, CGSize, and CGRect, allowing you to use keys and key paths matching their struct component names. For a complete list of KVC compliant classes related to CALayer, along with the keys and key paths they implement, plus rules for how to wrap nonobject values as objects, see “Core Animation Extensions to Key-Value Coding” in the Core Animation Programming Guide.
Moreover, you can treat a CALayer as a kind of NSDictionary, and get and set the value for any key. This is tremendously useful, because it means you can attach arbitrary information to an individual layer instance and retrieve it later. For example, earlier I mentioned that to apply manual layout to a layer’s sublayers, you will need a way of identifying those sublayers. This feature could provide a way of doing that. For example:
[myLayer1 setValue:@"Manny" forKey:@"name"];
[myLayer2 setValue:@"Moe" forKey:@"name"];
A layer doesn’t have a name property; the @"name" key is something I’m attaching to these layers arbitrarily. Now I can identify these layers later by getting the value of their respective @"name" keys.
Also, CALayer has a defaultValueForKey: class method; to implement it, you’ll need to subclass and override. In the case of keys whose value you want to provide a default for, return that value; otherwise, return the value that comes from calling super. Thus, even if a value for a particular key has never been explicitly provided, it can have a non-nil value.
The truth is that this feature, though delightful (and I often wish that all classes behaved like this), is not put there for your convenience and enjoyment. It’s there to serve as the basis for animation, which is the subject of the next chapter.