6.8. moefonts-cid - 由 Adobe 轉譯的 MOE CID Font
CID-Keyed font 由 CID font 和 CMap 所組成, CMap 可以透過安裝 print/adobe-cmaps 來達成, 而 CID font 則必須另外安裝。 中文 CID font(MOEKai 和 MOESung) 是從教育部而來的, 原本為 48x48 點陣字型,由 Adobe 製作成 CID font。
自行安裝的話,CID-Keyed font 可以從 ftp://ftp.oreilly.com/pub/examples/nutshell/cjkv/adobe/samples/ 取得 MOEKai-Regular MOESung-Regular 這兩個 CIDFont,並在 ftp://ftp.oreilly.com/pub/examples/nutshell/cjkv/adobe/ 取得 ac14.tar.Z,裡面包含了 Adobe-CNS1 的 CMap 檔案。
裝完後就有如下的 CID-Keyed font 可以使用:
MOEKai-Regular-ETen-B5-H
MOEKai-Regular-ETen-B5-V
MOESung-Regular-ETen-B5-H
MOESung-Regular-ETen-B5-V
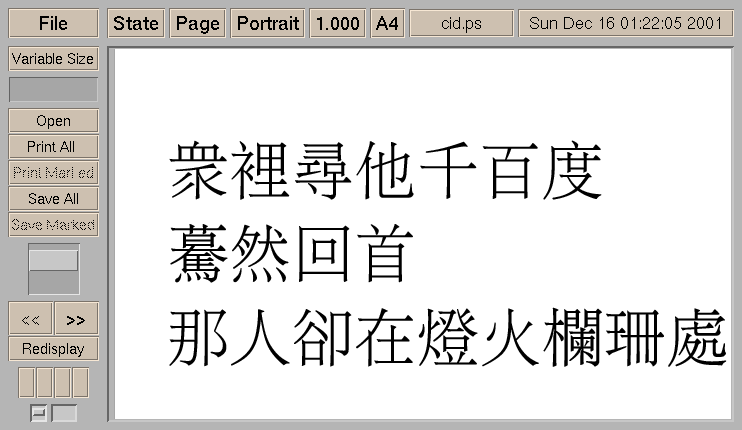
以下是一個測試的範例:
% cat cid.ps
/MOEKai-Regular-ETen-B5-H findfont 60 scalefont setfont
50 600 moveto (眾裡尋他千百度) show
50 520 moveto (驀然回首) show
50 440 moveto (那人卻在燈火欄珊處) show
showpage
quit
% gv -antialias cid.ps
% ps2ps cid.ps cid2.ps
% ps2pdf cid.ps
% ps2pdf cid2.ps
% xpdf cid.pdf (可能不行)
% xpdf cid2.pdf
目前已經可以由 ttfm 搭配 gs-cjk 的方式來取代,而且效果更好。
以下是以 MOESung-Regular 為例子,來增加粗體、斜體、粗斜體支援, 在安裝時,由於必須額外安裝 adobe-cmaps 來搭配, 所以會 DEPENDS print/adobe-cmaps。
再來是建立粗體,斜體,粗斜體等,在看完 ttfm 的 gs-cjk 模組後, 有個想法就是 gs-cjk 的做法是在 ttf 上面建立粗體,斜體,粗斜體等, 這些做法是不是應該也適用於 moefonts-cid?
因此就建立了 MOESung-Regular-Bold
%!PS-Adobe-3.0 Resource-CIDFont
%%BeginResource: CIDFont (MOESung-Regular-Bold)
/MOESung-Regular-Bold
/MOESung-Regular /CIDFont findresource
16 dict begin
  /basecidfont exch def
  /basefont-H /.basefont-H /Identity-H [ basecidfont ] composefont def
  /basefont-V /.basefont-V /Identity-V [ basecidfont ] composefont def
  /CIDFontName dup basecidfont exch get def
  /CIDFontType 1 def
  /CIDSystemInfo dup basecidfont exch get def
  /FontInfo dup basecidfont exch get def
  /FontMatrix [ 1 0 0 1 0 0 ] def
  /FontBBox [
    basecidfont /FontBBox get cvx exec
    4 2 roll basecidfont /FontMatrix get transform
    4 2 roll basecidfont /FontMatrix get transform
  ] def
  /cid 2 string def
  /BuildGlyph {
    gsave
    exch begin
      dup 256 idiv cid exch 0 exch put
      256 mod cid exch 1 exch put
      rootfont /WMode known { rootfont /WMode get 1 eq } { false } ifelse
      { basefont-V } { basefont-H } ifelse setfont
      .03 setlinewidth 1 setlinejoin
      newpath
      0 0 moveto cid false charpath stroke
      0 0 moveto cid show
      currentpoint setcharwidth
    end
    grestore
  } bind def
  currentdict
end
/CIDFont defineresource pop
%%EndResource
%%EOF
以及 MOESung-Regular-Bold-ETen-B5-H.gsf
/MOESung-Regular-Bold-ETen-B5-H
/MOESung-Regular-Bold (MOESung-Regular-Bold)
/ETen-B5-H (CMap/ETen-B5-H)

1 index /CMap resourcestatus
{pop pop pop}
{runlibfile} ifelse
/CMap findresource

3 1 roll
1 index /CIDFont resourcestatus
{pop pop pop}
{runlibfile} ifelse
/CIDFont findresource

[ exch ] composefont pop
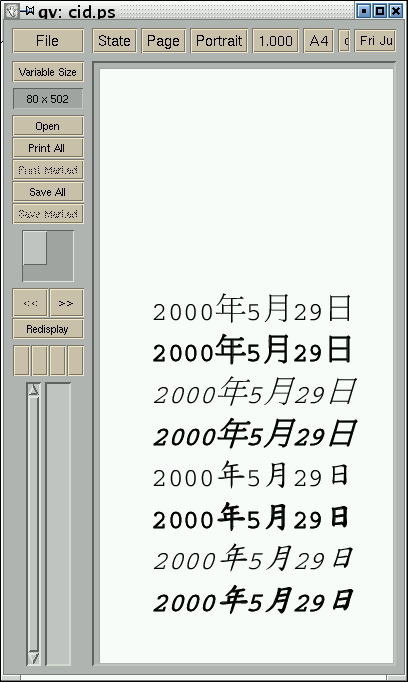
結果發現在測試檔 cid.ps
/MOESung-Regular-ETen-B5-H findfont 30 scalefont setfont
50 600 moveto (2000年5月29日) show
/MOESung-Regular-Bold-ETen-B5-H findfont 30 scalefont setfont
50 560 moveto (2000年5月29日) show
/MOESung-Regular-Italic-ETen-B5-H findfont 30 scalefont setfont
50 520 moveto (2000年5月29日) show
/MOESung-Regular-BoldItalic-ETen-B5-H findfont 30 scalefont setfont
50 480 moveto (2000年5月29日) show
/MOEKai-Regular-ETen-B5-H findfont 30 scalefont setfont
50 440 moveto (2000年5月29日) show
/MOEKai-Regular-Bold-ETen-B5-H findfont 30 scalefont setfont
50 400 moveto (2000年5月29日) show
/MOEKai-Regular-Italic-ETen-B5-H findfont 30 scalefont setfont
50 360 moveto (2000年5月29日) show
/MOEKai-Regular-BoldItalic-ETen-B5-H findfont 30 scalefont setfont
50 320 moveto (2000年5月29日) show
showpage
quit
粗體的部分出現了預期的效果,所以就繼續製作斜體與粗斜體, 這部分可以參考 gs-cjk,斜體的名稱定為 MOESung-Regular-Italic, 而粗斜體則是 MOESung-Regular-BoldItalic。
最後,記得把這些 .gsf 寫入 /usr/local/share/ghostscript/7.05/lib/Fontmap.GS 寫法是:字型 (字型.gsf) ;
/MOESung-Regular-ETen-B5-H (MOESung-Regular-ETen-B5-H.gsf) ;
/MOESung-Regular-Bold-ETen-B5-H (MOESung-Regular-Bold-ETen-B5-H.gsf) ;
/MOESung-Regular-BoldItalic-ETen-B5-H (MOESung-Regular-BoldItalic-ETen-B5-H.gsf) ;
/MOESung-Regular-Italic-ETen-B5-H (MOESung-Regular-Italic-ETen-B5-H.gsf) ;
最後修改一下 -H 成 -V 再重複上面的過程即可, 其他的字型也是幾乎一樣的做法就可以完工了, 不過,真的比不上用 ttf 做出來的呀
如此建立完,就會有一堆可用的 CID-Keyed 字型
MOESung-Regular-ETen-B5-H
MOESung-Regular-Bold-ETen-B5-H
MOESung-Regular-BoldItalic-ETen-B5-H
MOESung-Regular-Italic-ETen-B5-H
這樣子在配合文書軟體上,應該會更好, 文書軟體慢慢的也會把列印的部分用 gs 所提供的字型來模擬,像是 editors/Abiword 就是個很棒的例子, 而 kde2 則是自己做粗體,斜體等的模擬, 不過還沒去測試到粗體和斜體的部分, 等有空閒了再去試試。